
- What is OBS Studio?
- Taking screenshots in OBS Studio – how does it work?
- Take a screenshot using the preview window
- Take screenshots with a keyboard shortcut
- Where does OBS Studio save screenshots?
- Better Screenshot Plugin for OBS Studio – What is it?
- What features does Better Screenshot offer?
- Requirements and compatibility
- Download and install the Better Screenshot plugin
- Step 1: Download Better Screenshot
- Step 2: Quit OBS Studio completely
- Step 3: Unzip and copy plugin files
- Step 4: Restart OBS Studio
- Change the OBS Studio screenshot format from PNG to JPG or WebP
- Step 1: Set keyboard shortcut
- Step 2: Select image format
- Step 3: Set storage folder
- Step 4: Save settings and test
- PNG, JPG and WebP in comparison – which image format is best?
- PNG – Best quality without losses
- JPG – Small files and high compatibility
- WebP – Modern compression with small files
- How much storage space can you save with JPG or WebP?
- Automatically send screenshots to Discord
- Create a Discord webhook
- Convert OBS screenshots to JPG or WebP afterwards
- Convert multiple PNG files with ImageMagick
- Tips for taking better screenshots with OBS Studio
- Use the correct resolution
- Take screenshots without overlay
- Pay attention to HDR content
- Save screenshots to an SSD
- Organize screenshots sensibly
- Other useful OBS Studio plugins
- Fix common problems with Better Screenshot
- Better Screenshot not showing in OBS
- Screenshots are still saved as PNG
- Screenshots are not saved
- Screenshots are black
- Discord upload not working
OBS Studio is a free, open-source program that can be used to record the screen, individual windows, games and connected recording devices. In addition to video recordings and live streams, OBS Studio can also create screenshots. This is particularly useful if, for example, you want to take pictures from games or create screenshots for tutorials and instructions.
However, there is a limitation: OBS Studio saves screenshots in PNG format by default. Although this offers very good image quality, it requires a comparatively large amount of storage space depending on the image content and resolution. Especially when playing games or taking high-resolution recordings, several gigabytes of images can quickly accumulate.
There is currently no way to change the file format from PNG to JPG or WebP directly in the normal OBS settings.
This feature can be added with the free Better Screenshot Plugin. It lets OBS Studio save screenshots as JPG or WebP files. You can also set a dedicated save folder, assign keyboard shortcuts and even configure automatic uploads to Discord.
In this guide, I explain how to install the Better Screenshot plugin on Windows, change the screenshot format in OBS Studio and choose settings that help save storage space.
What is OBS Studio?
OBS Studio, formerly known as Open Broadcaster Software, is a free program for recording and streaming screen content. It is available for Windows, Linux and macOS.
The program is primarily used by streamers and content creators, but is also suitable for many other tasks.
For example, with OBS Studio you can:
- Record games and applications
- Record the entire desktop or individual monitors
- Record individual program windows
- Integrate webcams, cameras and capture cards
- Combine multiple image sources in one scene
- Record microphones and system audio
- Broadcast live streams on YouTube, Twitch and other platforms
- Take screenshots of scenes or individual sources
OBS also supports numerous extensions and plugins that can be used to increase the range of functions.
For example, additional video effects, automated scene changes or new recording functions can be added.
Download: Download OBS Studio for free
Taking screenshots in OBS Studio – how does it work?
OBS Studio already has an integrated screenshot function. Neither a recording nor a live stream needs to be started.
A screenshot can be taken directly from the preview window or using a keyboard shortcut.
Take a screenshot using the preview window
To take a screenshot in OBS, follow these steps:
- Start OBS Studio.
- Select the desired scene.
- Right-click on the preview.
- Select the menu item to take a screenshot.
- OBS saves the image automatically.
There are several types of screenshot to choose from.
| Screenshot type | Function |
|---|---|
| Screenshot Output | Creates an image of the current OBS output with the visible sources. |
| Screenshot Preview | Creates an image of the preview. |
| Screenshot Source | Creates an image of a single source, such as a camera or a game. |
The names may differ depending on the language used and OBS version.
A screenshot of the entire scene is particularly useful when multiple sources are combined. On the other hand, if you only want to save the image of a game or a camera, a screenshot of the individual source can be more practical.
Take screenshots with a keyboard shortcut
Alternatively, screenshots can be taken using hotkeys.
To do this, open the Settings > Hotkeys in OBS Studio and look for the entries for screenshots.
For example, a key combination like Ctrl + Shift + F12 can be specified here.
You can then take a screenshot at any time without having to use the OBS window first. When playing games, however, you should make sure that the key combination is not already being used elsewhere.
Where does OBS Studio save screenshots?
By default, the normal OBS screenshots are saved in the capture directory. This can be found under Settings > Output > Recording > Recording Path.
Unfortunately, the normal OBS settings cannot be used to change the screenshot format to JPG or to select a separate image format for screenshots.
This is where the Better Screenshot plugin comes into play.
Better Screenshot Plugin for OBS Studio – What is it?
Better Screenshot is a free extension for OBS Studio that provides additional ways to capture and save screenshots.
The plugin was developed by MMLTech and is available on GitHub. The source code is publicly available.
It extends the normal screenshot function of OBS and, among other things, allows saving in different image formats.
What features does Better Screenshot offer?
| Function | Description |
|---|---|
| PNG support | Continue saving screenshots in lossless PNG format |
| JPG support | Save screenshots as compressed JPEG images |
| WebP support | Save images in modern WebP format |
| Custom save folder | Select a separate folder for screenshots |
| Hotkeys | Take screenshots with your own keyboard shortcut |
| Discord webhook | Automatically send screenshots to a Discord channel |
| Remove original file | Delete the PNG file originally generated by OBS when the corresponding setting is enabled |
The option to save screenshots as JPG or WebP is particularly interesting.
For many images, these file formats use much less storage space than PNG without necessarily causing a noticeable drop in image quality.
This is useful, for example, if you regularly take screenshots of games and then use them for YouTube, a blog or social networks.
Requirements and compatibility
The Better Screenshot Plugin requires at least OBS Studio 32.0.2.
The extension is offered for Windows, Linux and macOS. However, the appropriate plugin files for the operating system used must be downloaded.
The following guide covers OBS Studio 32.1.2 on Windows 11 with plugin version 1.2.3. The interface may differ slightly in other versions.
Download and install the Better Screenshot plugin
Installation is relatively simple and usually only takes a few minutes.
The plugin can be downloaded directly from GitHub.
Download and further information:
- Better Screenshot Plugin on GitHub
- Better Screenshot Plugin – Releases and Download
- Better Screenshot in the OBS plugin directory
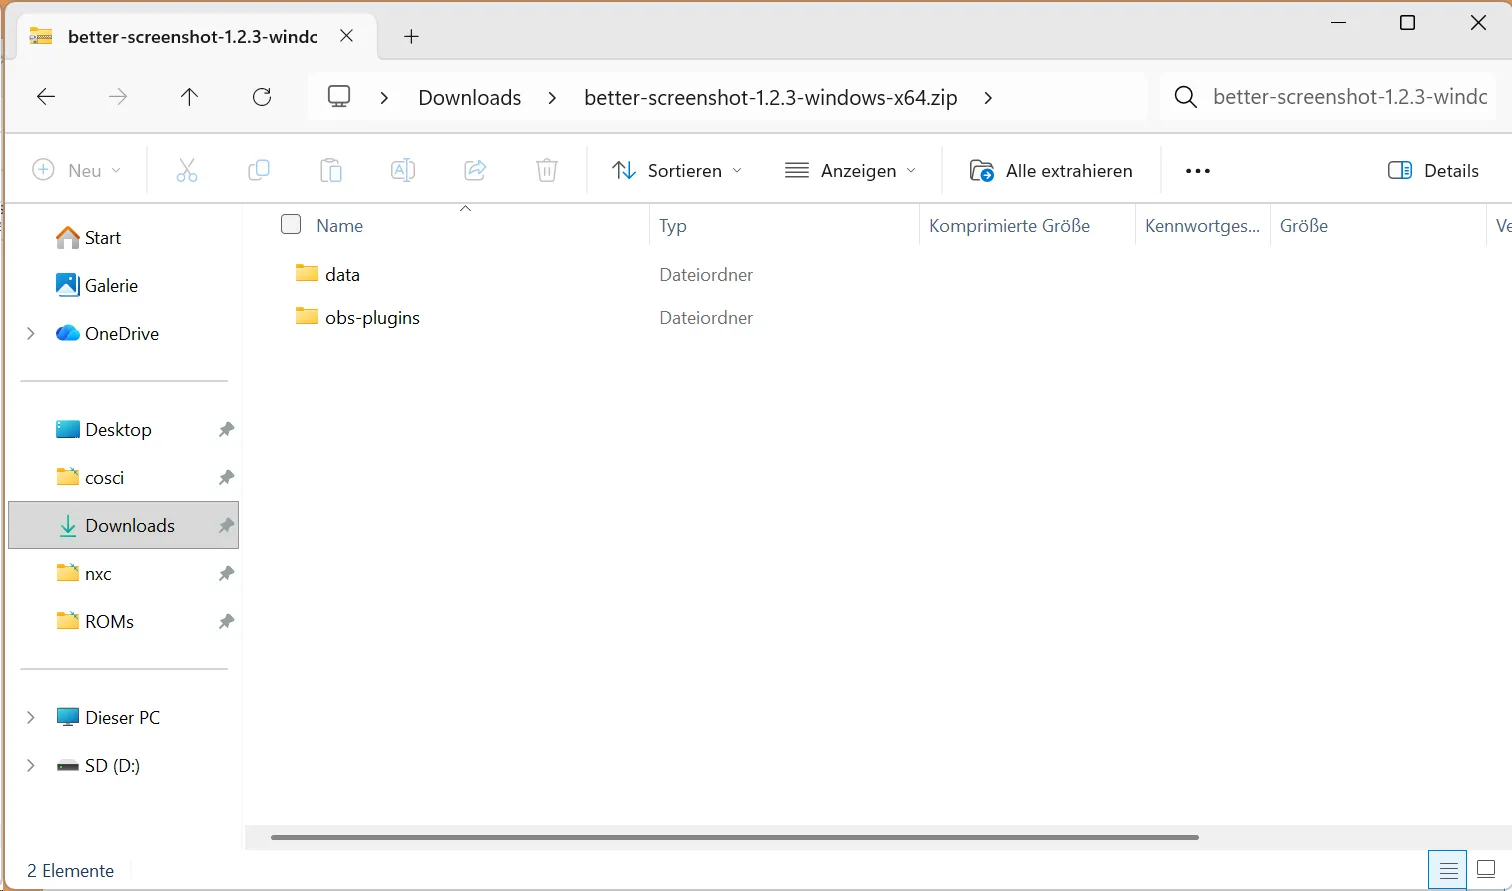
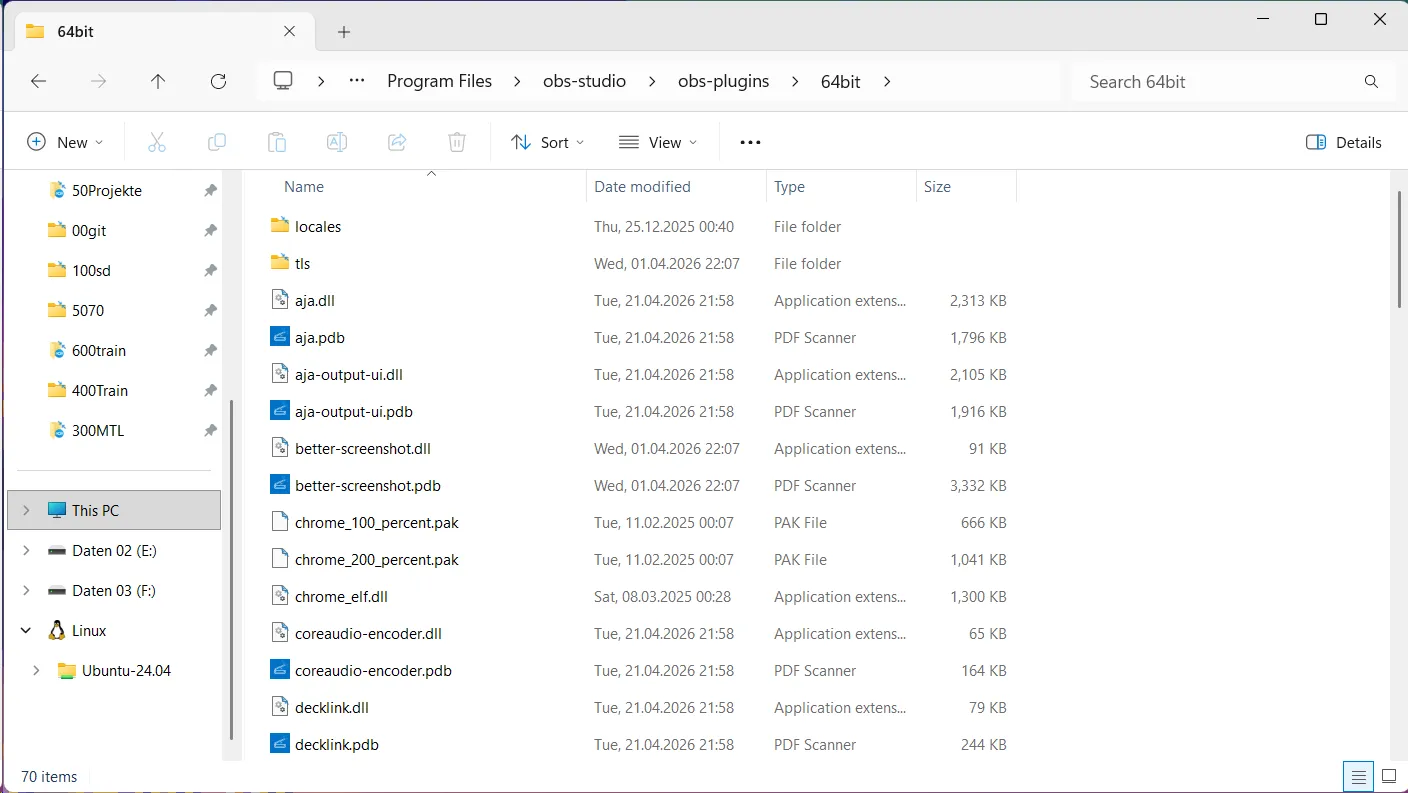
Step 1: Download Better Screenshot
First, open the plugin’s GitHub page and go to the releases.
The available versions are listed there.
For Windows, download the ZIP file that matches your OBS installation, for example:
better-screenshot-1.2.3-windows-x64.zip
The downloaded ZIP file contains the files and folders required for the plugin.
Step 2: Quit OBS Studio completely
Before installing, OBS Studio should be closed.
Otherwise, individual files may not be able to be replaced because they are still being used by the program.
Step 3: Unzip and copy plugin files
The downloaded ZIP file can be opened and unzipped using File Explorer on Windows 11.
The archive includes the following directories:
data
obs-plugins
With a normal OBS installation on Windows, the program is located in the following directory by default:
C:\Program Files\obs-studioThe directory can also be opened by pressing Win + R and entering the following path:
%ProgramFiles%\obs-studioThen copy the appropriate files from the unpacked archive into the corresponding subdirectories of the OBS installation.
For example, the plugin file better-screenshot.dll must be located here for this installation variant:
C:\Program Files\obs-studio\obs-plugins\64bit\better-screenshot.dllMerge the files into the existing directory structure. Make sure the folders are merged correctly and that you do not accidentally create extra subfolders.
Some versions of the plugin also include additional files for the Discord webhook feature. This includes, for example, qschannelbackend.dll, a component for encrypted HTTPS connections.
If this file is required, it must be copied into the appropriate TLS directory of the OBS installation according to the plugin instructions:
C:\Program Files\obs-studio\bin\64bit\tlsWhen installing in the C:\Program Files folder, Windows may require administrator confirmation.
Important: The installation path used here is an older, so-called legacy plugin path. For newer OBS versions, an installation with the appropriate plugin directory structure under C:\ProgramData\obs-studio\plugins is recommended instead. Since the ZIP file described here is prepared for the classic directory structure, you should not copy the files unchanged into the ProgramData folder.
Future OBS versions may require adjustments to the installation.
Step 4: Restart OBS Studio
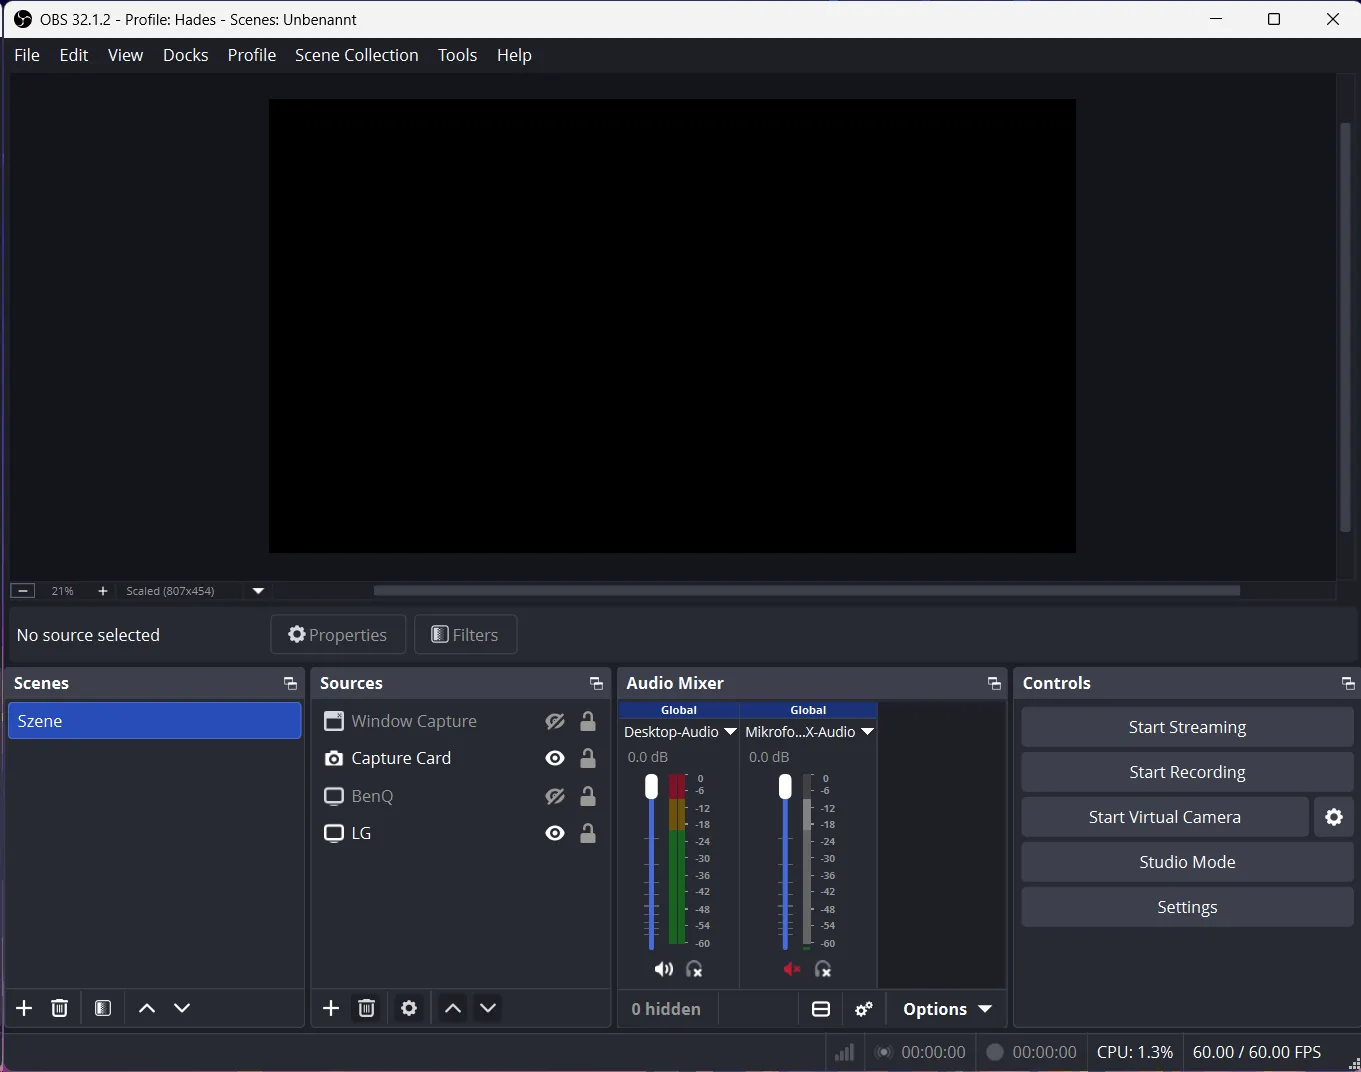
After the files have been copied, OBS Studio can be started again.
The plugin should now load automatically.
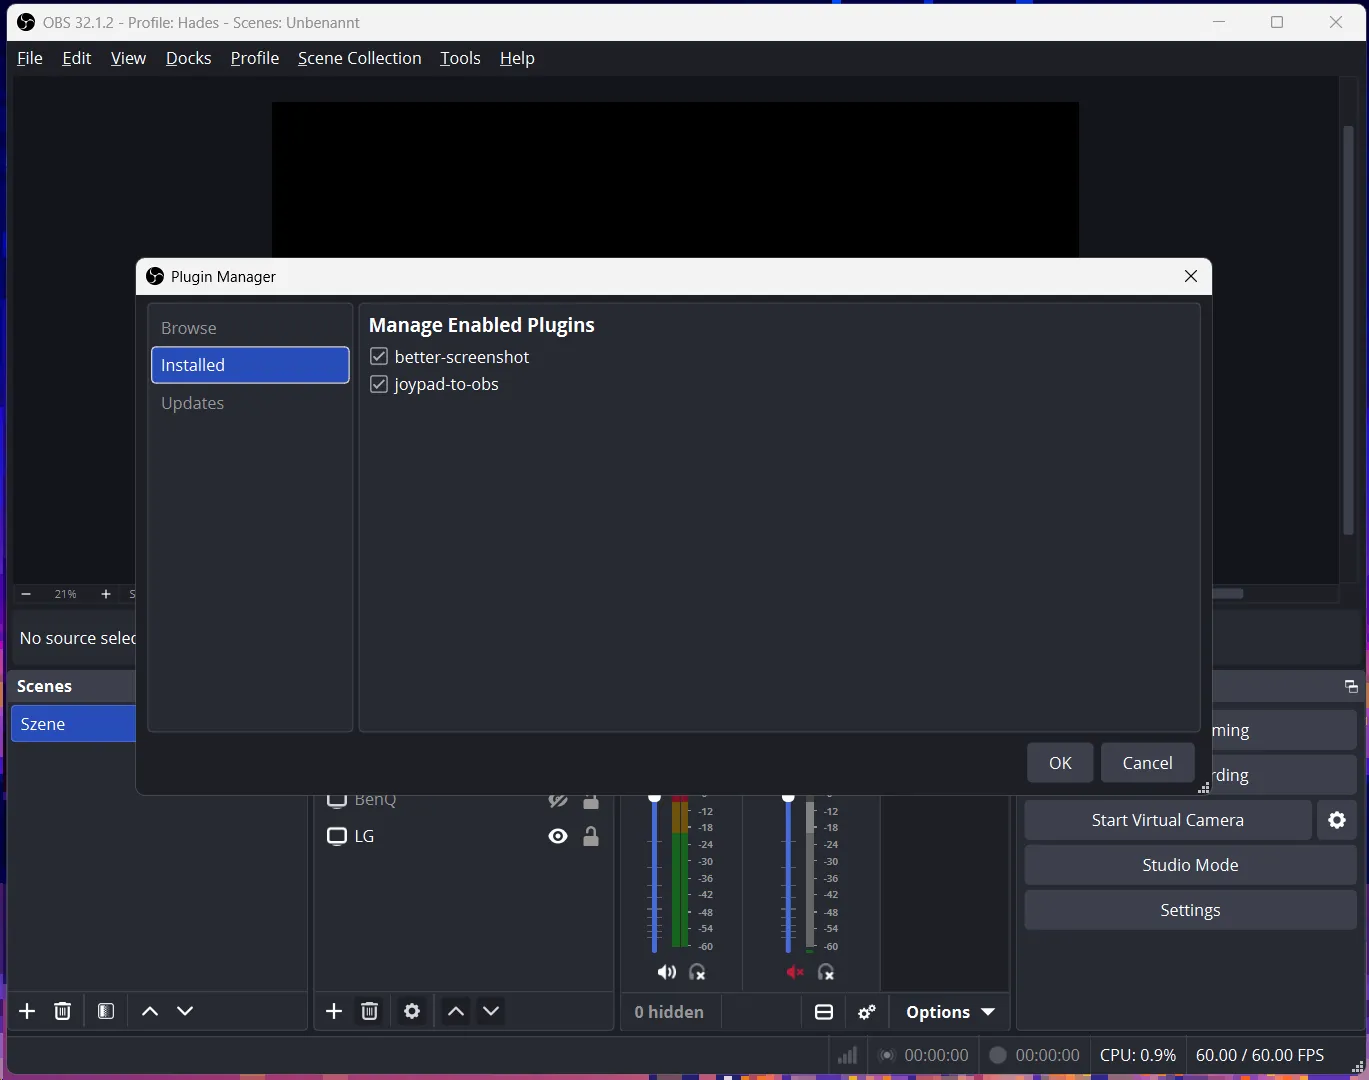
To check the successful installation, open the Tools > Plugin Manager menu in OBS Studio.
There you should see an entry called better-screenshot among the installed plugins.
If the plugin is activated, a checkmark will appear next to the name.
If it is disabled, you can turn it on here. OBS may then need to be restarted.
The built-in Plugin Manager in OBS Studio 32.1.2 is mainly used to manage installed plugins. The Browse and Updates areas are displayed, but in this version they cannot yet be used as a complete plugin store or automatic updater.
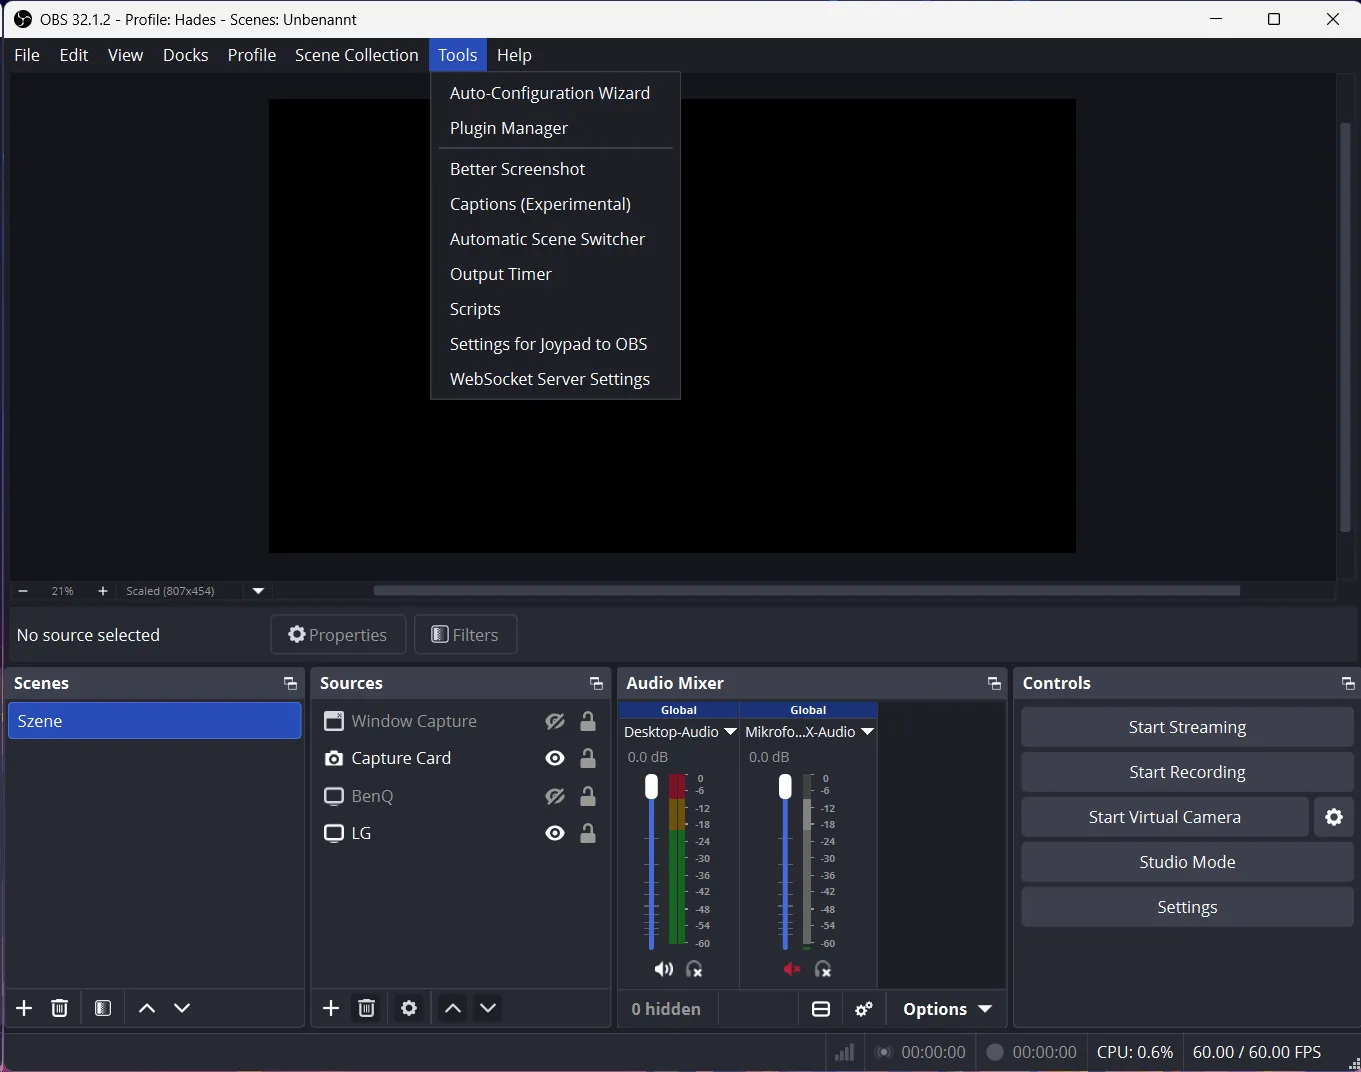
Change the OBS Studio screenshot format from PNG to JPG or WebP
After installation, the Better Screenshot plugin can be set up.
In OBS Studio, open:
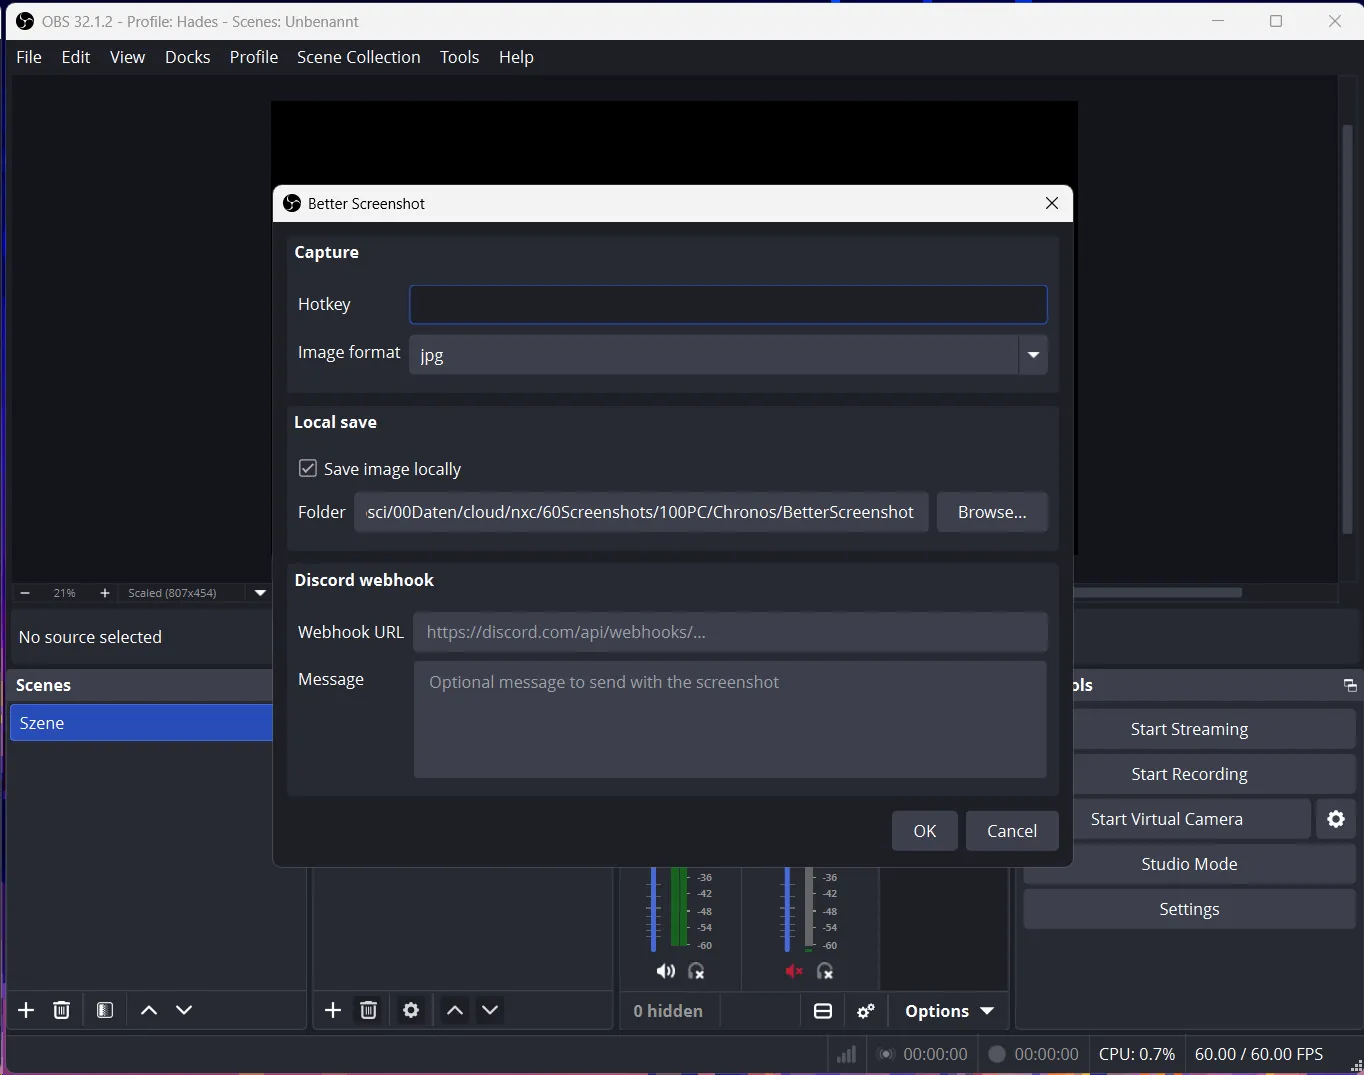
Tools > Better Screenshot
A separate window opens with the settings for the screenshot function.
Step 1: Set keyboard shortcut
Under Capture > Hotkey you can set a key combination that the plugin should use to create a screenshot.
For example:
Ctrl + Shift + F12
Care should be taken not to overwrite any keyboard shortcuts that have already been used.
If you use a controller or a macropad, you can also trigger the key combination using a corresponding program.
Step 2: Select image format
Under Image format you can select the format in which the screenshots should be saved.
The following formats are available:
- PNG
- JPG
- WebP
If you want to save as much storage space as possible, JPG and WebP are usually the most interesting options.
For example, for normal gameplay screenshots, I prefer to use JPG because this format is very common and supported by practically all image editing programs.
WebP is also a good choice, especially if the screenshots will later be used on a website.
Step 3: Set storage folder
In the Local save section you can specify whether the screenshots should be saved locally on the computer.
To enable local saving, activate:
Save image locally
Any storage folder can then be selected using Browse.
For example:
D:\Screenshots\OBSThis is particularly practical if you do not want to save the screenshots together with the video recordings.
If you automatically synchronize your screenshots with a cloud service such as Nextcloud, you can also select the corresponding synchronization folder directly here.
Step 4: Save settings and test
After the format, storage folder and key combination have been specified, confirm the settings with OK.
A first screenshot can then be created.
Now you should check whether the image was actually saved in the desired format.
Important for saving storage space: Better Screenshot uses the OBS screenshot function internally and then processes the original image file. Depending on the settings, the original PNG file may also remain in the normal OBS recording folder.
If you actually want to save storage space, you should check whether the original PNG files are removed. The plugin offers a corresponding function for this. If this is not visible in the interface you are using, you should check both storage directories after a test.
If both the PNG and the JPG or WebP are kept, this initially uses additional storage space.
PNG, JPG and WebP in comparison – which image format is best?
The three supported image formats differ primarily in terms of compression, image quality and file size.
Which format makes the most sense depends on what the screenshots will be used for.
| Property | PNG | JPG / JPEG | WebP |
|---|---|---|---|
| Compression | Lossless | Lossy | Lossless or lossy |
| File size | Often larger | Often small | Often very small |
| Image quality | Without compression losses | Depending on the quality | Depends on mode and quality |
| Transparency | Yes | No | Yes |
| Compatibility | Very high | Very high | High |
| Text and user interfaces | Very good | Depending on the quality | Good to very good |
| Game screenshots | Very good | Very good | Very good |
| Websites and blogs | Suitable | Suitable | Particularly interesting |
PNG – Best quality without losses
PNG stands for Portable Network Graphics and is a lossless image format.
This means that no image information is lost due to compression when saving.
This is a big advantage, especially for screenshots of programs, texts, user interfaces and graphics.
Text and fine lines remain sharp and there are no typical JPEG compression artifacts.
However, PNG files can become relatively large for complex images, such as screenshots from modern 3D games.
However, PNG is not inherently larger than JPG. PNG can actually be very efficient for simple graphics with a few colors or large monochrome areas.
JPG – Small files and high compatibility
JPG or JPEG is one of the most widely used image formats.
Unlike PNG, JPG uses lossy compression. This involves removing certain image information to reduce the file size.
If the quality is sufficiently high, the difference to the original is often hardly visible.
JPG is therefore particularly suitable for:
- Gameplay screenshots
- Photos
- Wallpapers
- Images for social networks
- Screenshots with lots of colors and complex image content
With text, small symbols or fine lines, visible artifacts can occur due to excessive compression.
Also, JPG does not support transparency.
For screenshots from games, JPG is often a good compromise between file size and image quality.
WebP – Modern compression with small files
WebP is an image format developed by Google that supports both lossless and lossy compression.
With comparable visible quality, WebP files can often be smaller than equivalent JPEG files.
The format also supports transparent image areas.
WebP is particularly suitable for images that are later to be integrated into websites.
Since the format is supported by modern browsers, WebP images can be used directly in WordPress, for example.
However, support in older image editing programs is sometimes limited.
Even with WebP, the actual file size depends on the compression selected and the image content.
How much storage space can you save with JPG or WebP?
How big the difference is between PNG, JPG and WebP depends on several factors.
These include:
- Resolution of the screenshot
- Colors and details in the image
- Type of content presented
- Compression used
- Selected image quality
For example, for a 3840 × 2160 pixel screenshot, PNG files can be several megabytes in size.
JPG and WebP files, on the other hand, can be significantly smaller with comparable visual quality.
This simplified example shows how the savings can add up in a larger screenshot collection:
| Number of screenshots | PNG with 8 MB | JPG with 1 MB | Savings |
|---|---|---|---|
| 100 | 800 MB | 100 MB | 700 MB |
| 500 | 4 GB | 500 MB | 3.5 GB |
| 1,000 | 8 GB | 1 GB | 7 GB |
| 5,000 | 40 GB | 5 GB | 35 GB |
These values are examples, rather than fixed file sizes for each format.
Especially if you regularly record games and take a lot of screenshots, the difference can be significant.
If the images are also synchronized via Nextcloud, OneDrive or another cloud service, smaller files also reduce the storage space required and the volume of data to be transferred.
Automatically send screenshots to Discord
Another feature of Better Screenshot is the ability to automatically send screenshots to a Discord channel.
The plugin uses so-called webhooks for this.
A webhook is a special URL that allows a program to transfer information or files to another service.
Create a Discord webhook
In order to create a Discord webhook, you need the necessary permissions on the corresponding server.
Then proceed as follows:
- Open the desired Discord server.
- Open the server settings.
- Go to Integrations > Webhooks.
- Create a new webhook.
- Select the desired channel.
- Copy the webhook URL.
Now open the Better Screenshot plugin again in OBS Studio.
Enter the copied address under Discord webhook > Webhook URL.
In the Message field you can also enter a message that will be sent together with the screenshot.
Once configured, screenshots can be sent automatically to Discord through this webhook.
You should keep in mind that the images leave your own computer and are uploaded to the service’s server.
Important: The webhook URL should be kept confidential. Anyone who has access may also be able to send messages or files via the webhook.
Convert OBS screenshots to JPG or WebP afterwards
If you have already created many PNG screenshots, you can convert them later.
The Better Screenshot plugin does not need to be installed for this.
There are various programs available on Windows that can be used to convert images individually or in batches.
Suitable examples are:
- IrfanView
- XnConvert
- ImageMagick
- GIMP
ImageMagick is particularly suitable if many images need to be processed automatically via the command line.
Convert multiple PNG files with ImageMagick
After installing ImageMagick, open a command prompt in the folder containing your screenshots.
Use the following command to convert all PNG files in the current folder to JPG:
magick mogrify -format jpg -quality 85 *.pngThe JPEG quality is set to 85.
For WebP the following command can be used instead:
magick mogrify -format webp -quality 85 *.pngThe original PNG files are retained with these commands because -format sets a different output format.
After the new files have been verified, PNG files that are no longer needed can be deleted manually.
Before larger batch processing, you should first try out the conversion with a few test images.
Note: The quality value 85 here refers to ImageMagick. It is not a setting that is automatically available in the Better Screenshot plugin.
Tips for taking better screenshots with OBS Studio
In addition to the file format, there are a few other settings that you should pay attention to.
Use the correct resolution
The resolution of a screenshot affects both the image quality and the file size.
If you use a 4K monitor, you may also want to take screenshots in 3840 × 2160 pixels.
You should check what resolution OBS works with.
Under Settings > Video you can set, among other things, the base resolution and the output resolution.
The base resolution describes the size of the OBS workspace on which the various sources are arranged.
Depending on the screenshot function, the configured workspace or output is recorded. Therefore, a screenshot does not necessarily have to have the same resolution as the game originally captured.
For high-quality images, check after taking the screenshot that it actually has the resolution you want.
Take screenshots without overlay
Those recording games may use additional overlays for FPS, temperatures, or CPU and GPU utilization.
Such information can be helpful for benchmarks, but is not always desirable on every screenshot.
OBS allows you to show and hide individual sources.
This allows, for example, screenshots to be created with or without certain overlays.
Alternatively, different scenes can be created for different purposes.
Pay attention to HDR content
Screenshots from games with HDR support are another consideration.
Not every screenshot function correctly handles HDR colors and brightness information.
Especially when converting to JPG or regular WebP, HDR information can be lost or converted to an SDR color space.
This means that brightness and colors may differ compared to the game.
If you need HDR screenshots with as complete image information as possible, you should use suitable HDR recording formats and appropriate tools.
Save screenshots to an SSD
If you take a lot of screenshots directly during a game, you can use a storage folder on an SSD.
This is particularly useful for high-resolution images and quick series of screenshots.
However, the actual speed also depends on the image compression and the performance of the system.
In addition, there should be enough free storage space.
Organize screenshots sensibly
Especially with larger collections, it’s worth creating separate subfolders for games, programs or projects.
For example:
Screenshots
  Spiele
    Palworld
    Graveyard Keeper
    Cyberpunk 2077
  Programme
    OBS
    Windows 11
  Tutorials
    Docker
    WordPress
This makes screenshots easier to find and process later.
Other useful OBS Studio plugins
In addition to Better Screenshot, there are many other plugins that can be used to expand OBS Studio.
Some of them are particularly interesting for screen recordings, tutorials and gameplay videos.
| Plugin | Function |
|---|---|
| Advanced Scene Switcher | Automates scene changes and other OBS actions using rules and macros. |
| Source Record | Allows additional recording of individual sources independent of normal scene output. |
| Move | Adds animations and motion effects to scenes and sources. |
| Audio Monitor | Expands the possibilities for audio monitoring and playback of individual sound sources. |
If you want to control OBS with a controller, Stream Deck or macropad, for example, you can also use hotkeys or the built-in OBS WebSocket interface.
This allows you, among other things, to start and stop recordings, change scenes or call up certain functions from other applications.
However, before installing a plugin, it is important to check whether it is compatible with the OBS version you are using.
Fix common problems with Better Screenshot
Better Screenshot not showing in OBS
If the plugin does not appear after installation, you should first check whether all files have been copied to the correct folder.
For example, under Windows, the following file must be present for the classic installation variant described here:
C:\Program Files\obs-studio\obs-plugins\64bit\better-screenshot.dllAlso, OBS should be completely restarted after copying the files.
You can check in the Plugin Manager whether Better Screenshot has been recognized and activated.
If the plugin cannot be loaded, an incompatible OBS version could also be the cause.
Screenshots are still saved as PNG
If screenshots continue to be saved in PNG format, you should check whether the Better Screenshot plugin keyboard shortcut is actually being used.
The normal OBS screenshot hotkey may have accidentally been triggered.
In addition, the desired format should be selected in the plugin under Image format.
It is also important to distinguish between the screenshots of the plugin and the PNG files originally created by OBS.
The plugin first processes a normal OBS recording. The PNG file can therefore still exist if it is not removed.
Screenshots are not saved
If no images are saved, you should check whether the Save image locally option is activated.
It is then recommended to check the storage folder you have set.
Missing access permissions can cause problems, especially with network drives, external storage devices or cloud folders.
A simple local folder can be used for a test.
Screenshots are black
If OBS only displays a black image, the problem is usually not with the screenshot format.
Common causes include a disabled source, incorrect capture window, or problems capturing a game.
In this case, you should first make sure that the desired source is displayed correctly in the OBS preview window.
When playing games, it can also help to switch between Game Capture, Window Capture and Display Capture.
Discord upload not working
If local storage works but Discord upload fails, the webhook URL should be checked first.
The plugin also requires the appropriate TLS components for the encrypted connection to Discord.
Under Windows, a missing or incorrectly installed qschannelbackend.dll can also be the cause.
In this case, it is recommended to check the additional files from the downloaded plugin archive and the installation instructions.


