
- Remove a Tripod or Selfie Stick from a 360° Photo
- 1. Open the 360° Photo in Affinity
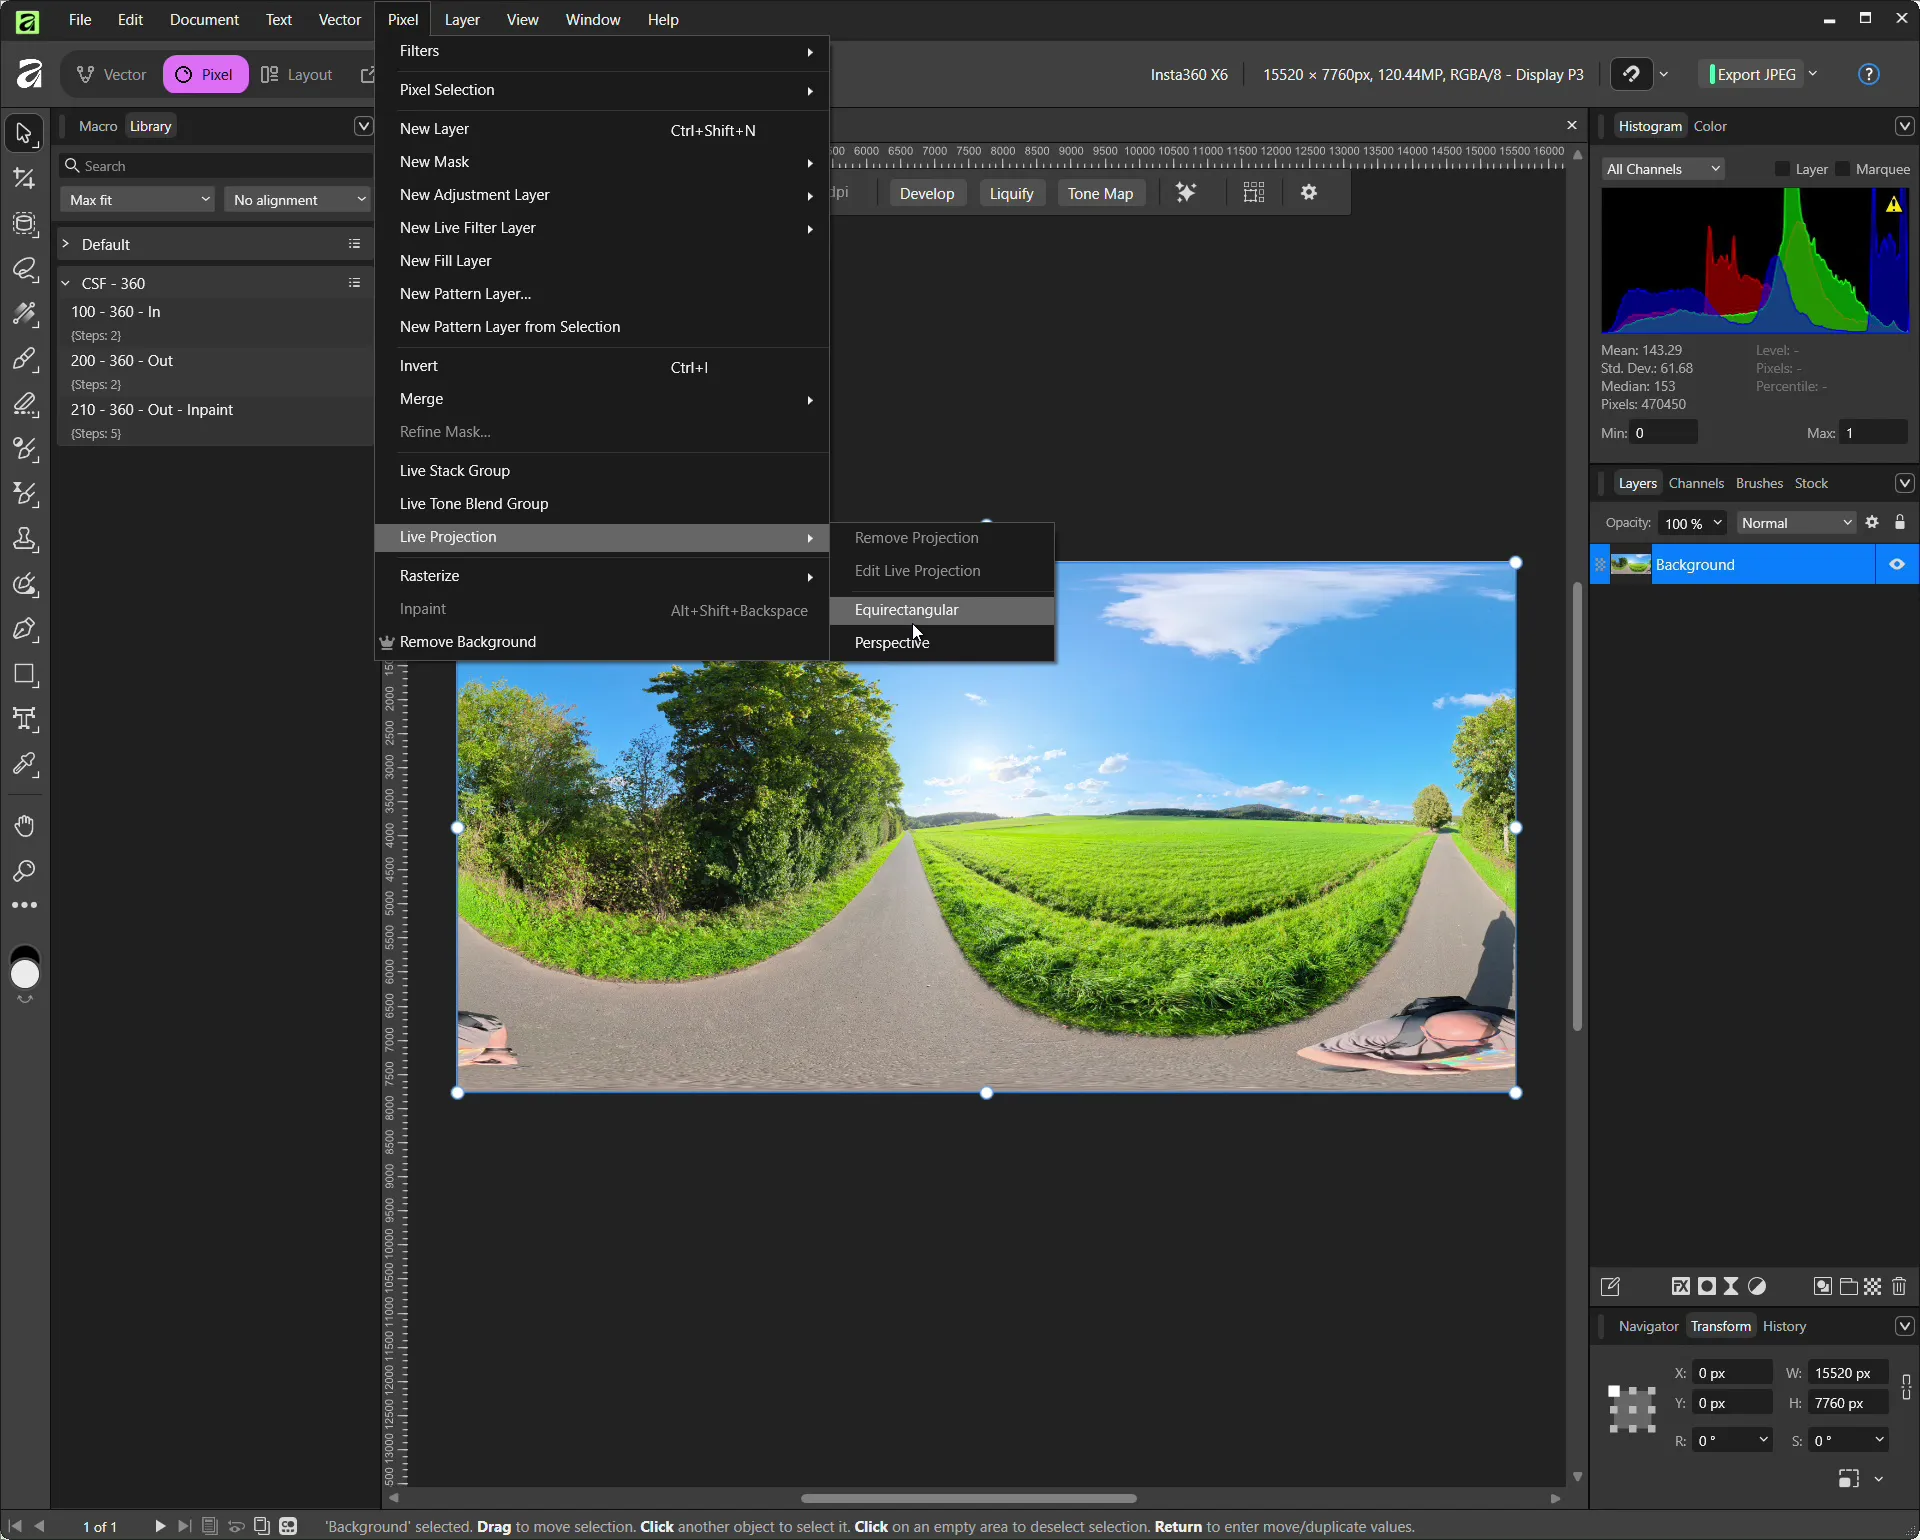
- 2. Enable Equirectangular Live Projection
- 3. Rotate the View Down to the Nadir
- 4. Select the Tripod, Person and Shadow
- 5. Remove the Selection with Inpainting
- 6. Check the Result
- Alternative: Use the Inpainting Brush Tool
- Using Generative Fill with Canva AI
- Remove the Live Projection Again
- Speed Up the Workflow with Macros
- Macro 1 – Prepare the Panorama
- Macro 2 – Inpainting and Remove Projection
- When Does Inpainting Work Best?
- Do Not Forget the Shadow
- Photoshop as an Alternative
- Photoshop with Flexify 2
- Can You Still Use Photoshop CS6?
- Affinity or Photoshop for 360° Photos?
- How Can You View 360° Photos on Windows?
- Pano2VR and 3DVista for Virtual Tours
- Another Useful Trick: Take Two Photos
- What Is Affinity?
- How Much Do Affinity, Canva and Photoshop Cost?
- What Is an Equirectangular 360° Photo?
Anyone who regularly takes photos with a 360° camera will probably know the problem: the camera itself almost completely disappears after stitching, but the tripod or selfie stick may still remain visible. Depending on the shooting position, your feet, your own body or a long shadow may also appear directly underneath the camera.
With a normal photo, removing these objects would usually be fairly easy. With a 360° photo, however, things are a little more complicated. An equirectangular panorama is stored as a heavily distorted 2D image. The area directly underneath the camera is especially distorted, which makes it difficult to use normal Inpainting or repair tools directly on the flat panorama.
One solution that works very well for me is Affinity by Canva, formerly known, among other things, as Affinity Photo. Affinity includes a Live Projection mode for equirectangular 360° panoramas. This lets you rotate the panorama much like you would in a normal 360° viewer, move the problematic area into view and edit it directly.
I have used this method with photos from my Insta360 X6, Insta360 X5 and Insta360 X4. It also works with manually stitched panoramas, for example panoramas created from several photos taken with a mirrorless camera and a fisheye lens.
Remove a Tripod or Selfie Stick from a 360° Photo
For this example, I am using a photo taken with my Insta360 X6. The same workflow also works with other 360° cameras or with panoramas you have stitched yourself.
1. Open the 360° Photo in Affinity
First, open the finished stitched 360° photo in Affinity.
It is important that you are already working with a completed equirectangular panorama. The individual fisheye images recorded by an Insta360 camera need to be stitched before you start editing them in Affinity.
You can do this, for example, with Insta360 Studio.
2. Enable Equirectangular Live Projection
The exact location of the feature depends on the Affinity version you are using.
Affinity Photo V1 and V2
Go to: Layer -> Live Projection -> Equirectangular Projection
Affinity 3.0 and newer
In the current version of Affinity, you can find the feature in the Pixel workspace under: Pixel -> Live Projection -> Equirectangular
The panorama is no longer displayed as a flat 2:1 image. Instead, Affinity converts it into an interactive projection.
You can now freely look around inside the 360° photo.
3. Rotate the View Down to the Nadir
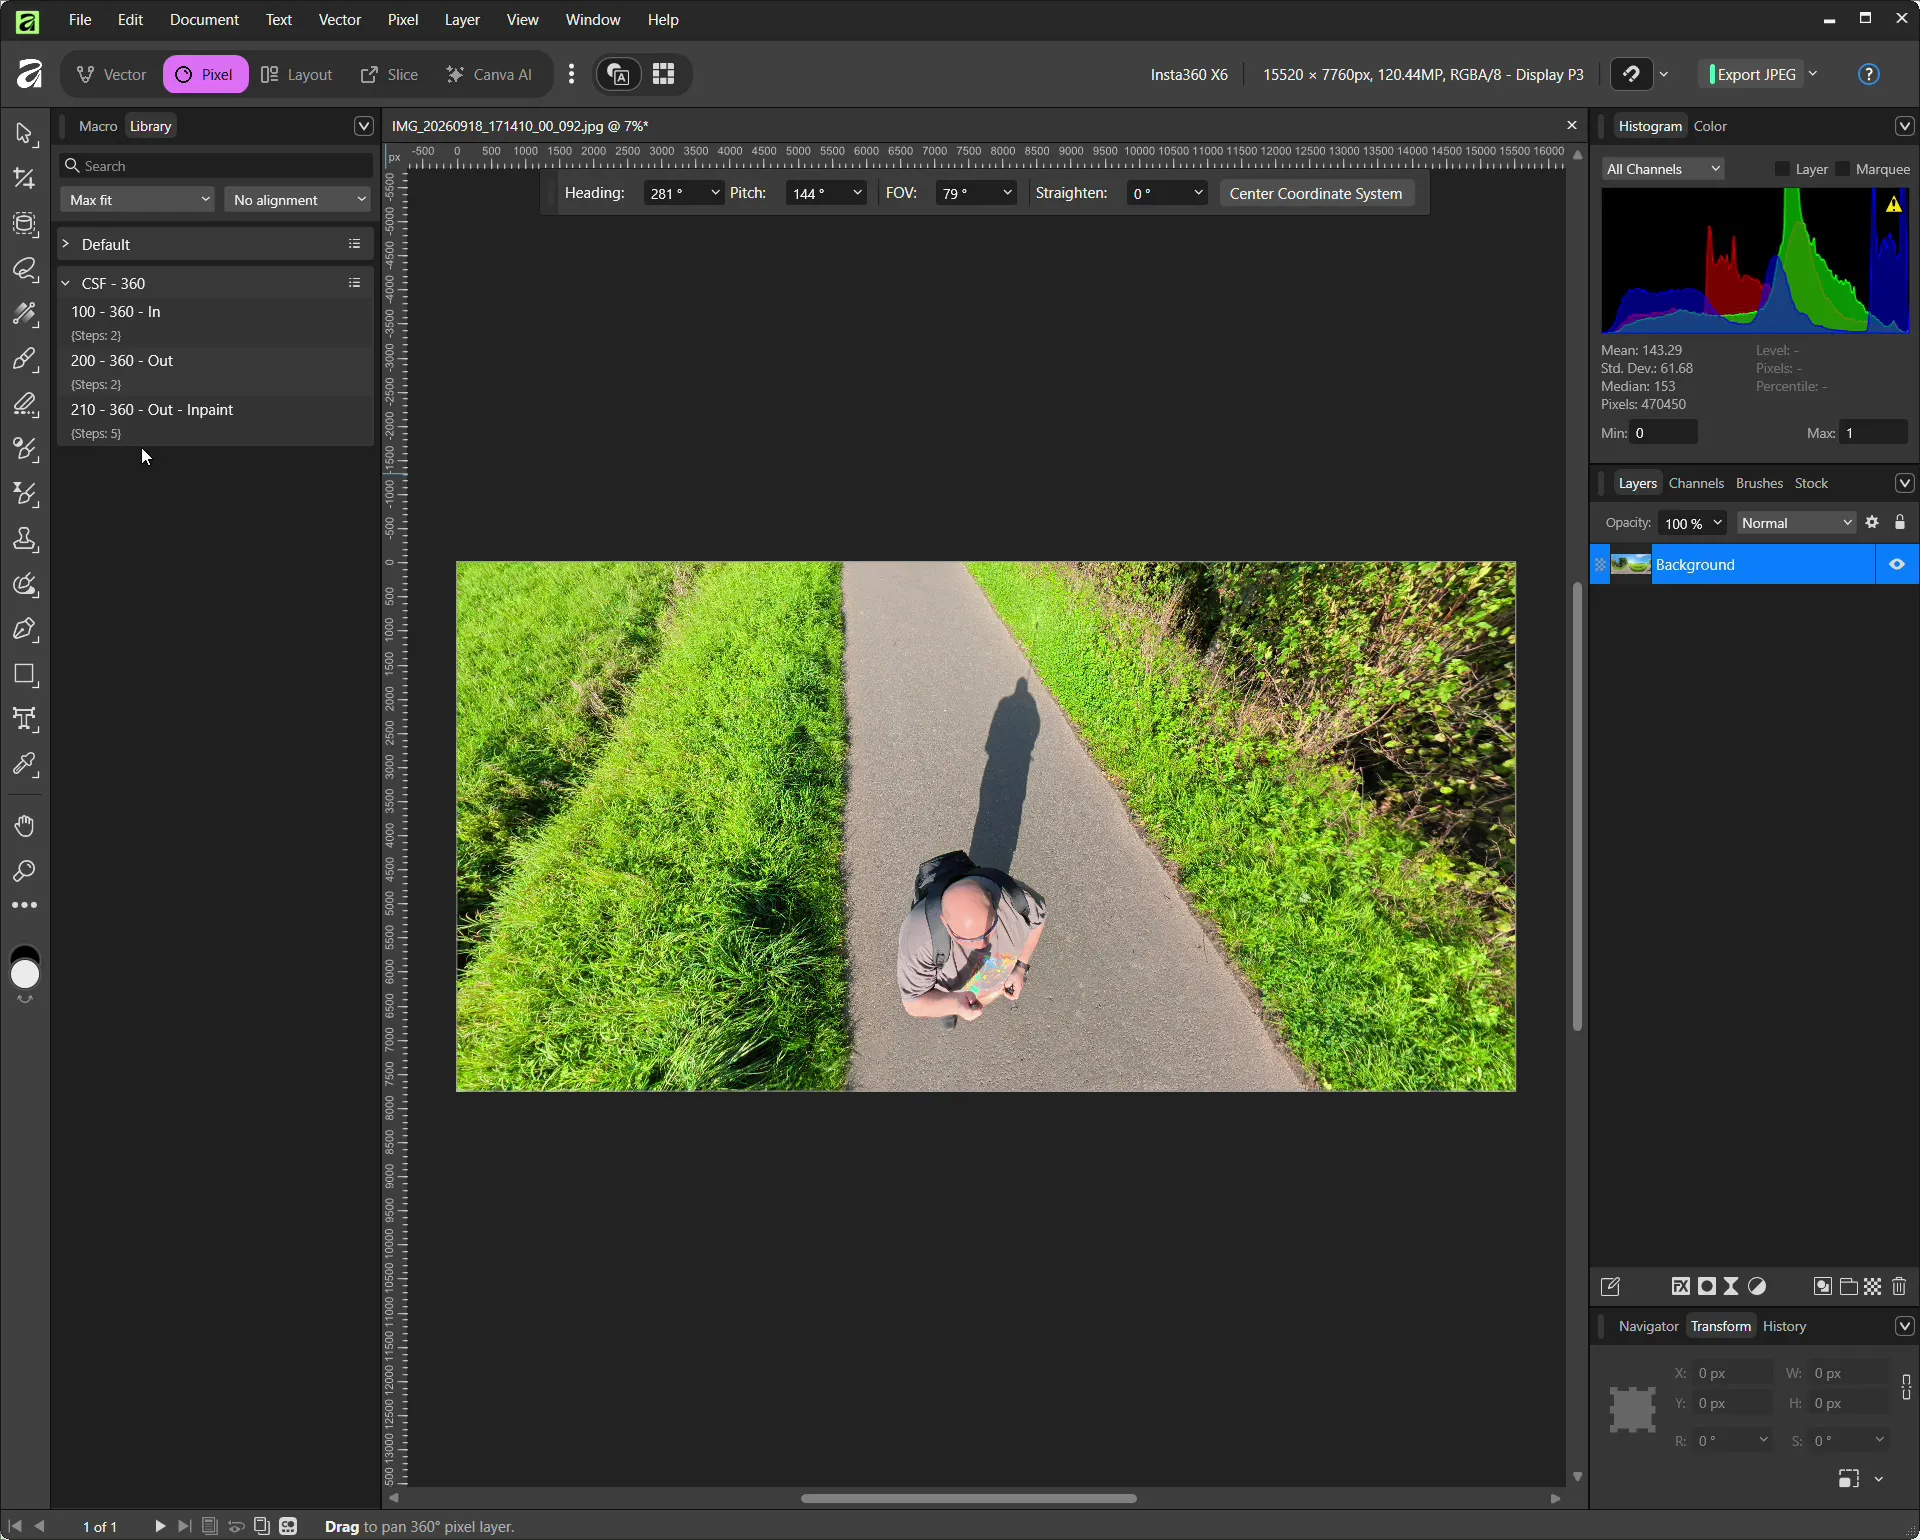
Rotate the panorama downward until the tripod, selfie stick or person is positioned as centrally as possible in front of you.
At the top of the interface, you will find settings such as:
- Heading
- Pitch
- FOV
- Straighten
I usually work with a FOV of around 80 to 90 degrees.
A very narrow field of view can make it easier to create a precise selection, but in my experience it is often better to leave a little more of the surrounding area visible for the later Inpainting process.
This gives Affinity more visible information from the area around the object.
This works especially well on fairly uniform surfaces such as:
- asphalt
- paving
- grass
- sand
- carpet
- concrete
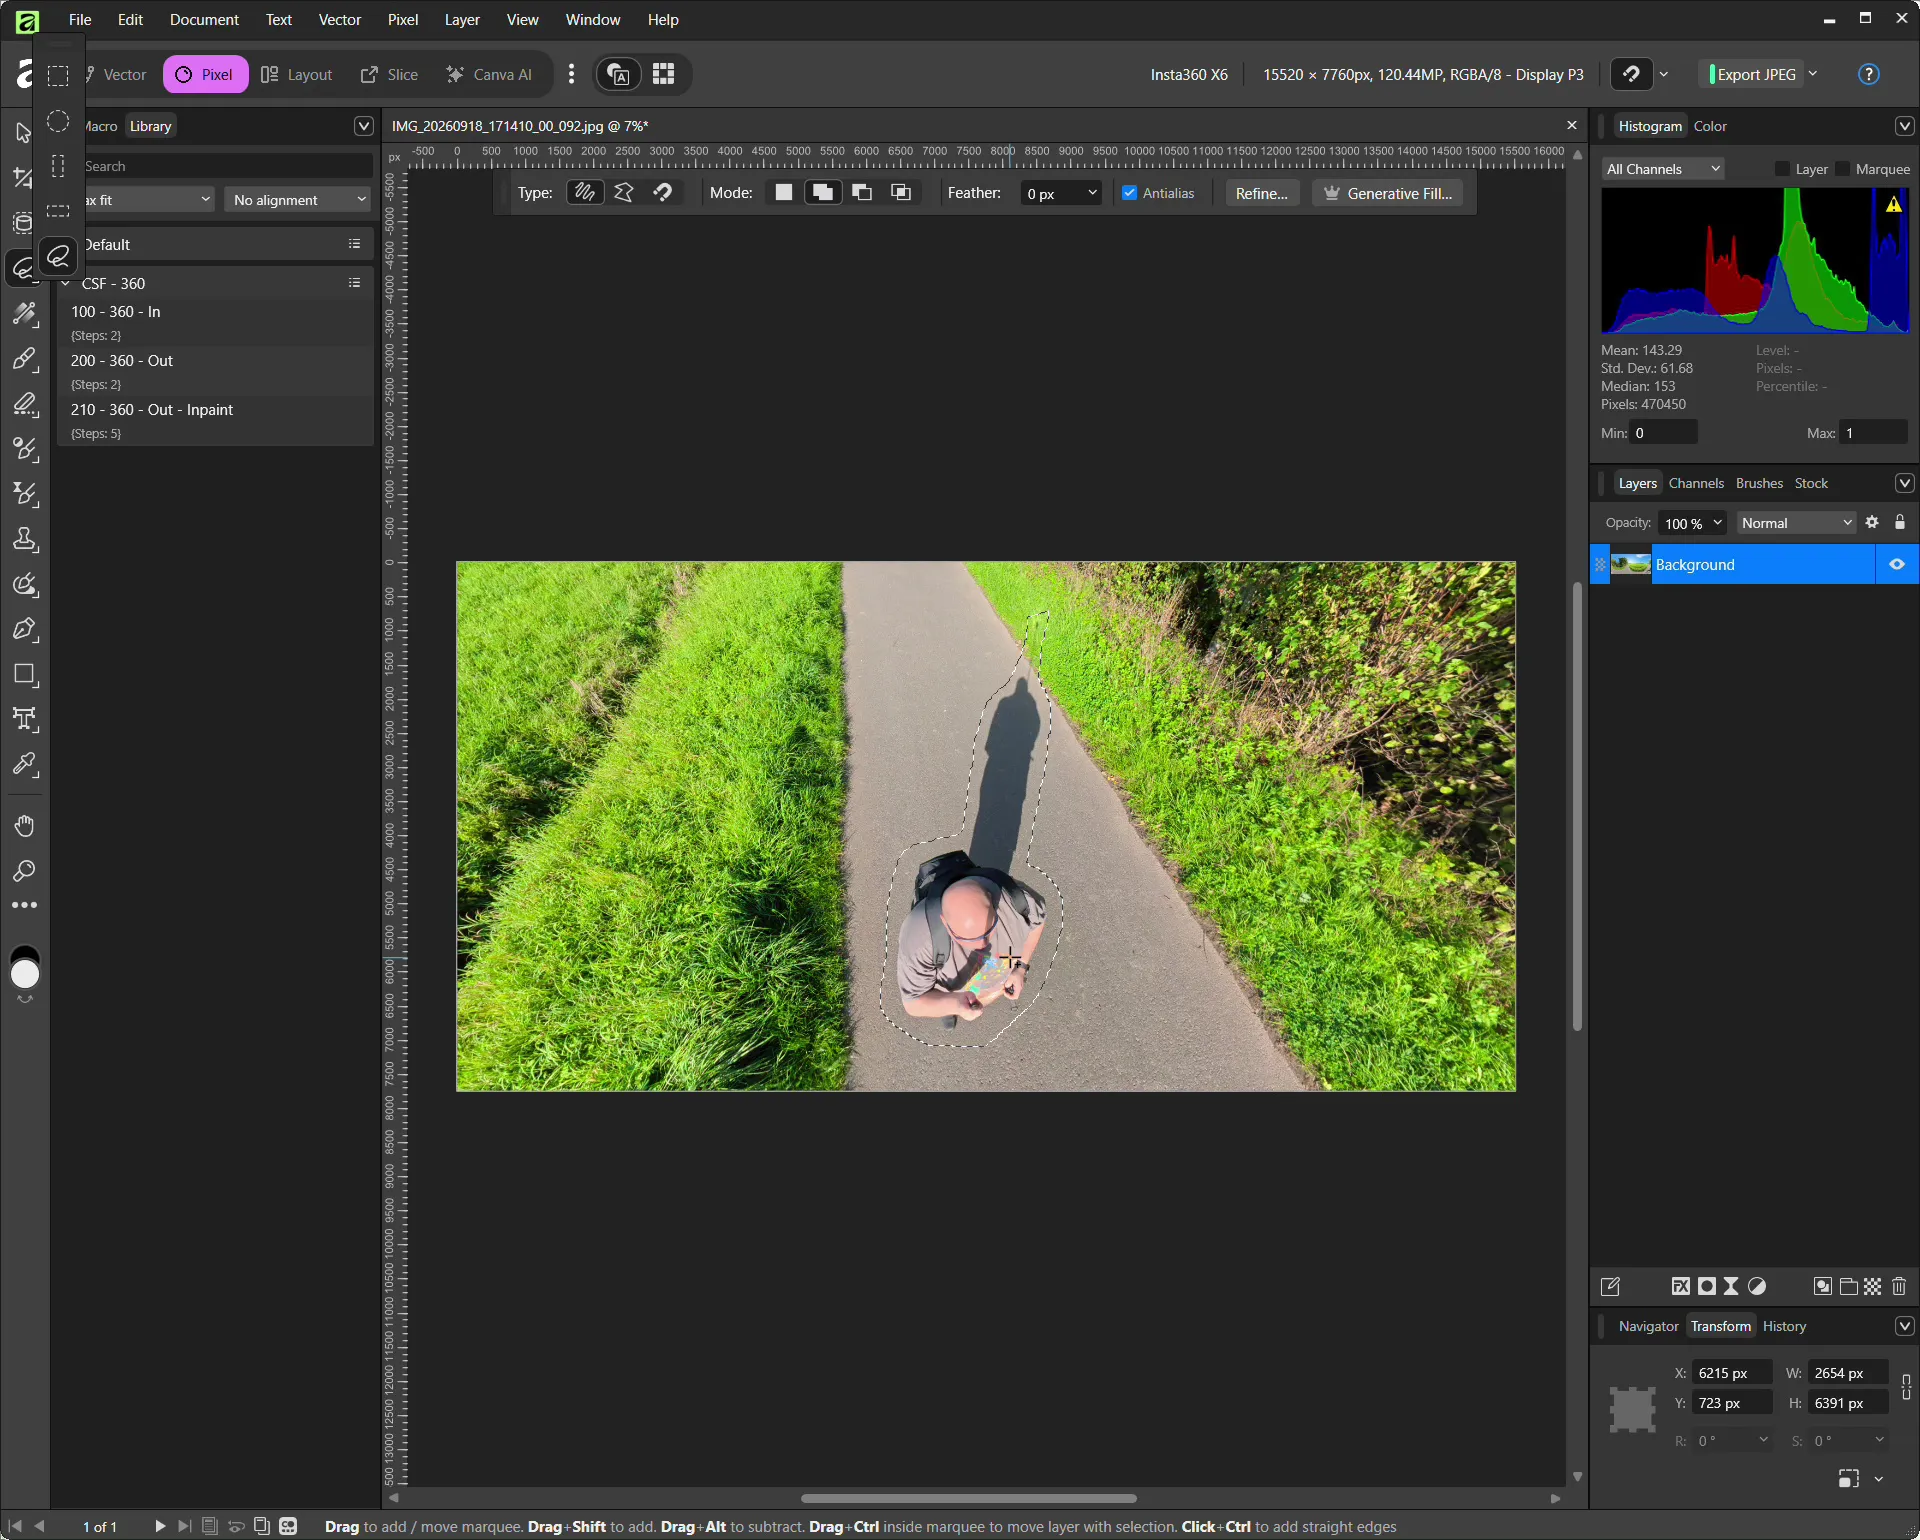
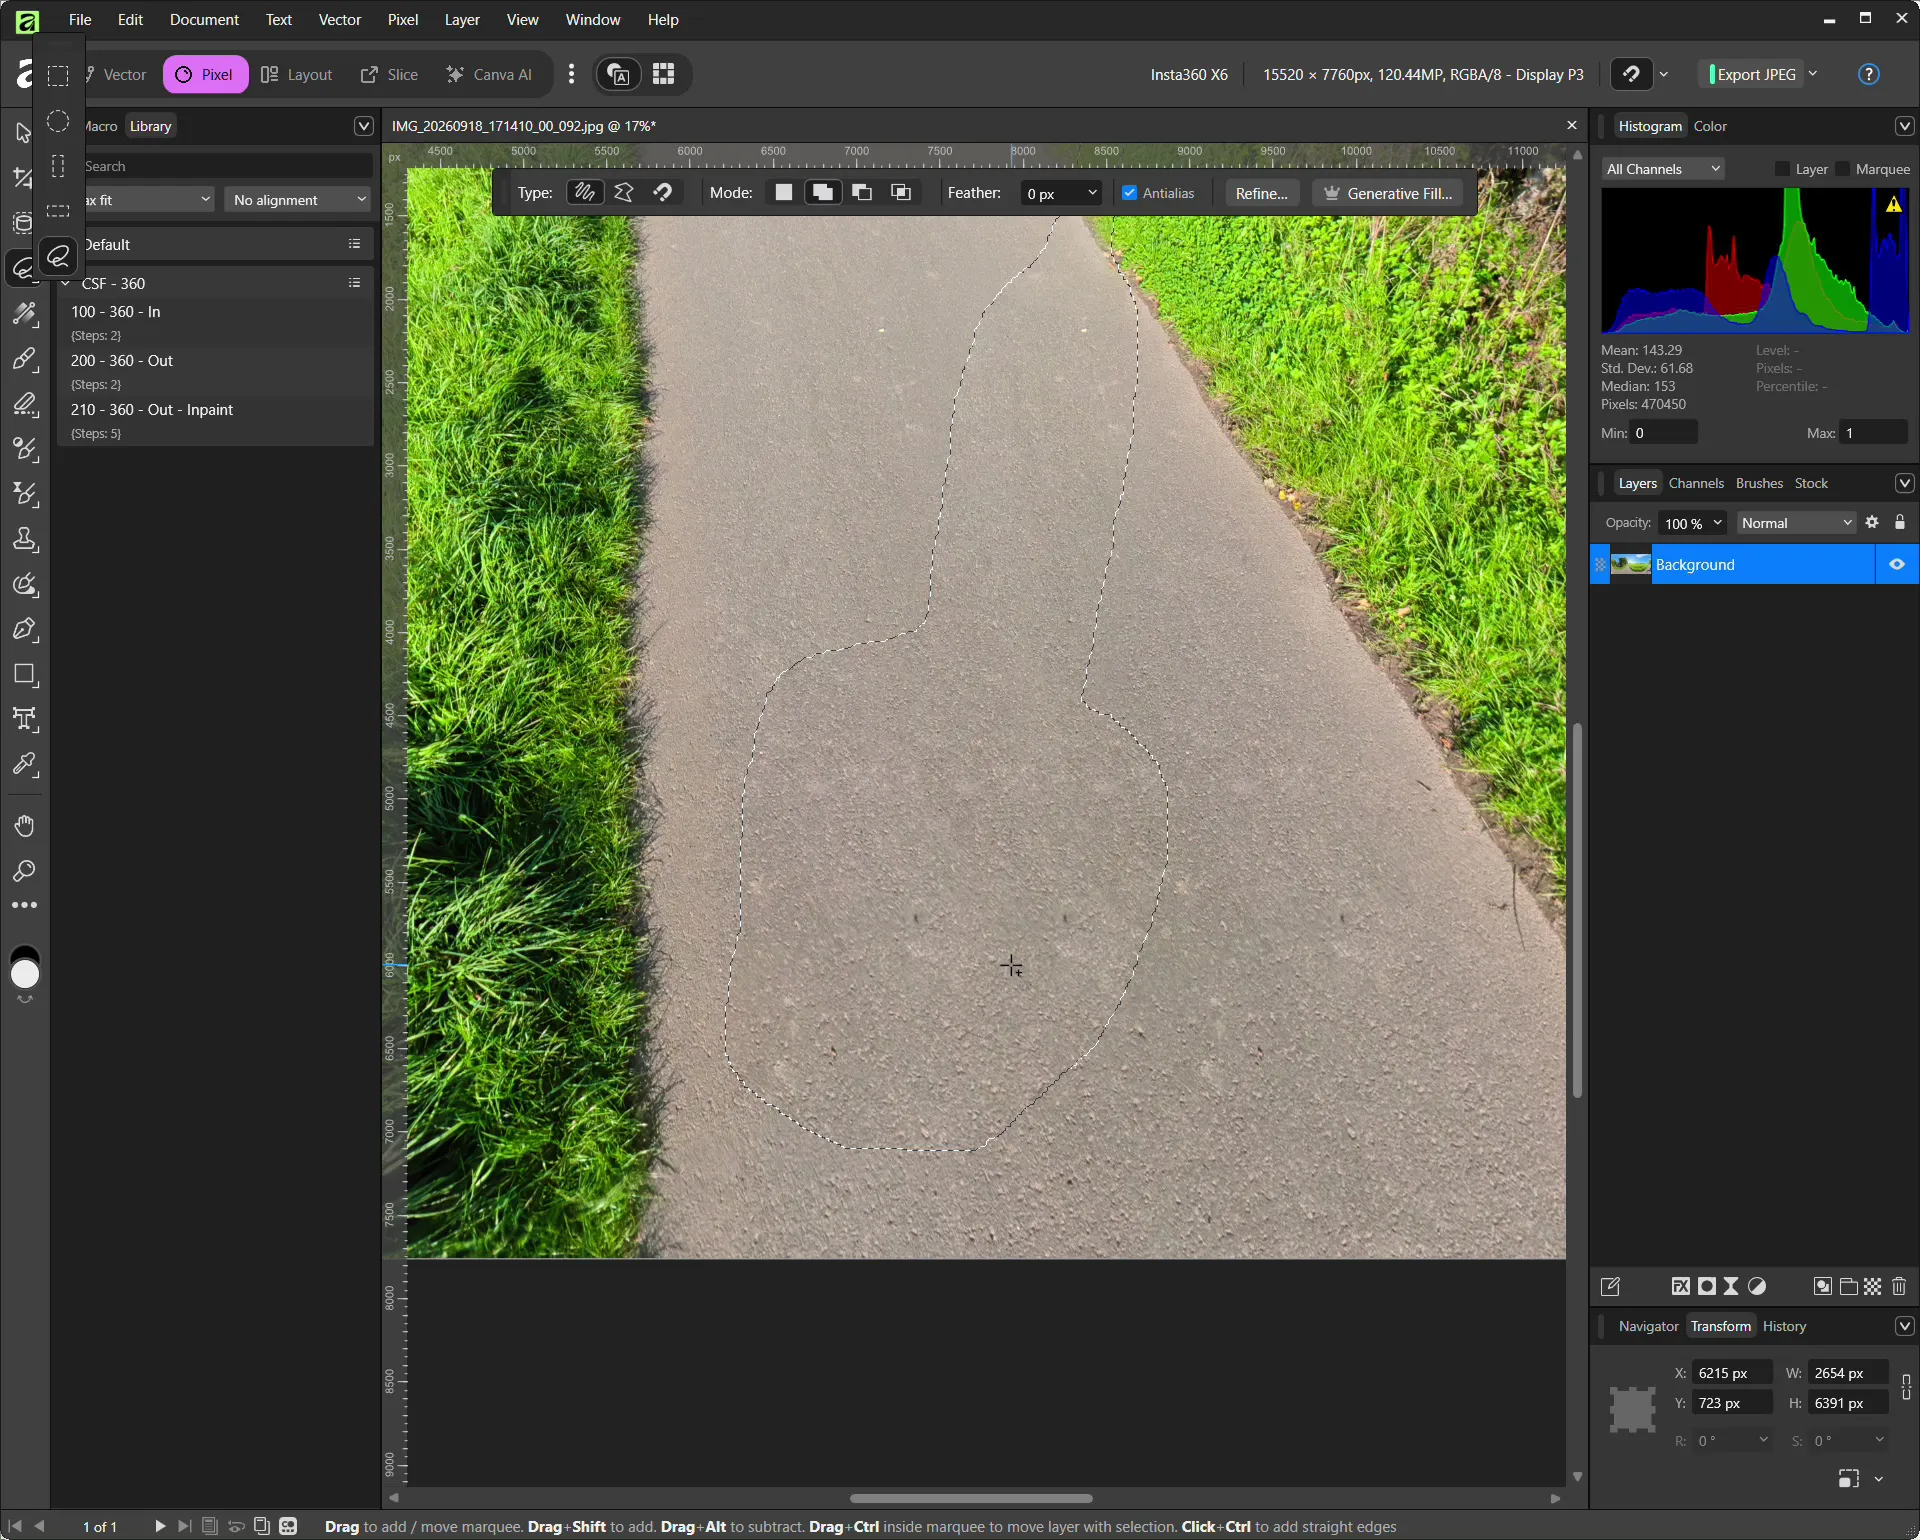
4. Select the Tripod, Person and Shadow
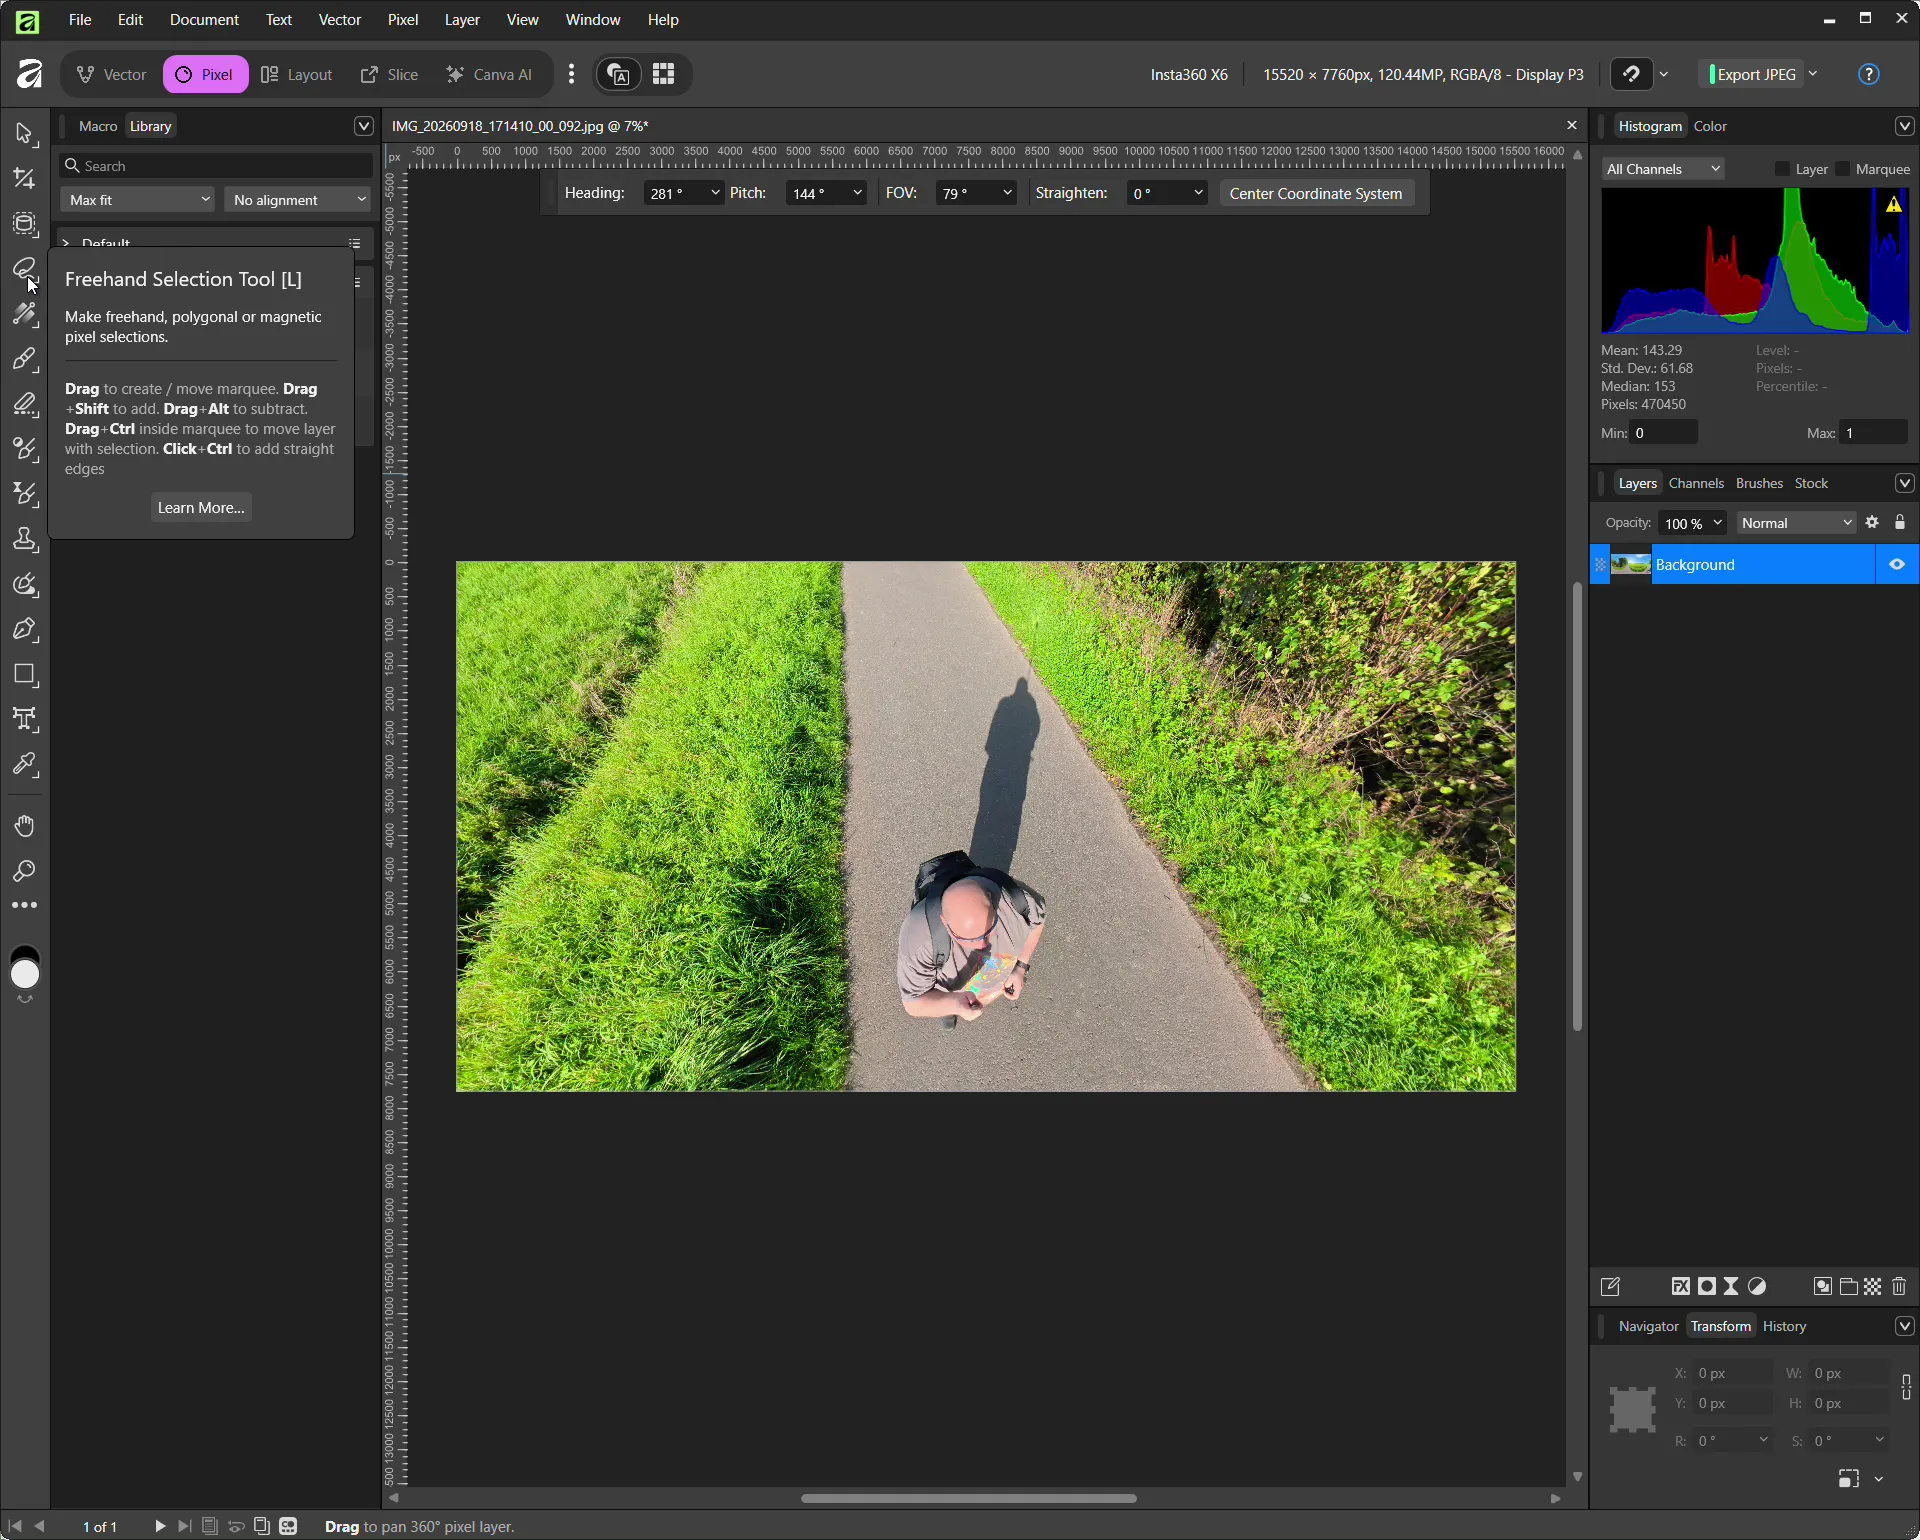
Next, select the Lasso Tool (L).
Mark the complete area that you want to remove.
You should not only select the tripod or person itself.
Also look for:
- shadows
- feet
- backpacks
- hands
- selfie sticks
- tripod legs
- reflections
- other unwanted objects
I usually leave a small additional margin around the object.
If the selection follows the object too closely, Inpainting can sometimes leave visible remains around the edges.
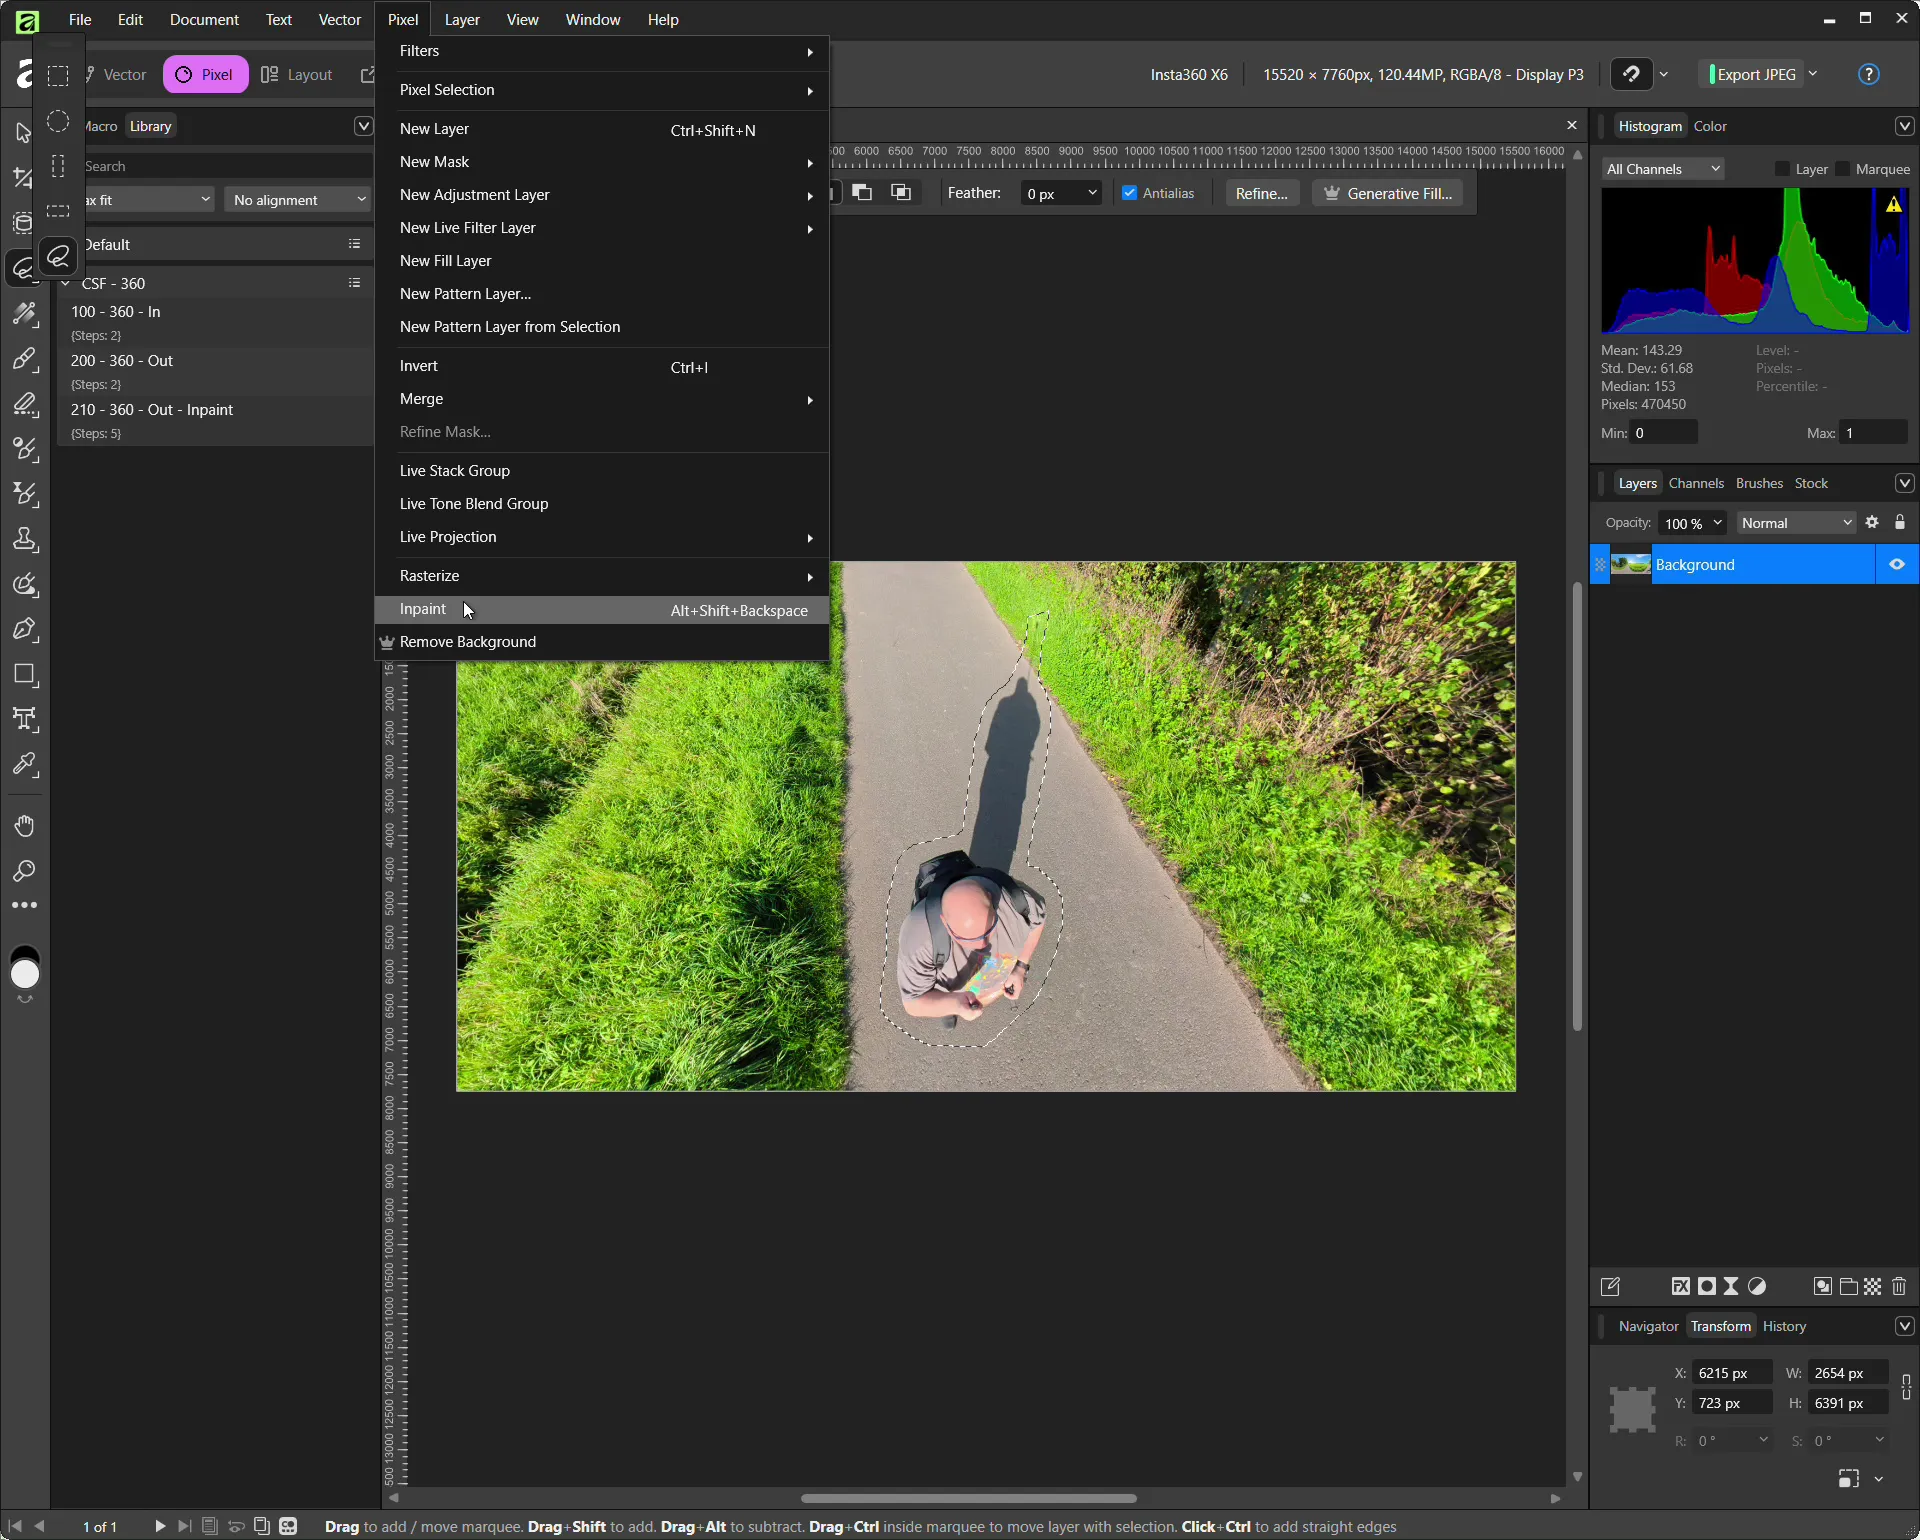
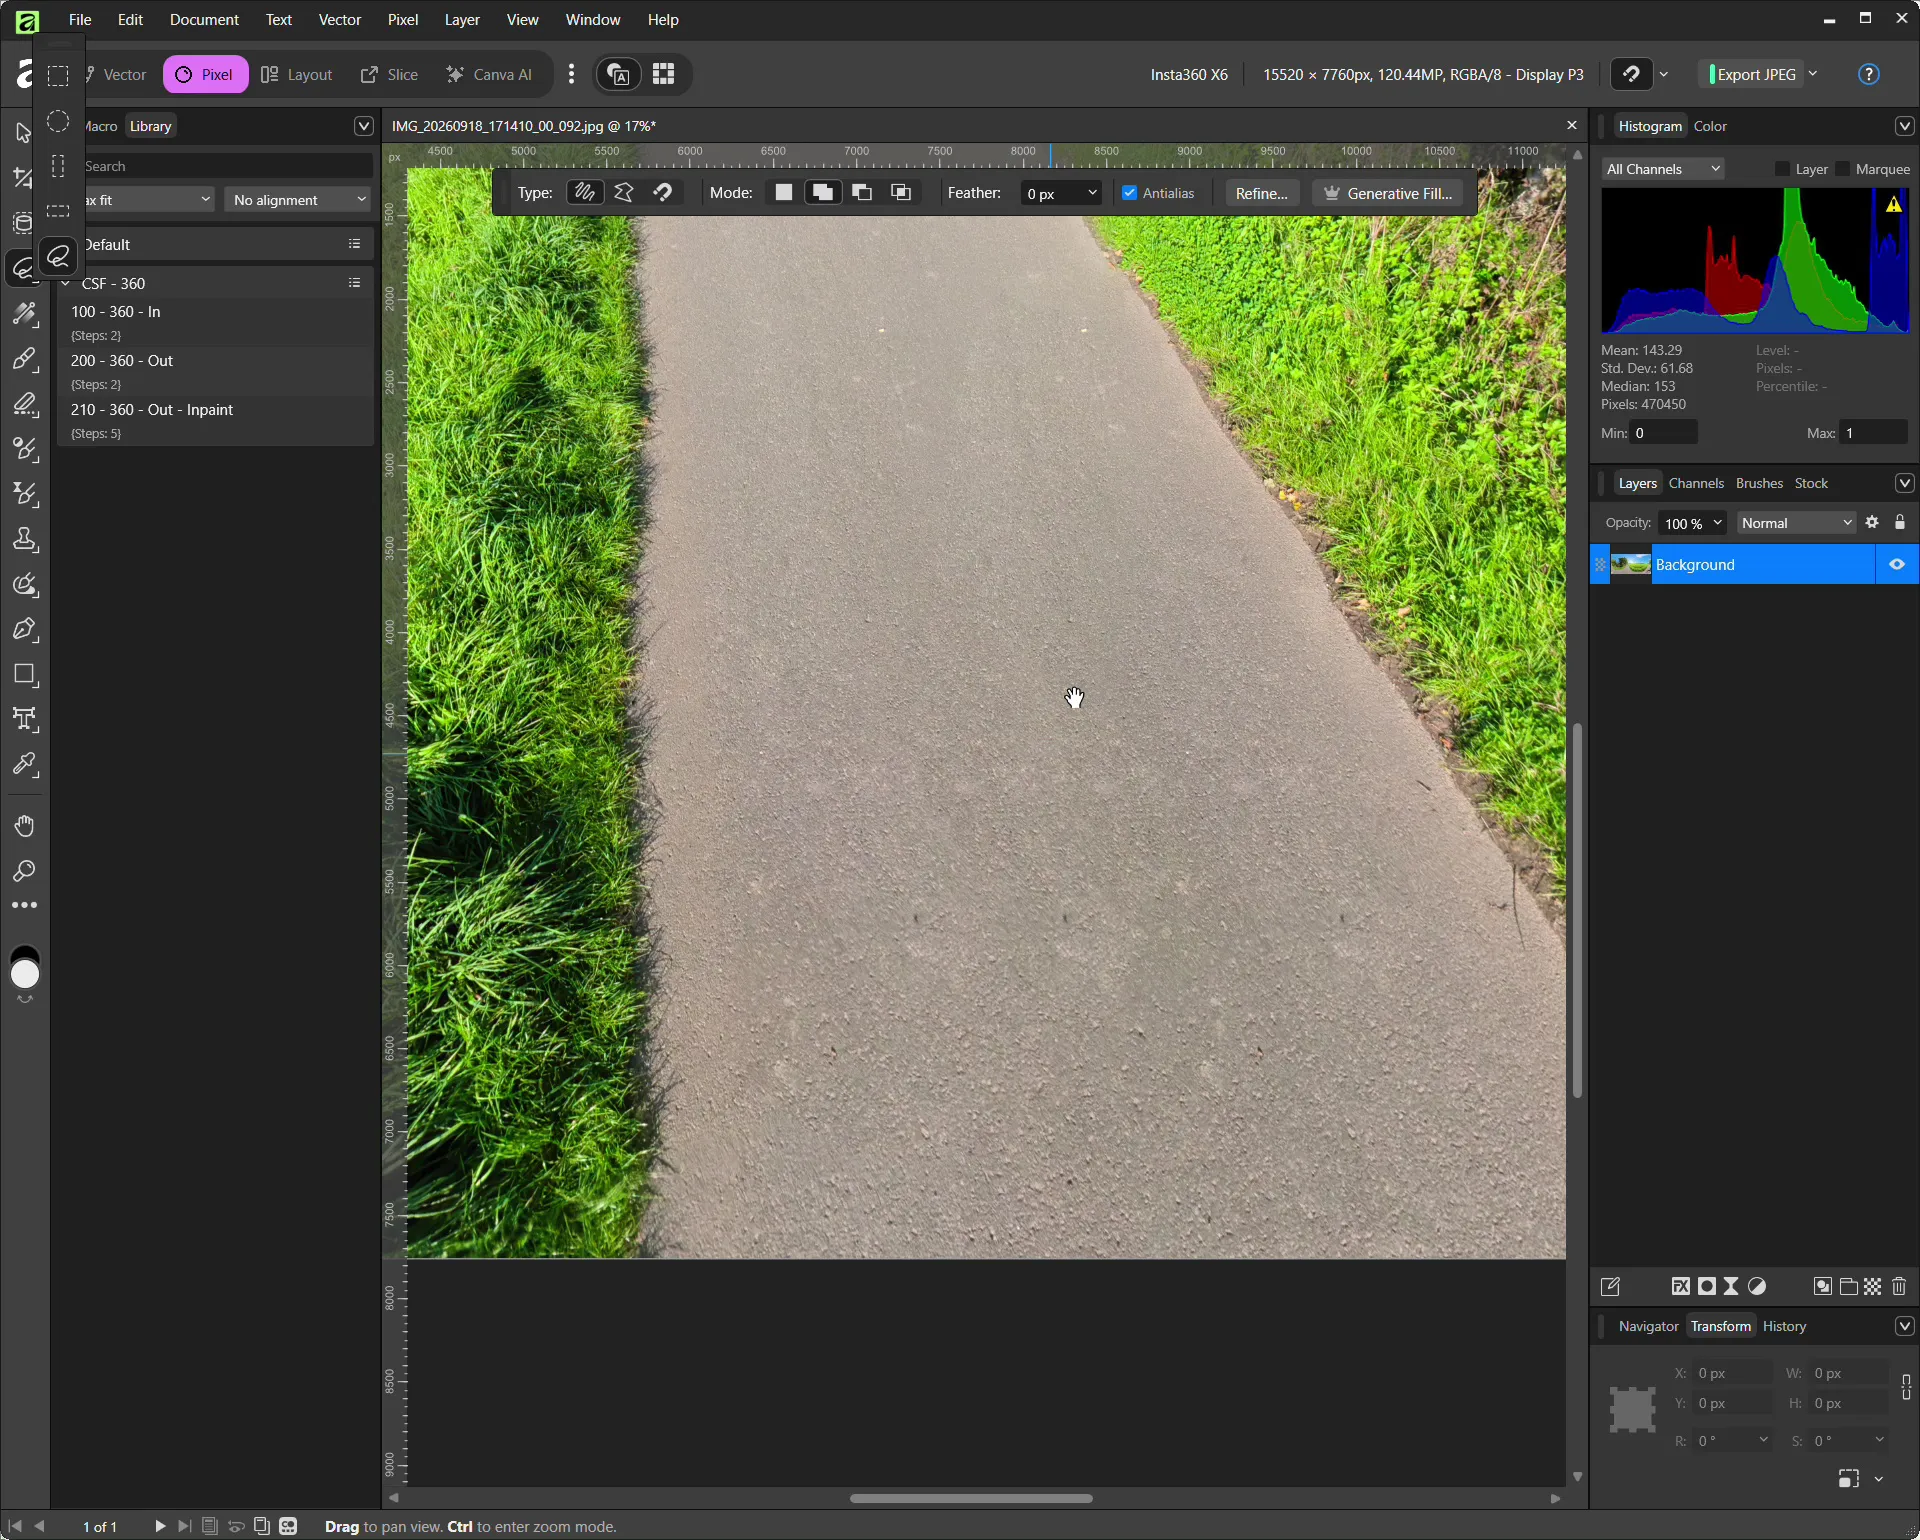
5. Remove the Selection with Inpainting
Once the area has been selected, go to:
Pixel -> Inpaint
You can also use the keyboard shortcut:
Alt + Shift + Backspace
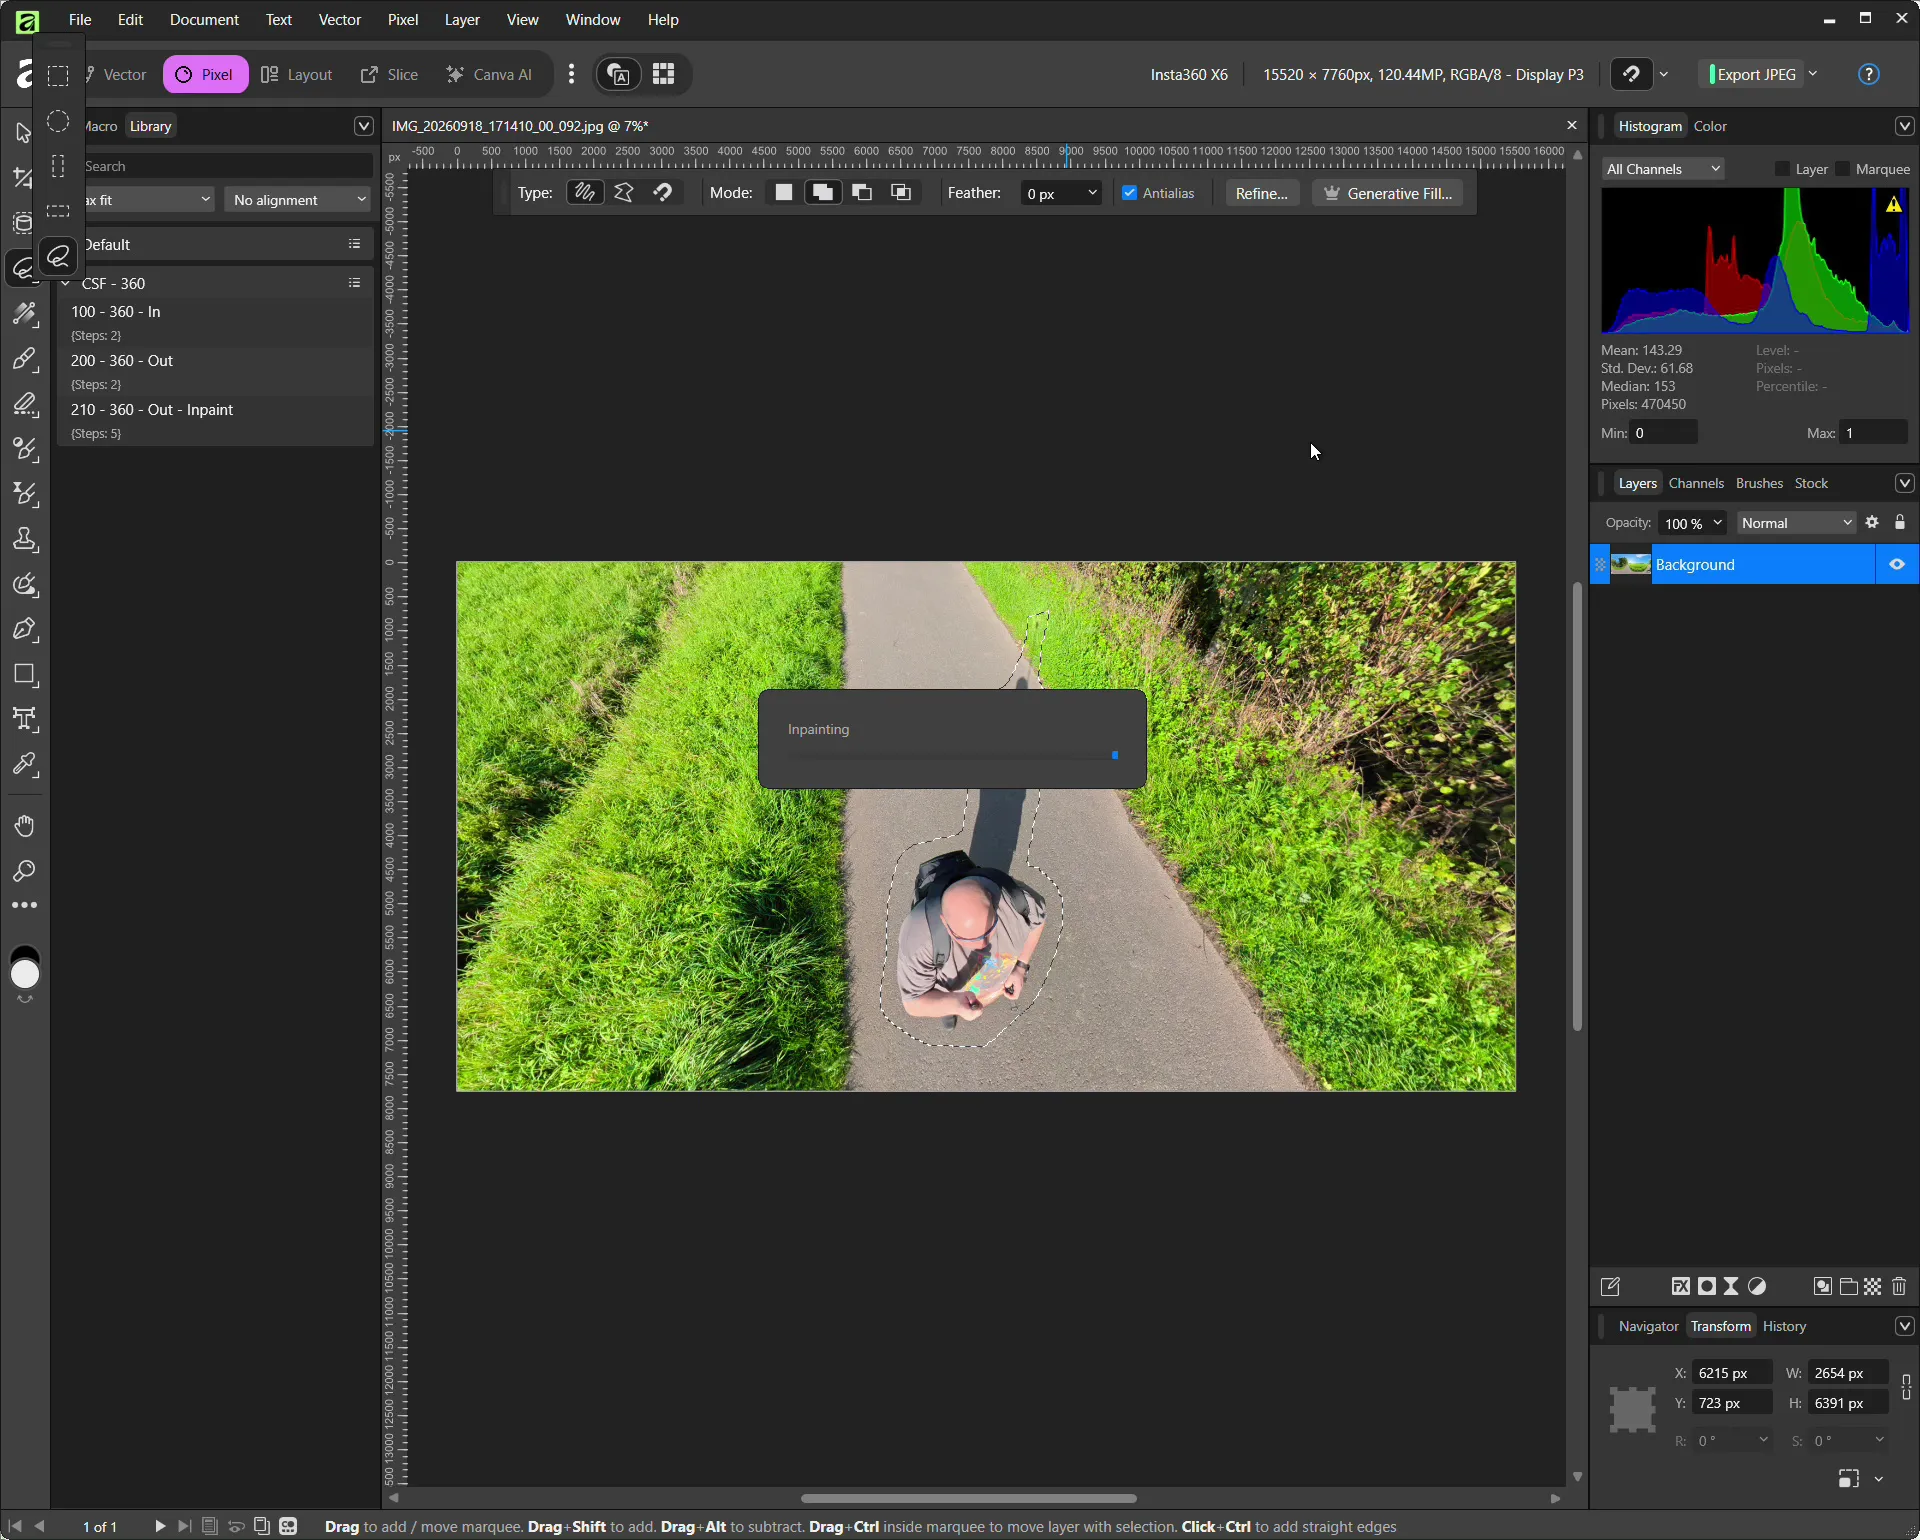
Affinity now analyses the surrounding area and tries to replace the selected section with suitable image information.
This works surprisingly well with simple structures.
A tripod positioned on:
- grass
- asphalt
- a dirt road
- fairly uniform paving
can often be removed almost completely.
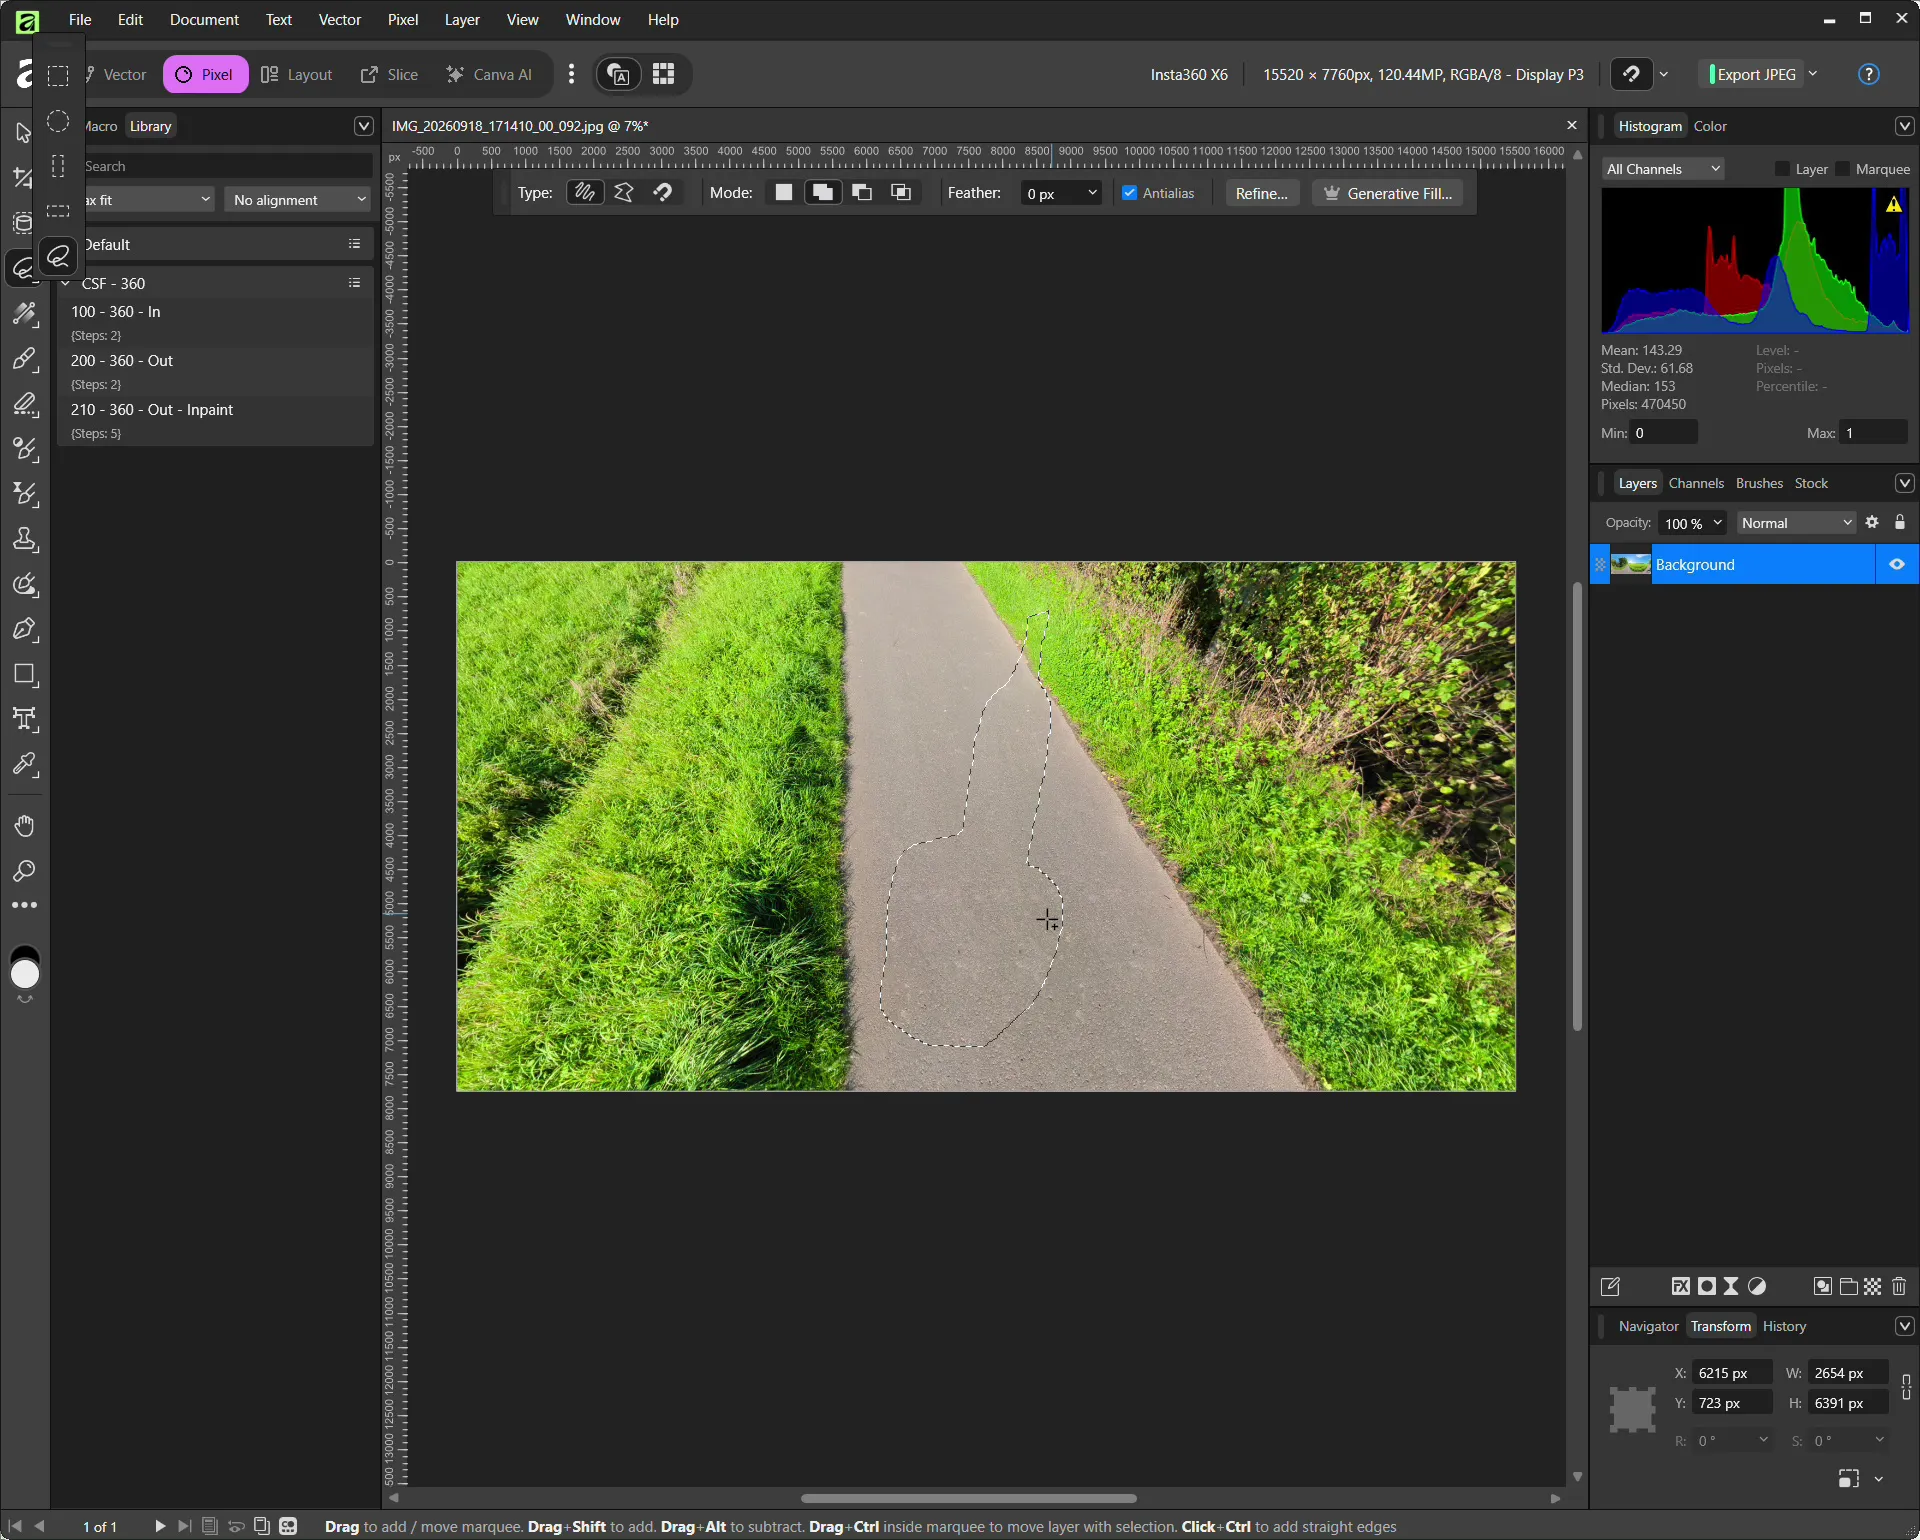
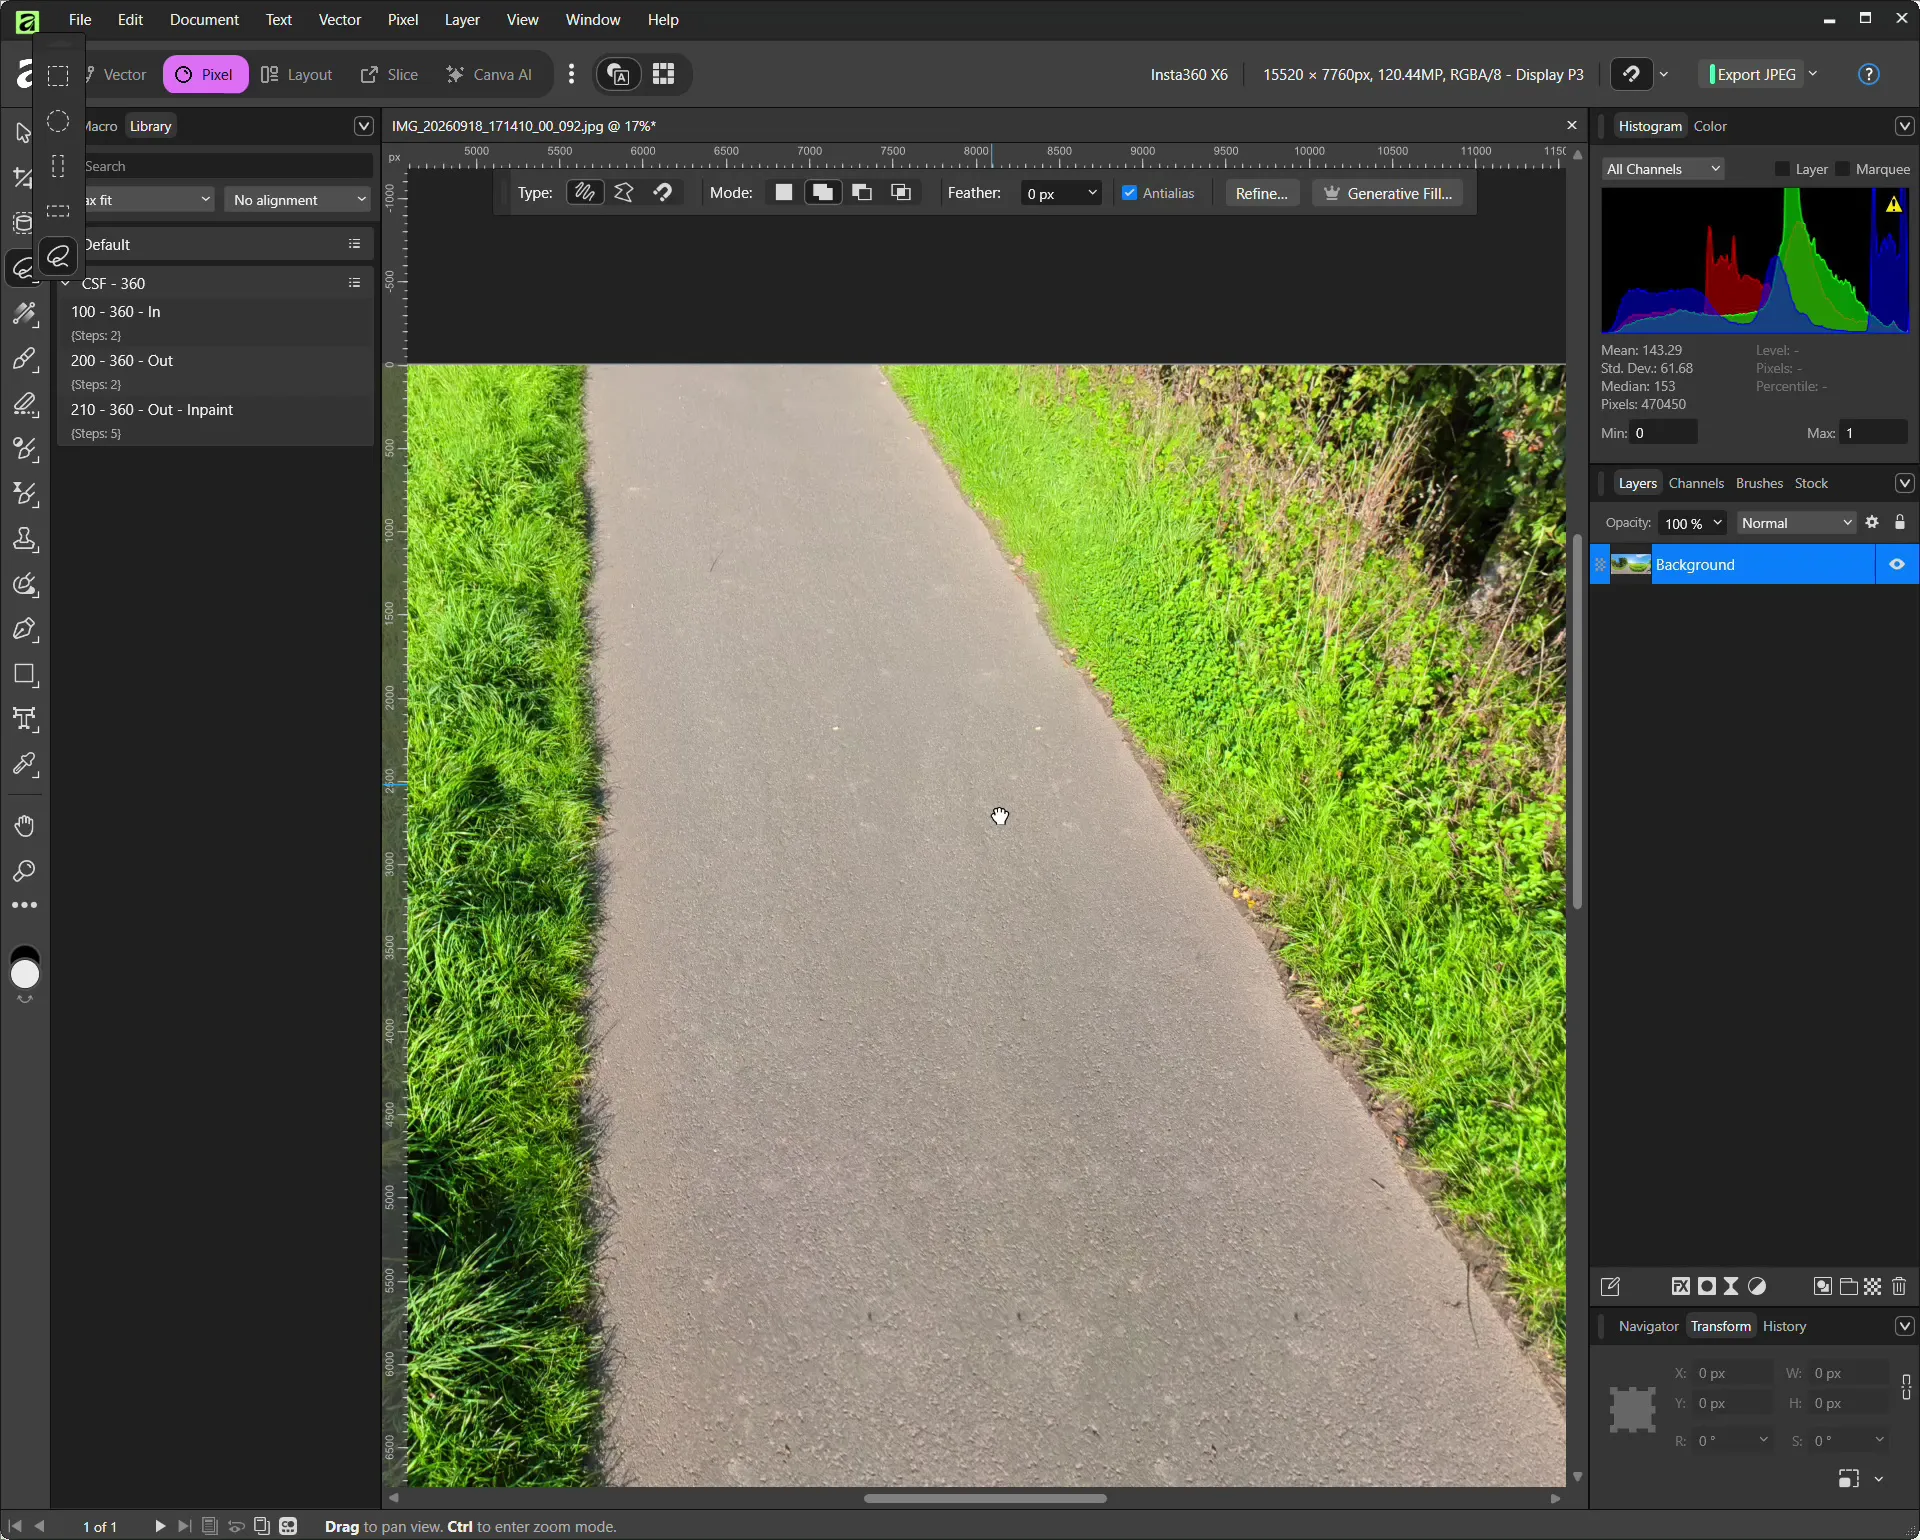
6. Check the Result
Before removing the Live Projection, take a closer look at the result.
Pay particular attention to:
- repeating patterns
- smeared textures
- duplicated blades of grass
- unnatural patches of asphalt
- bent lines
- visible edges
- repeated stones or paving blocks
- remaining shadows
If the result does not look good, undo the step and adjust the selection.
Sometimes it is better to divide one large selection into two or three smaller areas and process them separately.
Alternative: Use the Inpainting Brush Tool
You do not necessarily have to create a selection first.
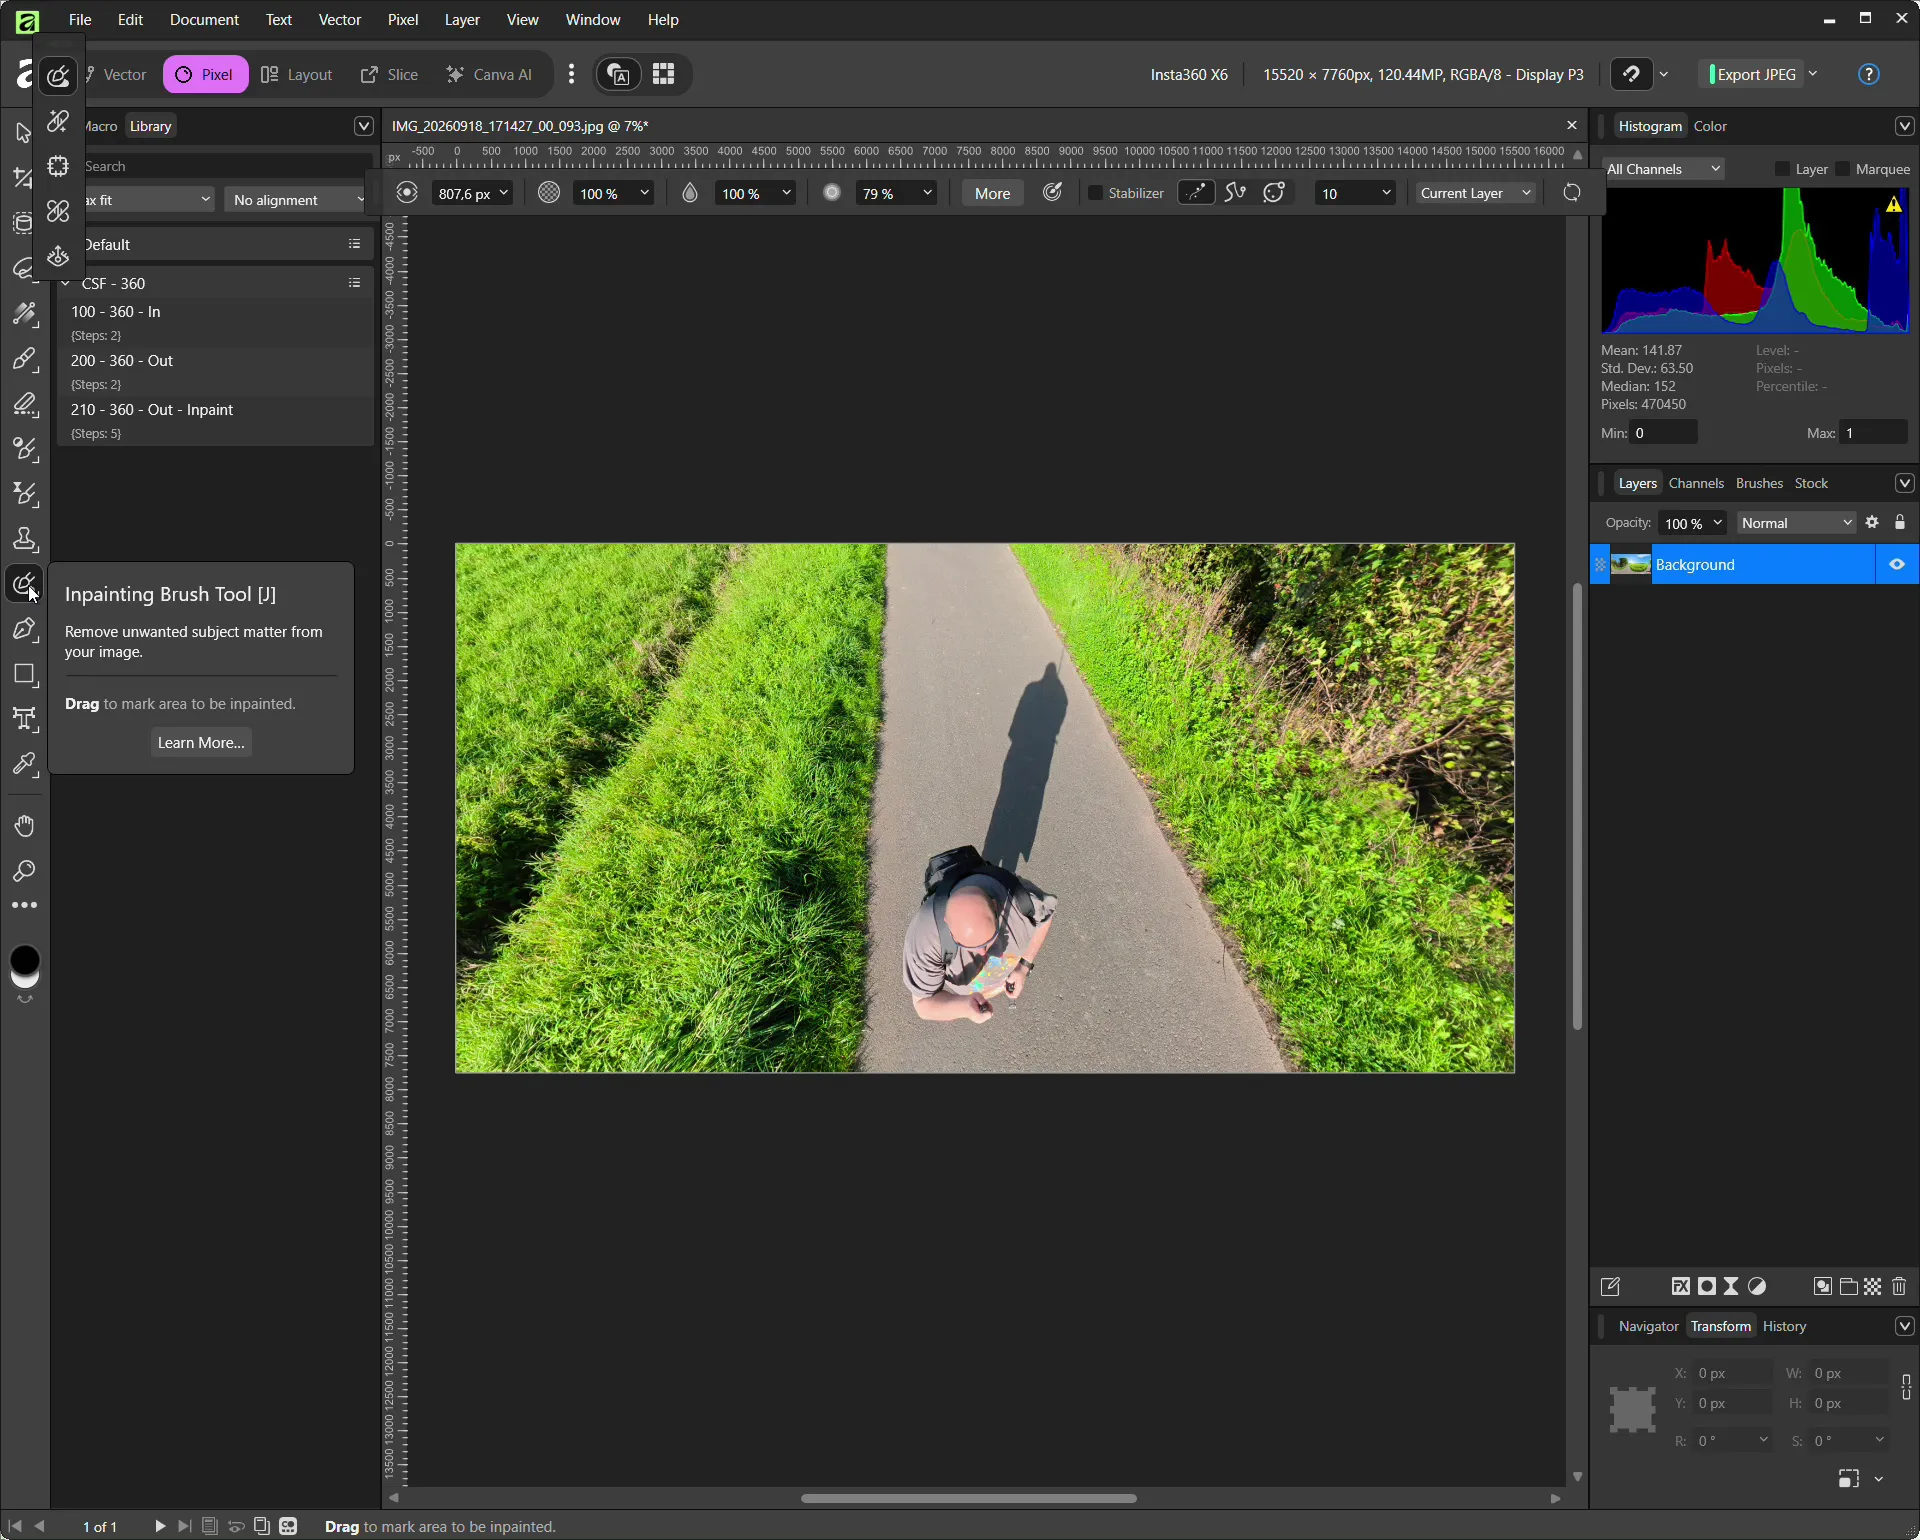
Instead, you can use the Inpainting Brush Tool (J) directly.
Simply paint over the areas that Affinity should remove.
This is especially useful for smaller objects such as:
- thin selfie sticks
- individual tripod legs
- smaller shadows
- cables
- people farther away from the camera
For an entire person including their shadow, I usually prefer the Lasso Tool, because it gives me more control over exactly which part of the image should be recalculated.
Using Generative Fill with Canva AI
Current versions of Affinity also provide additional generative AI features for users with a Canva Premium subscription.
These include features such as:
- Generative Fill
- Generative Expand
- generative editing
- automatic background removal
In theory, Generative Fill can also be used to remove a tripod or person.
In my tests, however, the results were very mixed.
When I tried to remove an entire person together with their shadow from a road or grass surface, the AI sometimes did not simply restore the existing ground. Instead, it generated entirely new objects.
You may suddenly find things such as:
- vehicles
- people or figures
- random objects
- animals
- new plants
For creative image editing, this can be interesting. For a realistic 360° panorama, however, I normally just want the existing ground texture to continue naturally.
For this reason, I usually try the classic Inpainting method first.
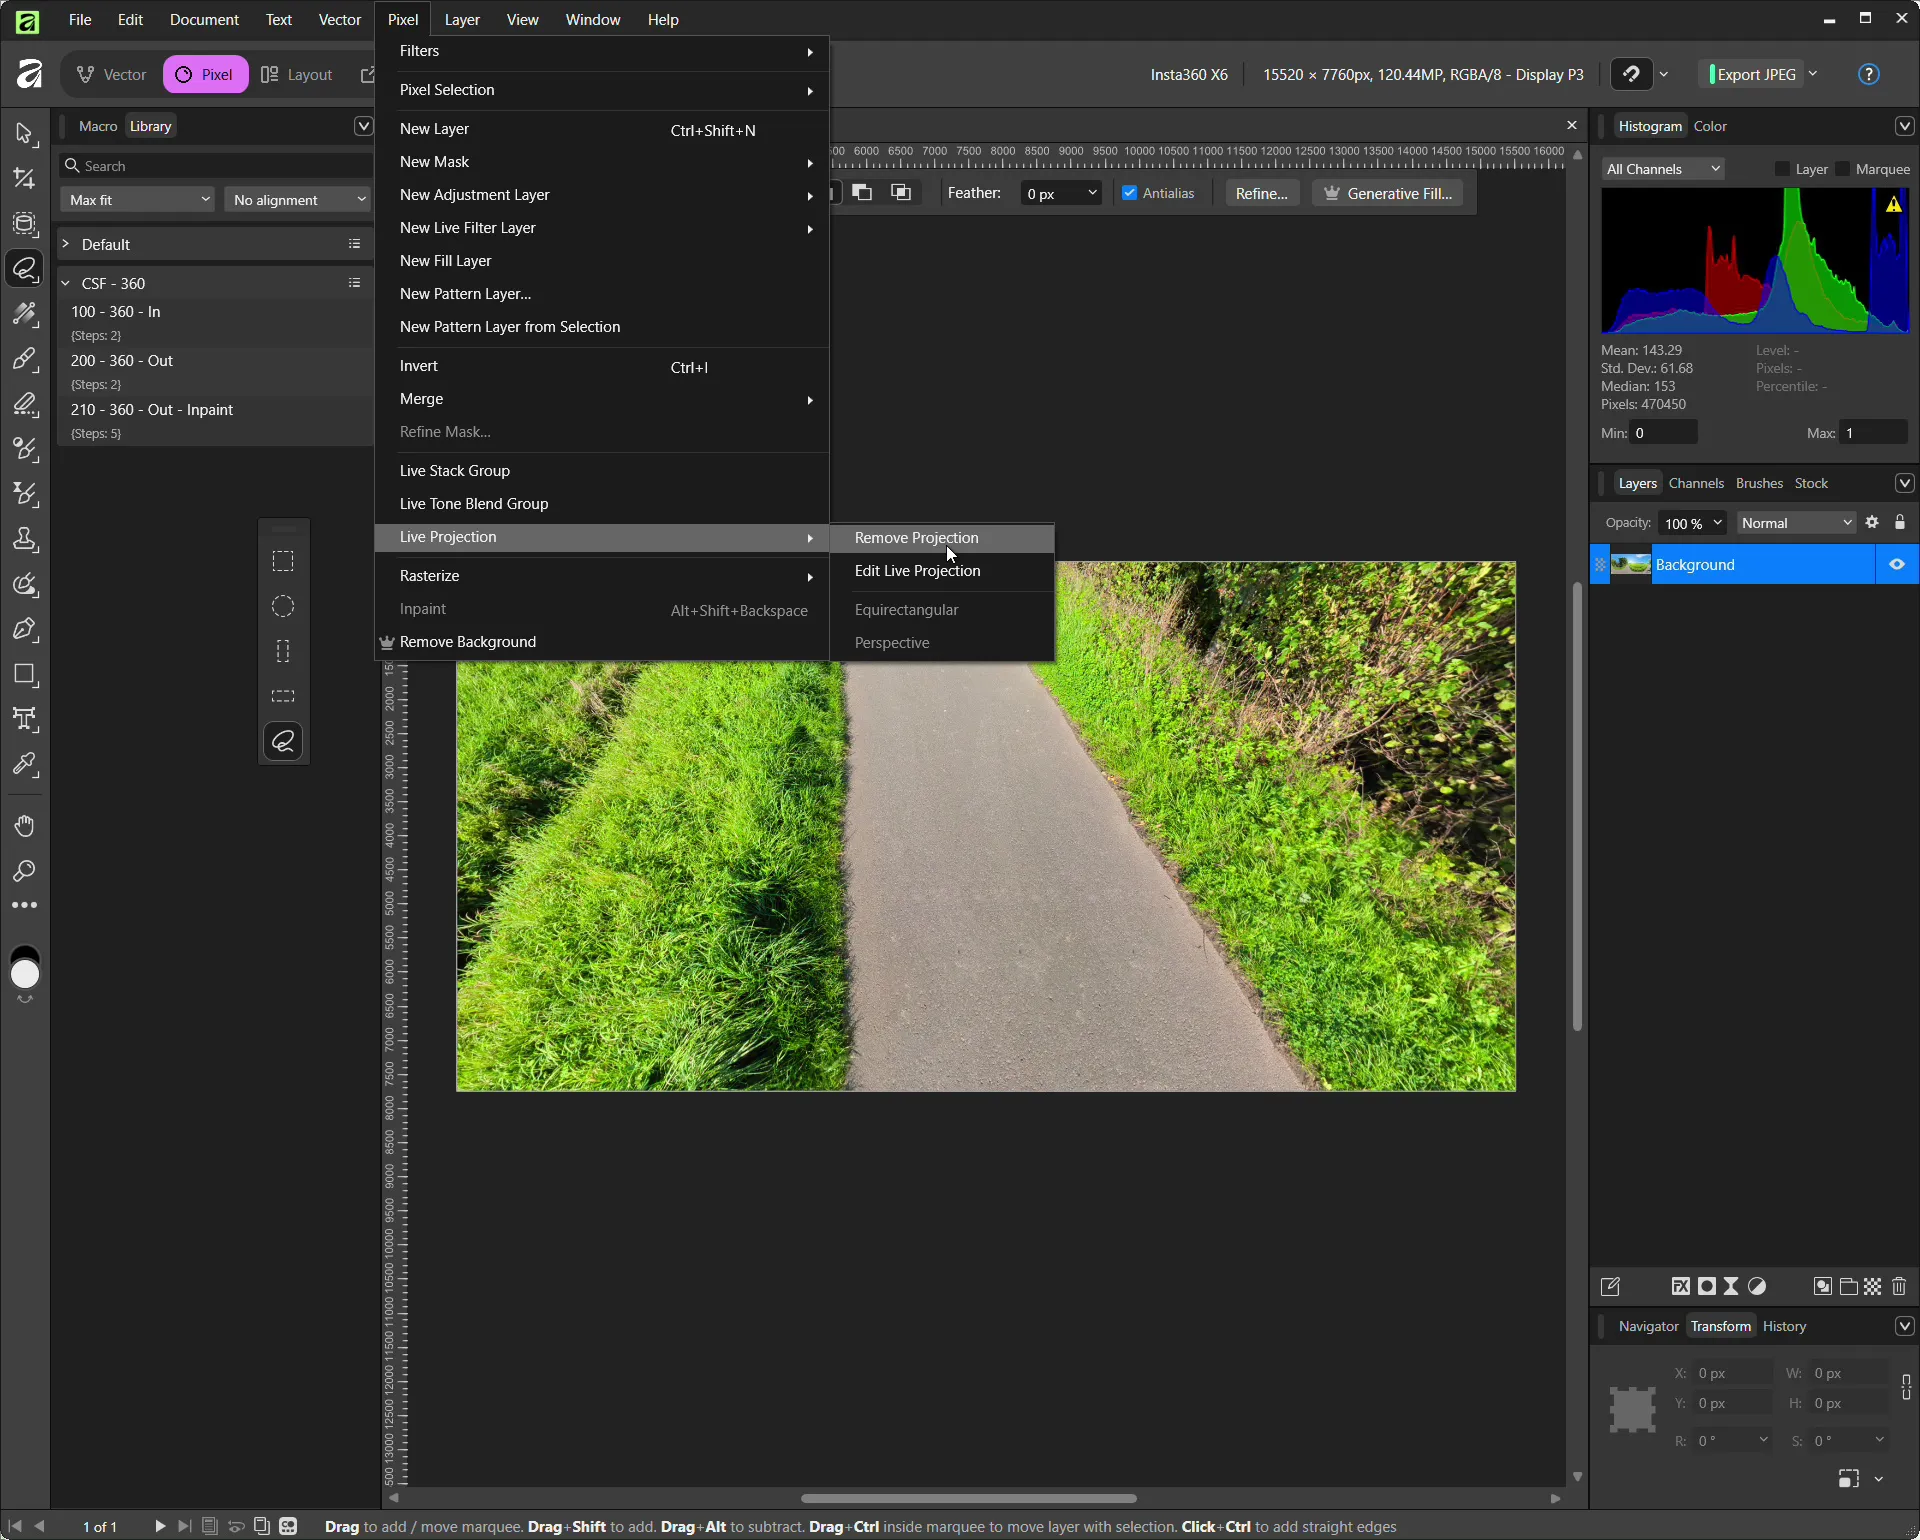
Remove the Live Projection Again
Once you are satisfied with the result, the panorama needs to be converted back to its original equirectangular view.
Go to:
Live Projection -> Remove Projection
Depending on your Affinity version, you will find this option under Layer or Pixel.
The image will now once again look like a typical rectangular 2:1 panorama.
This step is important because this is the format required by 360° viewers and most panorama software.
Only after removing the Live Projection should you save or export the image.
If you export the image while the Live Projection is still active, only the current view may be exported instead of the complete panorama.
Speed Up the Workflow with Macros
If you regularly edit 360° photos, it is worth saving parts of the workflow as macros in Affinity.
I have split my workflow into several macros.
Macro 1 – Prepare the Panorama
My first macro performs roughly the following steps:
- Enable Equirectangular Live Projection
- Rotate the panorama down to the nadir
- Set the FOV to approximately 90 degrees
After that, I only have to select the object that I want to remove.
Macro 2 – Inpainting and Remove Projection
For simple surfaces, a second macro can perform the remaining steps:
- Run Inpaint
- Remove Live Projection
On a normal road or uniform grass surface, this usually works without any additional adjustments.
For more complicated surfaces, I prefer to keep these steps separate so that I can inspect the Inpainting result before converting the panorama back.
When Does Inpainting Work Best?
How successfully a tripod can be removed from a 360° photo depends heavily on the surface underneath it.
| Surface | Difficulty | Typical Result |
|---|---|---|
| Asphalt | Low | Usually very good |
| Grass | Low | Usually very good |
| Sand | Low to medium | Usually good |
| Concrete | Low | Usually good |
| Forest floor | Medium | Depends on leaves, branches and details |
| Paving stones | Medium | Lines and repeating patterns can cause problems |
| Tiles | Medium to high | Grout lines need to continue correctly |
| Stairs | High | Perspective and edges are difficult |
| Railings | High | Regular lines make errors easy to spot |
| Detailed shadows | Medium to high | Often requires additional editing |
The fewer geometric lines passing through the area that needs to be reconstructed, the easier the Inpainting process usually is.
With more difficult textures and surfaces, I have personally achieved noticeably better results with Photoshop and its generative AI tools. This was also the case with higher-resolution panoramas created with my Sony A7R II.
Do Not Forget the Shadow
When editing 360° photos, it is easy to focus only on the tripod.
The tripod may be gone afterwards, but a large and obvious shadow can still remain in the middle of the ground.
With a low sun, this shadow can extend several metres across the image.
In my example, the shadow is actually much larger than the person itself.
For this reason, I normally select:
Person + selfie stick/tripod + complete shadow
as one area.
If the shadow is very long, it may be better to remove it in several smaller sections.
Photoshop as an Alternative
Adobe Photoshop used to support direct editing of 360° panoramas in a spherical or 3D view.
The advantage was similar to Affinity: you could rotate the panorama and comfortably edit the nadir.
Adobe completely removed the old Photoshop 3D features in July 2024.
As a result, this workflow is no longer directly available in current versions of Photoshop.
Photoshop with Flexify 2
One interesting alternative is the Flexify 2 plugin from Flaming Pear.
Flexify can convert between a wide range of panorama and map projections.
For example, it can transform the nadir of an equirectangular panorama into a projection that is easier to edit.
A simplified workflow looks like this:
- Open the equirectangular panorama in Photoshop
- Use Flexify 2
- Convert the required area into a suitable projection
- Remove the person or tripod in Photoshop
- Convert the image back to equirectangular projection
The main advantage is that you can then use Photoshop’s much more powerful retouching and AI tools.
In my experience, Photoshop’s Generative Fill often produces better results than Affinity’s current generative tools, especially when working with complicated textures or structures.
The disadvantage is the workflow.
Affinity’s Live Projection feels much more direct. You can simply rotate the panorama, change the viewing angle and edit the problematic area.
Flexify relies much more heavily on projection settings and is therefore less convenient for quickly navigating through a panorama.
Can You Still Use Photoshop CS6?
An old version of Photoshop CS6 can theoretically still be useful if you already own a valid licence and can run the software on your current system.
Photoshop CS6 Extended in particular still included several 3D features.
However, there are several disadvantages:
- very old software
- no current security updates
- possible compatibility problems with modern hardware
- possible compatibility problems with current operating systems
- no modern generative AI features
- older Content-Aware technology
The retouching tools available at the time are more comparable to traditional Inpainting tools.
They can still work well on simple surfaces, but current tools are considerably more capable when dealing with complicated scenes.
Affinity or Photoshop for 360° Photos?
For my workflow, I would roughly compare the two programs like this:
| Feature | Affinity | Photoshop |
|---|---|---|
| Interactive 360° editing | Very good | No longer directly available in current versions |
| Equirectangular Live Projection | Yes | No |
| Traditional Inpainting | Good | Very good |
| Generative AI | Available with Canva Premium | Very good |
| Complex object removal | Good | Very good |
| Freely rotate the panorama | Very convenient | More complicated with Flexify |
| Cost | Free | Subscription |
| Additional plugins required | No | Often required for a 360° workflow |
For quickly removing a tripod from the nadir, Affinity is currently one of the most practical solutions, especially since the Live Projection feature itself is available for free.
Keep 360° Metadata in Mind When Exporting
After editing, you should make sure that the panorama is still recognised as a 360° image.
A complete panorama should retain its original 2:1 aspect ratio.
For example, if the original image has a resolution of:
15520 x 7760 pixels
you should not simply crop it to a normal 16:9 image.
A panorama may also contain GPano XMP metadata.
This can include information such as:
- ProjectionType
- FullPanoWidthPixels
- FullPanoHeightPixels
- PoseHeadingDegrees
- InitialViewHeadingDegrees
This information helps programs and online platforms automatically recognise the file as a 360° panorama.
When exporting, it is therefore a good idea to enable the option to embed or preserve metadata, if available.
If a program later opens the image only as a normal flat JPEG, the GPano metadata is one of the first things worth checking.
How Can You View 360° Photos on Windows?
An equirectangular JPEG can technically be opened with almost any image viewer.
However, this is not particularly useful because you will only see the flat and distorted panorama.
Dedicated 360° panorama viewers provide a much better experience.
| Program | Use |
|---|---|
| FSPViewer | Simple and free panorama viewer |
| SimplePanoramaViewer | Simple viewer from the Microsoft Store |
| Insta360 Studio | Viewing, reframing and editing Insta360 content |
| Nextcloud | 360° viewing possible with suitable extensions |
| PTGui | Panorama stitching and inspection |
| PanoramaStudio 4 Pro | Panorama creation and viewing |
| Pano2VR | Panorama processing and virtual tours |
| 3DVista Virtual Tour | Advanced virtual tour creation |
One important detail with Insta360 Studio is that, after editing the image in Affinity, Insta360 Studio may no longer recognise the file as a panorama.
For this reason, I recommend making all required adjustments in Insta360 Studio first and only editing the image in Affinity afterwards.
For a quick check after editing, FSPViewer is often more than sufficient.
FSPViewer:
https://www.fsoft.it/FSPViewer/
SimplePanoramaViewer:
https://apps.microsoft.com/detail/9PPD1BZ9PKBJ
Pano2VR and 3DVista for Virtual Tours
If you want to do more than edit individual 360° photos and instead create complete virtual tours, programs such as Pano2VR and 3DVista Virtual Tour become particularly interesting.
They allow you to:
- connect multiple panoramas
- create hotspots
- add information boxes
- integrate floor plans
- add navigation
- add logos
- create virtual property tours
- export web-based tours
Pano2VR is also very useful if you need to manage and connect a large number of panoramas.
Another Useful Trick: Take Two Photos
If you need particularly clean 360° images, for example for real estate photography or virtual tours, there is another method that can provide better results.
Instead of removing the photographer entirely with Inpainting, you can take two separate photos.
For the second photo, move to the opposite side of the camera.
You can then use part of the second image to replace the area occupied by the photographer in the first image.
This works especially well with:
- indoor scenes
- tiled floors
- complicated surfaces
- carpet patterns
- stairs
- architectural structures
In these situations, it can often produce a cleaner result than automatic Inpainting.
The important requirement is that as little as possible changes between the two shots.
What Is Affinity?
Affinity was originally a software suite developed by Serif and consisted of several separate applications:
- Affinity Photo for image editing
- Affinity Designer for vector graphics
- Affinity Publisher for page layout and desktop publishing
After Canva acquired Affinity, the software was reorganised. Current versions combine the different workflows more closely within a single application.
For this tutorial, we mainly need the Pixel workspace, which contains the traditional image-editing tools.
One major advantage is that the current Affinity application can generally be used for free. Some additional Canva AI features, however, require a paid Canva subscription.
How Much Do Affinity, Canva and Photoshop Cost?
As of September 2026, the pricing is approximately as follows:
| Program | Price | Notes |
|---|---|---|
| Affinity | Free | Basic image editing including Live Projection |
| Canva Free | Free | Includes access to Affinity |
| Canva Pro | Approx. €110/year | Additional AI features in Canva and Affinity |
| Adobe Photoshop | Approx. €25.99/month | Annual plan billed monthly |
| Adobe Photography Plan | Approx. €23.79/month | Includes Photoshop and Lightroom |
| Flexify 2 | Approx. US$54 one-time | Plugin for Photoshop and other compatible applications |
Prices can of course change over time.
You do not need Canva Pro for the normal Inpainting workflow described in this tutorial.
What Is an Equirectangular 360° Photo?
Most 360° cameras store the finished stitched panorama using an equirectangular projection.
This projection maps the entire surface of a sphere onto a rectangular image.
A complete 360° x 180° panorama normally uses an aspect ratio of:
2:1
Typical resolutions include:
- 6000 x 3000 pixels
- 8000 x 4000 pixels
- 12000 x 6000 pixels
- 15520 x 7760 pixels
When opened in a normal image viewer, an equirectangular panorama can look strangely distorted. This is particularly noticeable near the top and bottom edges of the image.
The point directly below the camera is called the nadir.
When a 360° camera is mounted on a tripod, this is normally where you will find the tripod, selfie stick or the person holding the camera.
Affinity can convert the flat equirectangular image into an interactive projection. This makes it possible to view the nadir much like a normal photograph and makes it considerably easier to edit.


