- Requirements and server environment used
- Where can I find the security and setup warnings in Nextcloud?
- Preparations – Manage Nextcloud via SSH
- What is OCC at Nextcloud?
- Make a backup beforehand
- Nextcloud warning: Set start of maintenance window
- Configure maintenance windows via OCC
- Check maintenance window
- Nextcloud MIME type migrations available – fix bugs
- Perform MIME type migrations
- Nextcloud: Add missing database indexes
- Automatically create missing database indexes
- Nextcloud: Repair OCS provider resolution and OCM provider
- Check Apache2 Rewrite Module
- Check Apache2 AllowOverride
- Update Nextcloud .htaccess
- Override Nextcloud CLI URL
- Set Nextcloud public domain
- Correctly configure Nextcloud behind Nginx Proxy Manager
- What is trusted_domains?
- What is trusted_proxies?
- Configure HTTPS with overwrite protocol
- Nextcloud: Set default phone region
- Configure or disable Nextcloud AppAPI provisioning daemon
- What is an AppAPI deployment daemon?
- Disable AppAPI when not needed
- Enable Nextcloud two-factor authentication
- Make two-factor authentication mandatory
- Configure Nextcloud Server ID
- Check server ID
- Find and fix Nextcloud protocol errors
- Find Nextcloud log file
- Check Apache2 logs
- Common causes of Nextcloud log errors
- Set up Nextcloud cron jobs correctly
- Check Nextcloud cron job
- Update Nextcloud successfully – OCC Upgrade and Updater
- Check installed Nextcloud version
- Update Nextcloud via the command line
- Check maintenance mode after an upgrade
- Run additional maintenance commands after the update
- Check PHP version and PHP configuration
- Difference between PHP CLI and PHP in web server
- Accelerate Nextcloud with Redis and APCu
- Use APCu as local cache
- Using Redis for file locking
- Clean up Nextcloud trash and file versions
- Empty a user’s trash
- Remove old file versions
- Other important Nextcloud security and performance settings
- HTTPS and SSL certificates
- HTTP security header
- Check file permissions
- Protect Nextcloud data directory
- Maintain database regularly
- Frequently Asked Questions about Fixing Nextcloud Alerts
- Are all Nextcloud security alerts critical?
- Can Nextcloud warnings disappear after an update?
- What does No upgrade required mean at Nextcloud?
- Do you have to repair Nextcloud after every update?
- Does Nextcloud absolutely need Redis?
- Can you run Nextcloud without Docker?
- Do you have to restart Apache2 after making changes to the config.php?
Anyone who runs Nextcloud on their own server will regularly find various security and setup warnings in the administration settings. These appear, for example, after an update, a change to the server configuration or when new functions have been added.
Not every warning automatically means that Nextcloud is unsafe or not working properly. Often these are missing configuration entries, additional database indexes, incomplete migrations or problems with the web server. Nevertheless, you should not permanently ignore the messages, as some of them can affect the security, performance or reliability of your Nextcloud installation.
In my case, I run Nextcloud on an Ubuntu server inside a Proxmox LXC container. Apache2, PHP and the other required components are installed directly under Ubuntu. For access via the Internet, I also use the Nginx Proxy Manager as a reverse proxy.
After updating to Nextcloud 34.0.5, I started seeing various security and setup warnings. These include missing database indexes, MIME type migrations, problems with .well-known URLs and an unconfigured maintenance time.
In this guide I will show you how to fix these Nextcloud warnings, which OCC commands are needed and what you should pay particular attention to when installing behind a reverse proxy.
Requirements and server environment used
The following steps apply to a manually installed Nextcloud instance on Ubuntu.
As an example I use the following server configuration:
| component | Environment used |
|---|---|
| Virtualization | Proxmox VE |
| container | Ubuntu LXC |
| Cloud software | Nextcloud 34.0.5, upgraded to 35.0.2 |
| Web server | Apache2 |
| PHP | PHP 8.4 |
| database | MariaDB or MySQL |
| Reverse proxy | Nginx proxy manager |
| HTTPS | Via the reverse proxy |
| Nextcloud directory | /var/www/html |
| Web server user | www-data |
Most commands also work on Debian or an Ubuntu server that was installed directly on a PC or virtual machine.
For Docker installations, Nextcloud AIO or Snap packages, the directories and required commands may differ.
It is also important that the PHP version used and the database are within the system requirements of the installed Nextcloud version.
Where can I find the security and setup warnings in Nextcloud?
The messages can be found directly in the Nextcloud web interface.
To do this, log in with an administrator account and open the administrative settings via the profile menu.
Then go to the Overview menu item.
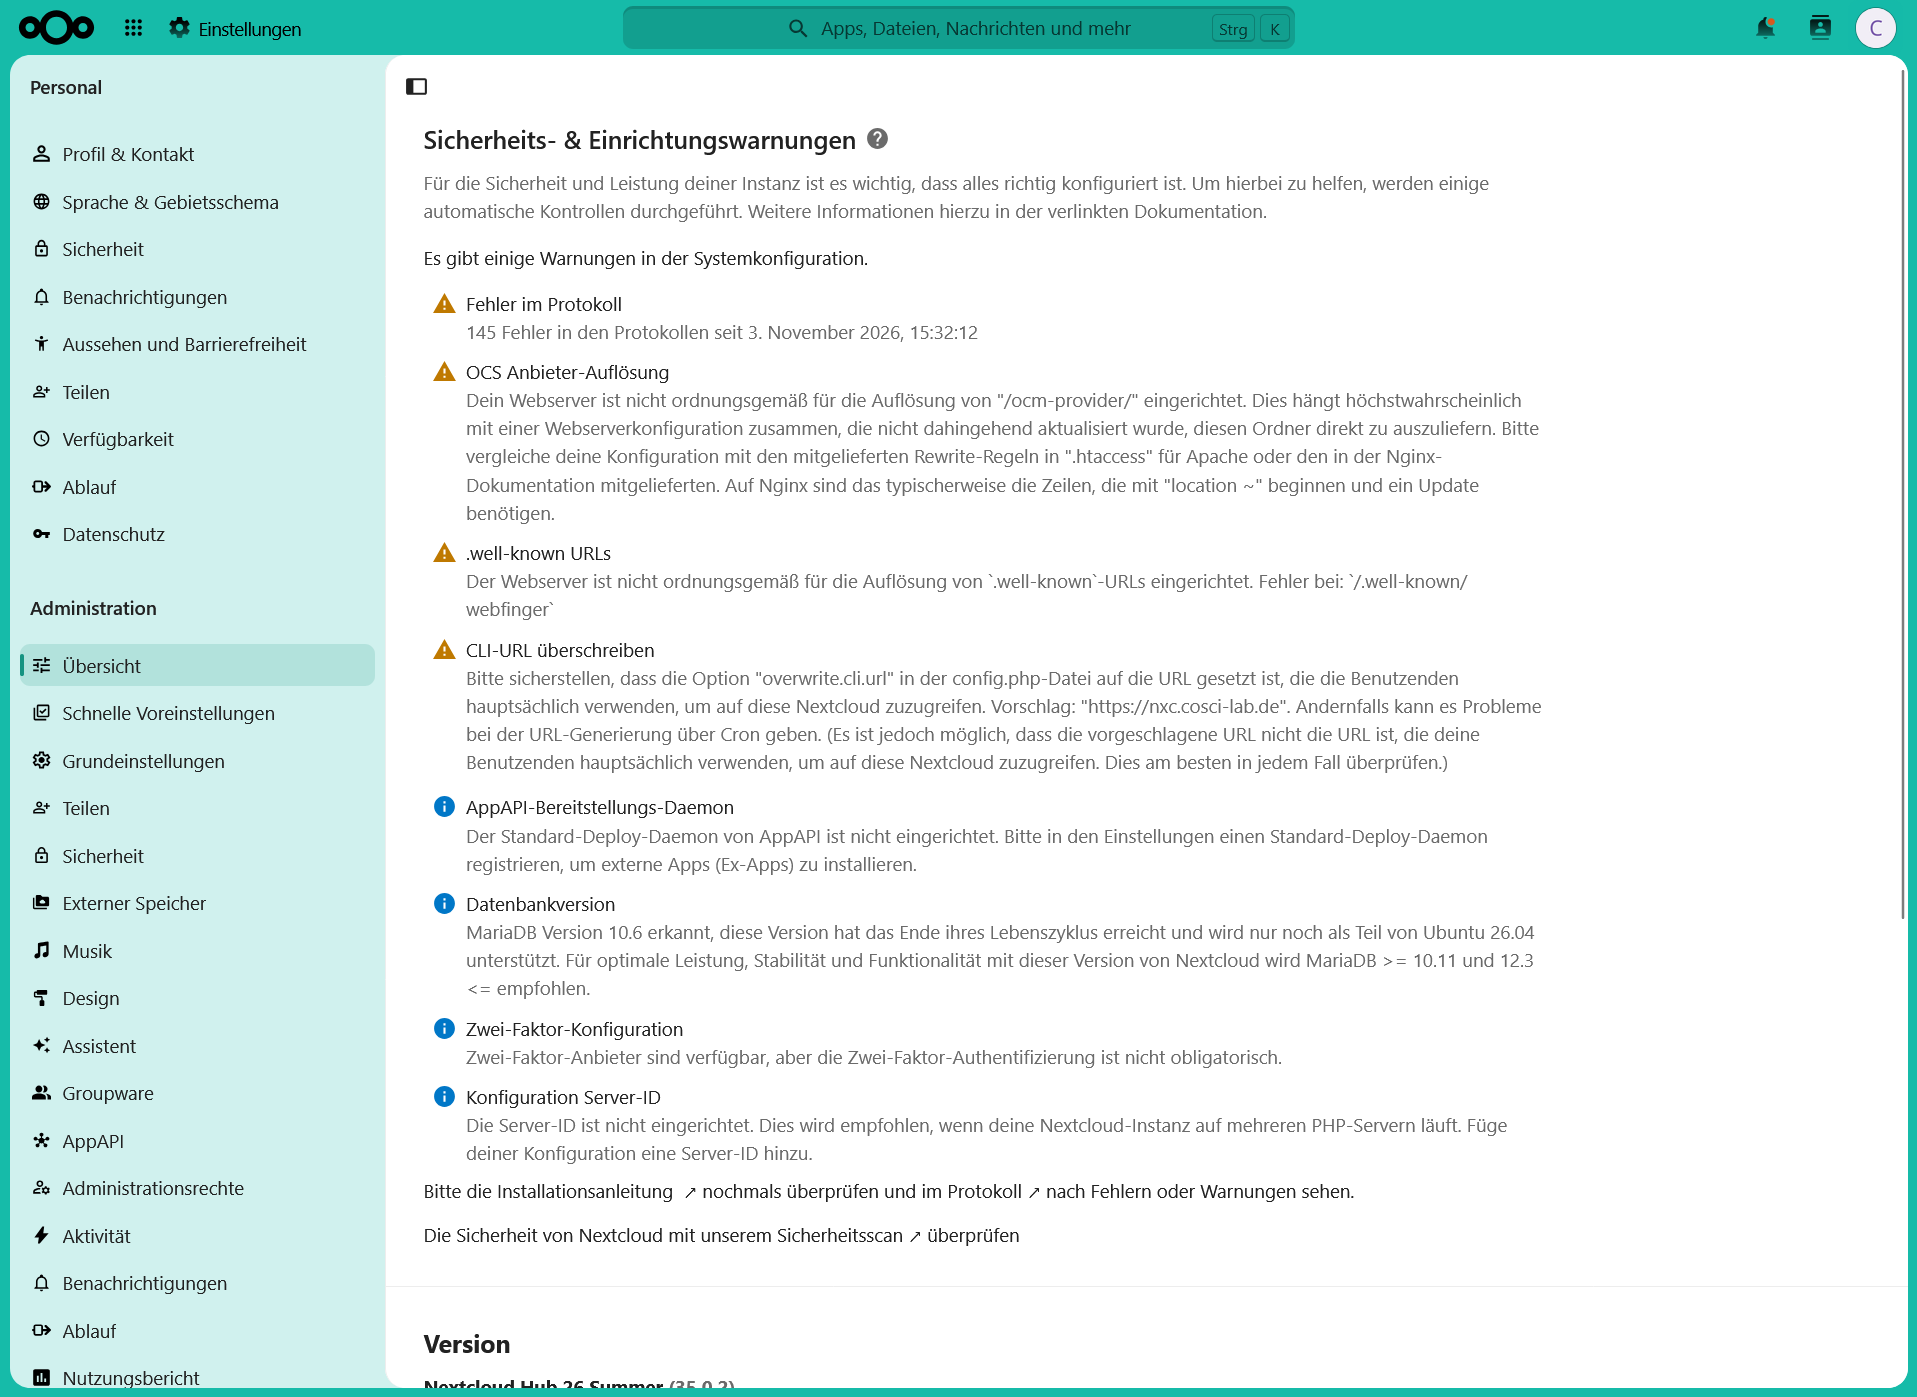
Nextcloud carries out various automatic checks there. Among other things, the database, the web server, the security settings, background tasks and certain functions of the installed apps are checked.
Nextcloud differentiates between warnings and notices.
Yellow warning symbols indicate configuration problems that should be checked or corrected. Blue information icons, on the other hand, often indicate recommended or optional settings.
Typical messages are:
| Error message | Caused | Solution |
|---|---|---|
| Error in protocol | Errors caused by apps, PHP, database or background jobs | Investigate logs |
| Start of the maintenance window | No start time for maintenance tasks | Configure maintenance windows |
| MIME type migrations available | Additional file type migrations required | Execute repair command |
| OCS provider resolution | Web server does not process /ocm-provider/ correctly | Check Apache configuration |
.well-known URLs | Missing or incorrect redirects | Configure Apache or reverse proxy |
| Missing database indexes | New indexes were not created automatically | Add indexes |
| Override CLI URL | Public Nextcloud address not stored | Set overwrite.cli.url |
| AppAPI deployment daemon | No deployment daemon set up | Configure or disable AppAPI |
| Two-factor configuration | 2FA not mandatory | Optionally activate |
| Default phone region | No standard country code | Set phone region |
| Configuration server ID | No fixed server ID available | Optionally set server ID |
The following sections explain each problem and show how to fix it.
Preparations – Manage Nextcloud via SSH
For many maintenance tasks you need access to the Nextcloud server terminal.
When installing within a Proxmox LXC container, you can open the console directly via the Proxmox web interface. Alternatively, you can connect to the Ubuntu server via SSH.
After logging in, go to the Nextcloud installation directory:
cd /var/www/htmlYou can then check whether Nextcloud is installed correctly using the following command:
sudo -u www-data php occ statusFor example, the output contains:
installed: true
version: 34.0.5.1
versionstring: 34.0.5
maintenance: false
needsDbUpgrade: false
Here you can see the currently installed Nextcloud version and whether the system is in maintenance mode.
The entry needsDbUpgrade: false means that the installed program files are no longer pending a database upgrade.
What is OCC at Nextcloud?
OCC stands for Nextcloud’s command line tool and is based on PHP.
Numerous administrative tasks can be carried out without having to open the web interface.
These include, for example:
- Nextcloud updates and database migrations
- Repairs and maintenance tasks
- Managing users and apps
- Configuring system settings
- Add missing database indexes
- Management of files and file versions
- Maintenance mode check
The OCC commands should normally be run with the web server user www-data on Ubuntu.
If you start it as root instead, you may risk incorrectly set file permissions.
If an error message regarding APCu appears during execution, you can instruct PHP to activate the cache via the command line:
sudo -u www-data php -d apc.enable_cli=1 occ statusFor the remaining examples I use the shorter notation. If APCu causes problems with individual OCC commands, the same parameter can be added.
Make a backup beforehand
Before a major Nextcloud update or a database repair, you should definitely create a complete backup.
This should contain at least the following components:
| ingredient | Meaning |
|---|---|
| Nextcloud program files | Files of the installed Nextcloud version |
config.php | Server settings and database connection |
| Nextcloud data directory | Uploaded files and user data |
| database | Users, file metadata, shares and apps |
| Web server configuration | Apache and, if necessary, PHP configuration |
Anyone who uses Proxmox can also create a snapshot or a complete container backup.
It should be noted that a snapshot of a running container does not necessarily guarantee a consistent backup of the database. For a reliable recovery, we recommend a coordinated backup of the database and the associated files.
Ideally, a backup should also be restored regularly for testing purposes.
Nextcloud warning: Set start of maintenance window
A common warning that appears is related to the unconfigured maintenance window.
Nextcloud regularly runs various background tasks. This includes, among other things, cleaning up old data, audits and other administrative tasks.
Some of these tasks may place greater strain on the database or server.
A maintenance window can be configured to ensure that such work is carried out outside of normal usage times.
Configure maintenance windows via OCC
The following command sets the maintenance window to 02:00 UTC:
sudo -u www-data php occ config:system:set maintenance_window_start --type=integer --value=2Nextcloud generally uses the UTC time zone for this.
In Germany this results in the following times:
| Time zone | Maintenance window |
|---|---|
| UTC | 02:00 to 06:00 |
| Germany winter time | 3:00 a.m. to 7:00 a.m |
| Germany summer time | 4:00 a.m. to 8:00 a.m |
The set value describes the starting hour of a four-hour time window.
However, this does not limit all background tasks to this time. The adjustment primarily affects less time-critical daily tasks.
Normal, time-critical cron jobs can continue to run outside of this time window.
Additionally, this setting only works if Nextcloud uses Cron background mode.
Check maintenance window
You can query the set value at any time:
sudo -u www-data php occ config:system:get maintenance_window_startWith the configuration described above, the output should be 2.
Nextcloud MIME type migrations available – fix bugs
After a Nextcloud update, the message occasionally appears that one or more MIME type migrations are available.
MIME types describe the content or format of a file.
Examples of this are:
| File type | MIME type |
|---|---|
| JPEG image | image/jpeg |
| PNG image | image/png |
| PDF document | application/pdf |
| MP4 video | video/mp4 |
| ZIP archive | application/zip |
Nextcloud uses such information to, among other things, recognize files, display appropriate thumbnails and associate them with applications.
Updates may add new MIME types or adjustments to existing mappings.
Since the migration can take longer for installations with many files, Nextcloud does not always carry out this automatically.
Perform MIME type migrations
To execute the available migrations, use the following OCC command:
sudo -u www-data php occ maintenance:repair --include-expensiveThe parameter --include-expensive ensures that more time-consuming repair work is also taken into account.
Depending on the size of the Nextcloud installation, the process may take some time.
For large installations, you should therefore run the command outside of peak usage time if possible.
Several steps are displayed during the repair, such as checking metadata, cleaning up old entries, or preparing background jobs.
It is important to let the process go through completely and not to stop it prematurely.
Nextcloud: Add missing database indexes
Another common warning is:
Indices are missing from the database
Database indexes help find specific records more quickly.
This is comparable to the table of contents of a book. Instead of having to search through all pages, the database can access specific information much more quickly using a suitable index.
For larger Nextcloud installations with many files, users or apps, missing indexes can negatively impact performance.
After an update or installing new apps, additional indexes may be required.
For example, in my case, Nextcloud reported missing index taskp_tasks_scheduled in table taskprocessing_tasks.
Automatically create missing database indexes
Nextcloud has its own OCC command for this:
sudo -u www-data php occ db:add-missing-indicesThis checks the existing indices and adds missing entries if they are recognized by Nextcloud.
For example, the output might look like this:
Adding additional taskp_tasks_scheduled index
to the oc_taskprocessing_tasks table,
this can take some time...

oc_taskprocessing_tasks table updated successfully.
The missing index has now been successfully created.
The process may take some time for larger tables and may temporarily put a strain on the database.
Therefore, if possible, index creation should not be carried out during periods of high server load.
Manual editing of the database using phpMyAdmin or direct SQL commands is usually not necessary for this standard warning.
Nextcloud: Repair OCS provider resolution and OCM provider
On some Nextcloud installations the following message appears:
OCS provider resolution
The description notes that the web server is not properly configured to call /ocm-provider/.
The OCM provider is part of the Open Cloud Mesh protocol and is used, among other things, for collaboration and sharing of resources between different cloud systems.
The name of the warning and the actual URL path affected can be a bit confusing. What is crucial here is the path specified by Nextcloud /ocm-provider/.
Often the cause is not Nextcloud itself, but rather an incorrect or outdated rewrite configuration of the web server.
Check Apache2 Rewrite Module
Since I use Apache2, I first check whether the required rewrite module is activated.
apache2ctl -M | grep rewriteIf no output appears, the module can be activated:
sudo a2enmod rewriteIn addition, the modules headers and env can be checked or activated:
sudo a2enmod headers
sudo a2enmod env
Then check the Apache configuration:
sudo apache2ctl configtestIf no errors are displayed, Apache2 can be reloaded:
sudo systemctl reload apache2Check Apache2 AllowOverride
In order for Apache2 to process the rewrite rules from Nextcloud’s .htaccess file, the corresponding directory configuration must allow this.
The setting is located in the main Apache configuration or in the VirtualHost file, depending on the installation.
On Ubuntu you can first view the active VirtualHosts:
apache2ctl -STypical configuration files are located at:
/etc/apache2/apache2.conf
/etc/apache2/sites-available/
For a Nextcloud installation directly in /var/www/html, the directory configuration can look like this:
<Directory /var/www/html>
    AllowOverride All
    Require all granted
</Directory>
It is important to make this setting in the VirtualHost actually used or in the relevant directory block.
Then test the configuration again and reload Apache2.
Update Nextcloud .htaccess
Nextcloud uses its own .htaccess file with different rewrite rules and security settings.
This can be regenerated or updated via OCC after certain configuration changes.
If Nextcloud is accessible directly under the domain and not in a subdirectory like /nextcloud, you can set the rewrite base as follows:
sudo -u www-data php occ config:system:set htaccess.RewriteBase --value="/"Then update the .htaccess:
sudo -u www-data php occ maintenance:update:htaccessBefore making any changes to the file, it is recommended to back up an existing individual configuration.
Important: Do not simply copy any files or directories from older Nextcloud versions. Especially with the OCM provider, the required files and rewrite rules can differ between versions.
If the warning continues to appear, you should also check whether the Apache configuration actually matches the installed Nextcloud version.
Override Nextcloud CLI URL
When installing behind a reverse proxy, the following warning occasionally appears:
Overwrite CLI URL
This is the Nextcloud setting overwrite.cli.url.
This determines which base address Nextcloud should use when generating URLs via command line processes or background tasks.
Without this setting, links may point to an internal IP address, an incorrect host name, or an unencrypted HTTP address, for example.
Set Nextcloud public domain
Assume that your own Nextcloud installation can be accessed at the following address:
https://cloud.example.deThen the CLI URL can be configured with this command:
sudo -u www-data php occ config:system:set overwrite.cli.url --value="https://cloud.example.de"You can then check the setting:
sudo -u www-data php occ config:system:get overwrite.cli.urlThe output should contain the previously configured address.
Correctly configure Nextcloud behind Nginx Proxy Manager
Additional settings are useful for a Nextcloud installation behind a reverse proxy.
The parameters trusted_domains, trusted_proxies and overwriteprotocol are particularly important.
These are located in the Nextcloud configuration file:
/var/www/html/config/config.phpWhat is trusted_domains?
With trusted_domains you specify under which host names Nextcloud can be reached.
This includes, for example, the public domain:
'trusted_domains' => [
    'cloud.example.de',
],
This setting should not be confused with trusted_proxies.
What is trusted_proxies?
At trusted_proxies you store the IP addresses of the reverse proxies that Nextcloud trusts.
This allows Nextcloud, for example, to determine a visitor’s actual IP address via the corresponding proxy headers.
An example:
'trusted_proxies' => [
    '192.168.1.10',
],
The IP address must be replaced with the actual IP address of the Nginx Proxy Manager.
Important: Only trustworthy reverse proxies should be entered. The setting should not be extended across the board to all IP addresses.
Otherwise, under certain circumstances, attackers can manipulate headers and submit false client IP addresses.
Configure HTTPS with overwrite protocol
If HTTPS is terminated on the Nginx Proxy Manager and Apache2 receives the requests internally via HTTP, Nextcloud may be able to detect the wrong protocol.
In this case the setting helps:
'overwriteprotocol' => 'https',This means that Nextcloud uses the HTTPS protocol for generated URLs.
This is particularly important if links within the web interface or in notifications incorrectly begin with http://.
Additionally, overwritehost can be used if necessary. However, this setting is usually not necessary if the reverse proxy forwards the host header correctly.
The existing config.php should not be completely replaced by an example configuration as it contains other important settings and access data.
Nextcloud: Set default phone region
If Nextcloud reports that a default phone region has not been set up, the default_phone_region setting is missing.
This determines which country code should be accepted for telephone numbers without an explicit international code.
For Germany the ISO country code DE is used.
The setting can be set directly via OCC:
sudo -u www-data php occ config:system:set default_phone_region --value="DE"You can then check them:
sudo -u www-data php occ config:system:get default_phone_regionThe command should return DE.
Alternatively, the setting can be stored in the config.php:
'default_phone_region' => 'DE',This setting is particularly useful when managing user profiles with telephone numbers.
Configure or disable Nextcloud AppAPI provisioning daemon
Newer Nextcloud versions support so-called external apps, or ex-apps for short.
These can provide additional functionality and run outside of the actual Nextcloud PHP process.
Nextcloud uses the AppAPI for this.
If AppAPI is activated but no suitable deployment daemon has been set up, a corresponding note appears in the administration overview.
What is an AppAPI deployment daemon?
A deployment daemon is responsible for deploying and managing external apps.
Depending on the solution used, additional services or containers may be required.
For example, HaRP is available for newer Nextcloud versions.
The AppAPI warning does not mean that the normal Nextcloud functions such as file synchronization, calendar or contacts no longer work.
Disable AppAPI when not needed
If you don’t want to use external apps, you can deactivate AppAPI.
To do this you use the following command:
sudo -u www-data php occ app:disable app_apiThis will deactivate the corresponding Nextcloud app.
However, this should only be done if no installed functions depend on AppAPI.
Alternatively, you can register a suitable deployment daemon under the AppAPI administration settings and set it as the default.
Enable Nextcloud two-factor authentication
Another message indicates that while two-factor authentication providers exist, their use is not mandatory.
With two-factor authentication, also known as 2FA, the normal password alone is not enough to log in.
In addition, for example, a time-limited numerical code is required, which is generated via an authenticator app.
This reduces the risk of unauthorized access if a password becomes known.
Nextcloud supports different methods for this, including TOTP apps and other authentication methods.
Make two-factor authentication mandatory
Mandatory two-factor authentication can be activated via the Nextcloud web interface under the administration settings in the Security area.
Alternatively, you can activate it via OCC.
For all users:
sudo -u www-data php occ twofactorauth:enforce --onTo enable mandatory use only for members of the Administrator group:
sudo -u www-data php occ twofactorauth:enforce --on --group=adminIt is important to ensure that the affected users have already set up a suitable authentication method or can set it up the next time they log in.
It is also advisable to generate recovery codes and store them safely.
If you lose your smartphone and have not set up an alternative login option, you could otherwise lose access to your own account.
For publicly accessible Nextcloud installations, securing administrator accounts is particularly recommended.
Configure Nextcloud Server ID
Since Nextcloud 33, a process for generating unique identifiers based on so-called Snowflake IDs has been used for certain functions.
Such an ID can contain, among other things, information about the time of creation and the server that created it.
For installations with multiple PHP servers, it makes sense or is necessary for them to use different server IDs.
The setting is called serverid.
Check server ID
You can display the existing value with the following command:
sudo -u www-data php occ config:system:get serveridIf there is no server ID yet, you can use the value 1 for a single PHP server, for example:
sudo -u www-data php occ config:system:set serverid --type=integer --value=1Integer values between 0 and 511 are permitted.
It is important that if there are multiple PHP servers, each instance uses its own ID.
Once server IDs have been set, they should not be changed if possible, as they are part of the generated identifiers.
For a small Nextcloud installation with just one web server, this notice is usually less critical than incorrect HTTPS settings or database problems.
Find and fix Nextcloud protocol errors
Nextcloud often shows errors from the past few days in the administration overview.
For example, several dozen or even hundreds of errors can be reported.
However, the number alone says little about the actual cause.
A single error can occur multiple times due to a regularly running background job.
Likewise, after an update, older log entries may still exist even though the actual problem has already been resolved.
Find Nextcloud log file
By default, the Nextcloud log file is named:
nextcloud.logIt is usually located in the configured Nextcloud data directory unless a different log path has been specified.
The data directory can be read out via OCC:
sudo -u www-data php occ config:system:get datadirectoryYou can then display the last 100 lines of the log file:
tail -n 100 /PFAD/ZUM/DATENVERZEICHNIS/nextcloud.logThe example path must be adjusted accordingly.
For Nextcloud installations with very large log files, you should not output the entire file at once.
Instead, it is advisable to specifically search for error messages or examine the latest entries.
Check Apache2 logs
If the error is related to Apache2 or PHP, the Apache error log may also be helpful.
On Ubuntu it is often located here:
/var/log/apache2/error.logThe latest entries can be viewed as follows:
sudo tail -n 100 /var/log/apache2/error.logAlternatively, you can access the current Apache messages via the system journal:
sudo journalctl -u apache2 -n 100 --no-pagerIf Nextcloud is operated behind a reverse proxy, you should also check the reverse proxy logs in case of connection problems.
HTTP status codes such as 403, 404, 502 or 504 are particularly helpful.
Common causes of Nextcloud log errors
| Error type | Possible cause |
|---|---|
| PHP error | Incompatible app or missing PHP module |
| Database error | Connection problem, query error or incorrect migration |
| HTTP 404 | Wrong path or rewrite rule |
| HTTP 502 | Backend web server not reachable |
| HTTP 504 | Timeout between proxy and backend |
| Permission error | Incorrect file permissions |
| Cron error | Background job failed |
| Redis error | Cache server not reachable |
Especially after major updates, it is advisable to check the logs again.
Individual warnings should not be hidden simply by deleting or resetting the log file.
Set up Nextcloud cron jobs correctly
In order for Nextcloud to function reliably over the long term, various background tasks must be carried out regularly.
AJAX, Webcron and Cron are available for this purpose.
For a self-operated Linux server, it is usually recommended to use a real cron job.
This works regardless of whether someone has currently opened the web interface.
Check Nextcloud cron job
On Ubuntu you can view the web server user’s existing cron jobs with the following command:
sudo crontab -u www-data -lA typical Nextcloud cron job looks like this:
*/5 * * * * /usr/bin/php -f /var/www/html/cron.phpThis will cause Nextcloud’s cron.php to run every five minutes.
If APCu needs to be activated for PHP-CLI, the call can be adapted accordingly:
*/5 * * * * /usr/bin/php -d apc.enable_cli=1 -f /var/www/html/cron.phpYou can edit the cron job with the following command:
sudo crontab -u www-data -eIt is important to adapt the installation path to your own environment.
If you have already set up a systemd timer for Nextcloud, you should not also use the same cron job.
Otherwise, background tasks may be started multiple times unnecessarily.
Also, in the Nextcloud management settings, you should check whether the background mode is set to Cron.
Update Nextcloud successfully – OCC Upgrade and Updater
For larger Nextcloud updates, there is an important difference between the actual updater and the OCC command upgrade.
The updater takes care of downloading and exchanging the Nextcloud program files.
The occ upgrade command, on the other hand, carries out the database migrations and further upgrade steps required for the installed version.
Check installed Nextcloud version
The following command displays the installed version:
sudo -u www-data php occ statusFor example, if it still says versionstring: 34.0.5, Nextcloud 34.0.5 is installed.
Even if Nextcloud 35.0.2 is already offered in the administration area, that does not mean that this version is already installed.
Update Nextcloud via the command line
For a manual installation, the integrated command line updater can be used:
cd /var/www/htmlAfterward:
sudo -E -u www-data php -d apc.enable_cli=1 updater/updater.pharThe updater checks the installation and then takes you through the necessary steps.
After exchanging the program files, he can also start the actual OCC upgrade.
If this step has not yet been carried out, you can call it manually:
sudo -E -u www-data php -d apc.enable_cli=1 occ upgradeIf the message No upgrade required appears, no further upgrade migrations are required for the currently installed Nextcloud files.
However, this does not automatically mean that the latest available version is already installed.
Check maintenance mode after an upgrade
After a successful upgrade, you should check whether Nextcloud has left maintenance mode:
sudo -u www-data php occ statusIf maintenance: false is displayed, maintenance mode is disabled.
If Nextcloud remains in maintenance mode after a fully completed upgrade, this can be deactivated manually if necessary:
sudo -u www-data php occ maintenance:mode --offYou should not run this command while an update or database migration is still in progress.
Run additional maintenance commands after the update
After a successful update, the following commands may be useful:
sudo -u www-data php occ maintenance:repair --include-expensivesudo -u www-data php occ db:add-missing-indicesThis means that further repairs are carried out and, if necessary, missing database indexes are added.
If possible, major repair work should take place during a planned maintenance period.
Check PHP version and PHP configuration
Nextcloud requires a PHP installation that matches the respective version.
Which PHP versions are supported depends on the Nextcloud version used.
For example, Nextcloud 35 supports PHP 8.4.
You can view the installed PHP version via the terminal:
php -vYou can also check which PHP modules are active:
php -mThe important or frequently used modules include:
| PHP module | use |
|---|---|
curl | HTTP requests |
gd | Image processing |
imagick | Advanced image processing |
intl | Language and character processing |
mbstring | Processing text |
mysqli / pdo_mysql | MariaDB and MySQL connection |
redis | Cache and file locks |
apcu | Local cache |
zip | ZIP files |
xml | XML processing |
opcache | Accelerating PHP |
Not all modules are mandatory for every Nextcloud installation.
Which ones are actually needed depends, among other things, on the database and the apps installed.
Difference between PHP CLI and PHP in web server
An important point is that the PHP version in the terminal does not necessarily match the PHP version used in the web server.
For example, under Ubuntu, multiple PHP versions can be installed in parallel.
While php -v shows the version of the command line, Apache2 can use a different version via its own PHP module or PHP-FPM.
To check, you can, for example, do the following:
apache2ctl -M | grep phpIf PHP-FPM is used, the corresponding PHP-FPM service should also be checked.
The configuration files also differ.
Typical paths on Ubuntu are:
/etc/php/8.4/cli/php.ini
/etc/php/8.4/apache2/php.ini
/etc/php/8.4/fpm/php.ini
Not every one of these files has to be present on every server.
After changing PHP settings, Apache2 or PHP-FPM may need to be restarted or reloaded.
Accelerate Nextcloud with Redis and APCu
In addition to fixing security warnings, it is also worth taking a look at the performance of your own Nextcloud installation.
Caching systems can improve speed, especially in installations with many files or multiple users logged in at the same time.
Nextcloud supports APCu and Redis, among others.
APCu is suitable as a fast local cache for PHP.
Redis can additionally be used for a distributed cache and file locking.
Use APCu as local cache
If APCu is not yet installed, you can install the module under Ubuntu with the following command, for example:
sudo apt install php-apcuThe following entry can then be stored in the Nextcloud configuration:
'memcache.local' => '\OC\Memcache\APCu',Using Redis for file locking
Redis can be installed on Ubuntu via the package manager:
sudo apt install redis-server php-redisThen check whether the Redis service is running:
systemctl status redis-serverFor example, in the Nextcloud configuration, Redis can be set up like this:
'memcache.local' => '\OC\Memcache\APCu',

'memcache.distributed' => '\OC\Memcache\Redis',

'memcache.locking' => '\OC\Memcache\Redis',

'redis' => [
    'host' => '127.0.0.1',
    'port' => 6379,
],
The example assumes that Redis is running on the same server and can be reached via the local address.
If there is an external Redis server or a connection via a Unix socket, the configuration must be adjusted.
It should also be ensured that Redis cannot be accessed unprotected from the Internet.
Using Redis for file locking is particularly interesting when synchronizing many files or transferring large amounts of data on a regular basis.
Clean up Nextcloud trash and file versions
Over time, Nextcloud can accumulate numerous deleted files and older file versions.
These take up additional storage space and can amount to several gigabytes for larger installations.
Nextcloud comes with its own maintenance commands for this.
Empty a user’s trash
To empty a specific user’s trash, use:
sudo -u www-data php occ trashbin:cleanup BENUTZERNAMEBENUTZERNAME must be replaced with the corresponding Nextcloud user ID.
Remove old file versions
Saved file versions can also be cleaned up using OCC:
sudo -u www-data php occ versions:cleanup BENUTZERNAMEAttention: These commands delete existing trash contents or saved file versions of the specified user. This data can then no longer be restored in the normal way via Nextcloud.
They should therefore not simply be carried out regularly without checking them first.
In particular, versions:cleanup not only removes particularly old versions, but also the file versions captured by the command.
For automatically limiting storage usage, Nextcloud retention rules are usually a better solution.
Other important Nextcloud security and performance settings
In addition to the warnings already described, there are a few settings that you should check regularly on a self-operated Nextcloud server.
HTTPS and SSL certificates
A publicly accessible Nextcloud installation should always be accessed via HTTPS.
If you use Nginx Proxy Manager, you can, for example, set up a Let’s Encrypt certificate and activate redirection from HTTP to HTTPS.
It is important that the certificate is valid and is automatically renewed.
You should also check whether Nextcloud itself correctly recognizes the public HTTPS address.
HTTP security header
Another important point is HTTP security headers.
This includes, for example, Strict-Transport-Security, HSTS for short.
This header tells the browser that a website should only be accessed via HTTPS in the future.
When installing with Nginx Proxy Manager, HSTS can be set directly on the reverse proxy, depending on the configuration.
Before you activate HSTS, you should make sure that HTTPS works correctly over the long term.
Check file permissions
Issues with file permissions can cause Nextcloud to be unable to write files or updates to fail.
When installing Ubuntu manually, the web server user should have access to the required directories.
However, you should not give all files write permissions for all users.
In particular, permissions like 777 are not a sensible solution and can pose a security risk.
Protect Nextcloud data directory
If possible, the data directory should be located outside of the publicly accessible web directory.
This reduces the risk of files being accessed directly over the Internet due to an incorrect web server configuration.
If the data directory is within the webroot, the access protection rules provided by Nextcloud must work correctly.
Changing the data directory should not be done without prior planning and complete data backup.
Maintain database regularly
The database should also be checked regularly.
The following are important, among other things:
- Sufficient free storage space
- A supported database version
- Regular backups
- Working database connections
- Missing indexes after updates
- Adequate memory and cache settings
Especially with heavily used Nextcloud installations, the database can become very large over time.
In such cases, it may make sense to analyze the database tables and stored information in more detail rather than solely providing additional CPU cores or memory.
Frequently Asked Questions about Fixing Nextcloud Alerts
Are all Nextcloud security alerts critical?
No. Some warnings indicate specific security issues, while others simply concern additional configurations or recommended optimizations.
Nevertheless, you should check every message at least once and understand the cause.
Can Nextcloud warnings disappear after an update?
Yes. Some messages arise from incompletely completed migrations or outdated configurations.
However, other warnings can only be resolved through manual adjustments to Apache2, PHP, the database or the reverse proxy.
What does No upgrade required mean at Nextcloud?
This message means that no further database upgrades are necessary for the currently installed Nextcloud executables.
It does not automatically mean that the latest available Nextcloud version has already been installed.
The actual version can be checked with occ status.
Do you have to repair Nextcloud after every update?
No. Normally Nextcloud carries out the required standard migrations itself.
However, certain complex tasks are deliberately not always carried out automatically.
If appropriate warnings are displayed, additional OCC commands may be required.
Does Nextcloud absolutely need Redis?
No. Smaller Nextcloud installations can also be operated without Redis.
However, Redis can improve reliability and performance, especially with frequent file access and multiple users.
Can you run Nextcloud without Docker?
Yes. Nextcloud can be fully installed on a Linux server without the need for Docker.
This requires, among other things, a compatible web server, PHP and a supported database.
The installation can be done on a regular Ubuntu server, a virtual machine or within an LXC container.
Do you have to restart Apache2 after making changes to the config.php?
Not fundamentally. The Nextcloud configuration file is processed by PHP, so many changes take effect without restarting the web server.
However, if Apache modules, VirtualHosts or PHP settings are changed, a reload or restart may be necessary.