- What is Autohotkey?
- Why I Use Autohotkey
- My Most Useful Autohotkey Scripts
- 1. Open Windows Terminal
- 2. Control Volume with Mouse
- 3. Switch between Tabs in you Browser or Windows Explorer
- 4. Move Windows on your Desktop, switch between Windows Virtual Desktops or Zoom in Documents
- 5. Control Media Volume with the Numpad on your Keyboard
- Autohotkey Commands Explained
- Advantages of Autohotkey
- Useful Tips for Getting Started
- FAQ – Frequently Asked Questions About Autohotkey
For several years now, I’ve been using a tool that has made my daily workflow on all my computers and laptops much easier: Autohotkey.
I first discovered it while searching for an alternative to Logitech Options, the official software used to customize the button functions on my Logitech MX Master 3 and MX Master 3S (*).
While Logitech Options offers many features, I found the software too bloated. I had to install it on every computer just to use my mouse shortcuts. In addition, some applications such as DaVinci Resolve had compatibility issues — shortcuts sometimes didn’t work until I closed the Logitech software completely. So I started looking for a more flexible solution and found exactly that in Autohotkey.
What is Autohotkey?
Autohotkey (AHK) is a free, open-source scripting tool for Windows that lets you create your own custom keyboard and mouse shortcuts.
Essentially, it’s a lightweight scripting language that automates Windows input and actions. With it, you can:
- Create shortcuts for keyboard and mouse
- Execute complex actions with a single keypress
- Automatically complete text snippets
- Launch programs or move windows
- Control media functions (volume, playback, etc.)
The best part? You’re not limited to a specific device. While Logitech Options only works with Logitech hardware, Autohotkey supports virtually any mouse, keyboard, or even game controller.
Why I Use Autohotkey
I use Autohotkey both personally and professionally — mainly to work more efficiently.
I’ve configured my mouse and keyboard to perform many tasks faster, without needing extra software running in the background.
For example, I control my system volume with my mouse’s side buttons or switch between browser and Explorer tabs using a combination of mouse buttons.
On the keyboard, I open Windows Terminal with a simple shortcut — either normally or with admin privileges.
I also use my numpad to adjust the system volume in 10% increments.
My script runs automatically at system startup, stored in the Windows Autostart folder, which you can quickly open by typing shell:startup in the Explorer address bar.
My Most Useful Autohotkey Scripts
You can download the full script from here or from pastebin (or here from a sponsored link with ads to support my blog)
1. Open Windows Terminal
With CTRL+ALT+T, I open Windows Terminal; with CTRL+ALT+SHIFT+T, it launches as administrator:
; Windows Terminal
; STRG+ALT
^!T::
WinActivate Program Manager ; desktop
RUN wt.exe
return
; Windows Terminal Elevated/Admin User
; STRG+ALT+SHIFT
^!+T::
WinActivate Program Manager ; desktop
RUN *RunAs wt.exe
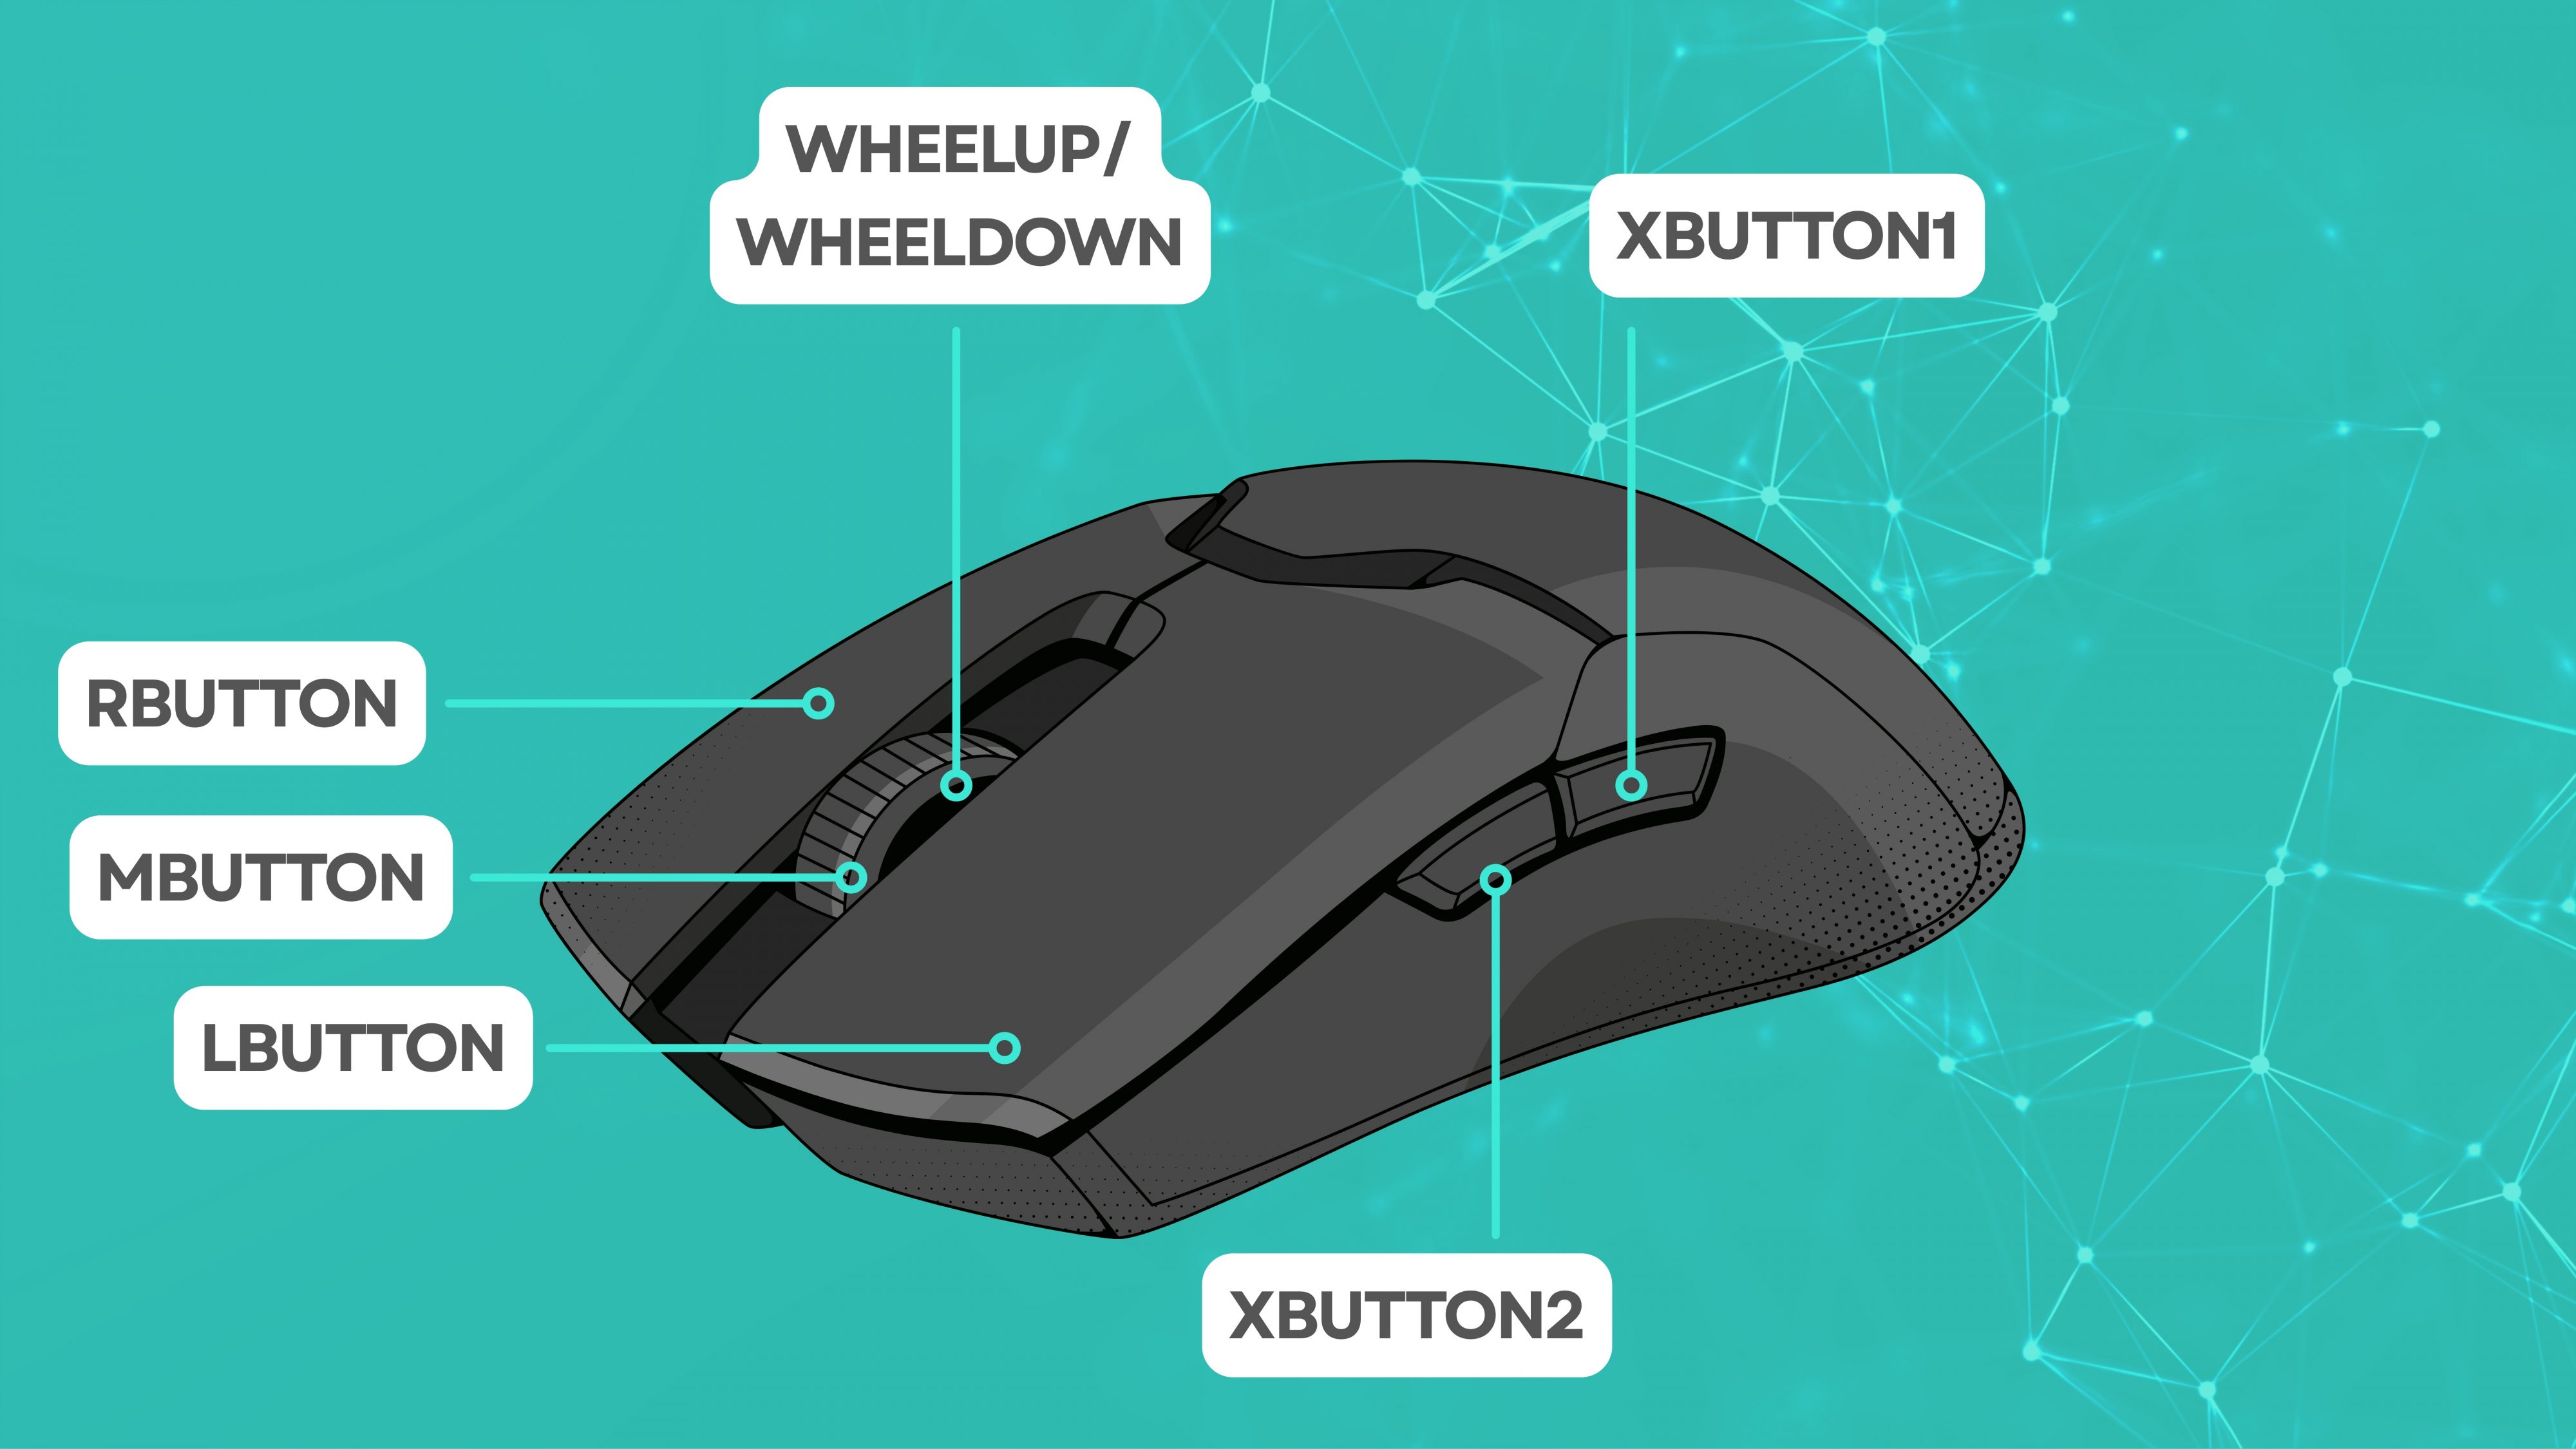
return2. Control Volume with Mouse
The side buttons on my Logitech mouse are configured to adjust the system volume:
; Mouse Forward - Volume Up
XButton2::
    Send {Volume_Up}
; SoundSet,+5 ;Volume +5
; while(GetKeyState("XButton2","P")){
;     Send {Volume_Up}
;     Sleep, 100
; }
return

; Mouse Back - Volume Down
XButton1::
	Send {Volume_Down}
	; SoundSet,-5 ;Volume -5
return
3. Switch between Tabs in you Browser or Windows Explorer
Hold a side button and click left or right to move between tabs:
; Mouse Thumb Forward - Tab Right
XButton2 & LButton::
    while(GetKeyState("XButton2","P") && GetKeyState("LButton","P")){
        Send ^+{Tab}
        Sleep, 400
    }
return

; Mouse Thumb Forward - Tab Left
XButton2 & RButton::
    while(GetKeyState("XButton2","P") && GetKeyState("RButton","P")){
        Send ^{Tab}
        Sleep, 400
    }
return

; Mouse Thumb Forward - Reload
XButton2 & MButton::
	Send ^R
return

; Mouse Thumb Back - Close Tab
XButton1 & MButton::
    ;Send ^W
	Send ^{F4}
return
4. Move Windows on your Desktop, switch between Windows Virtual Desktops or Zoom in Documents
Use your mouse wheel and side buttons to switch windows or virtual desktops:
; Mouse Thumb Back - Virtual Desktop Left
XButton1 & LButton::
    Send #^{LEFT}
return

; Mouse Thumb Back - Virtual Desktop Right
XButton1 & RButton::
    Send #^{Right}
return

; Wheel Up - Move Window Left
XButton2 & WheelUp::
	Send #{LEFT}
return

; Wheel Down - Move Window Right
XButton2 & WheelDown::
	Send #{RIGHT}
return

; Wheel Up - Zoom in
XButton1 & WheelUp::
	Send ^{WheelUp}
return

; Wheel Down - Zoom out
XButton1 & WheelDown::
	Send ^{WheelDown}
return
5. Control Media Volume with the Numpad on your Keyboard
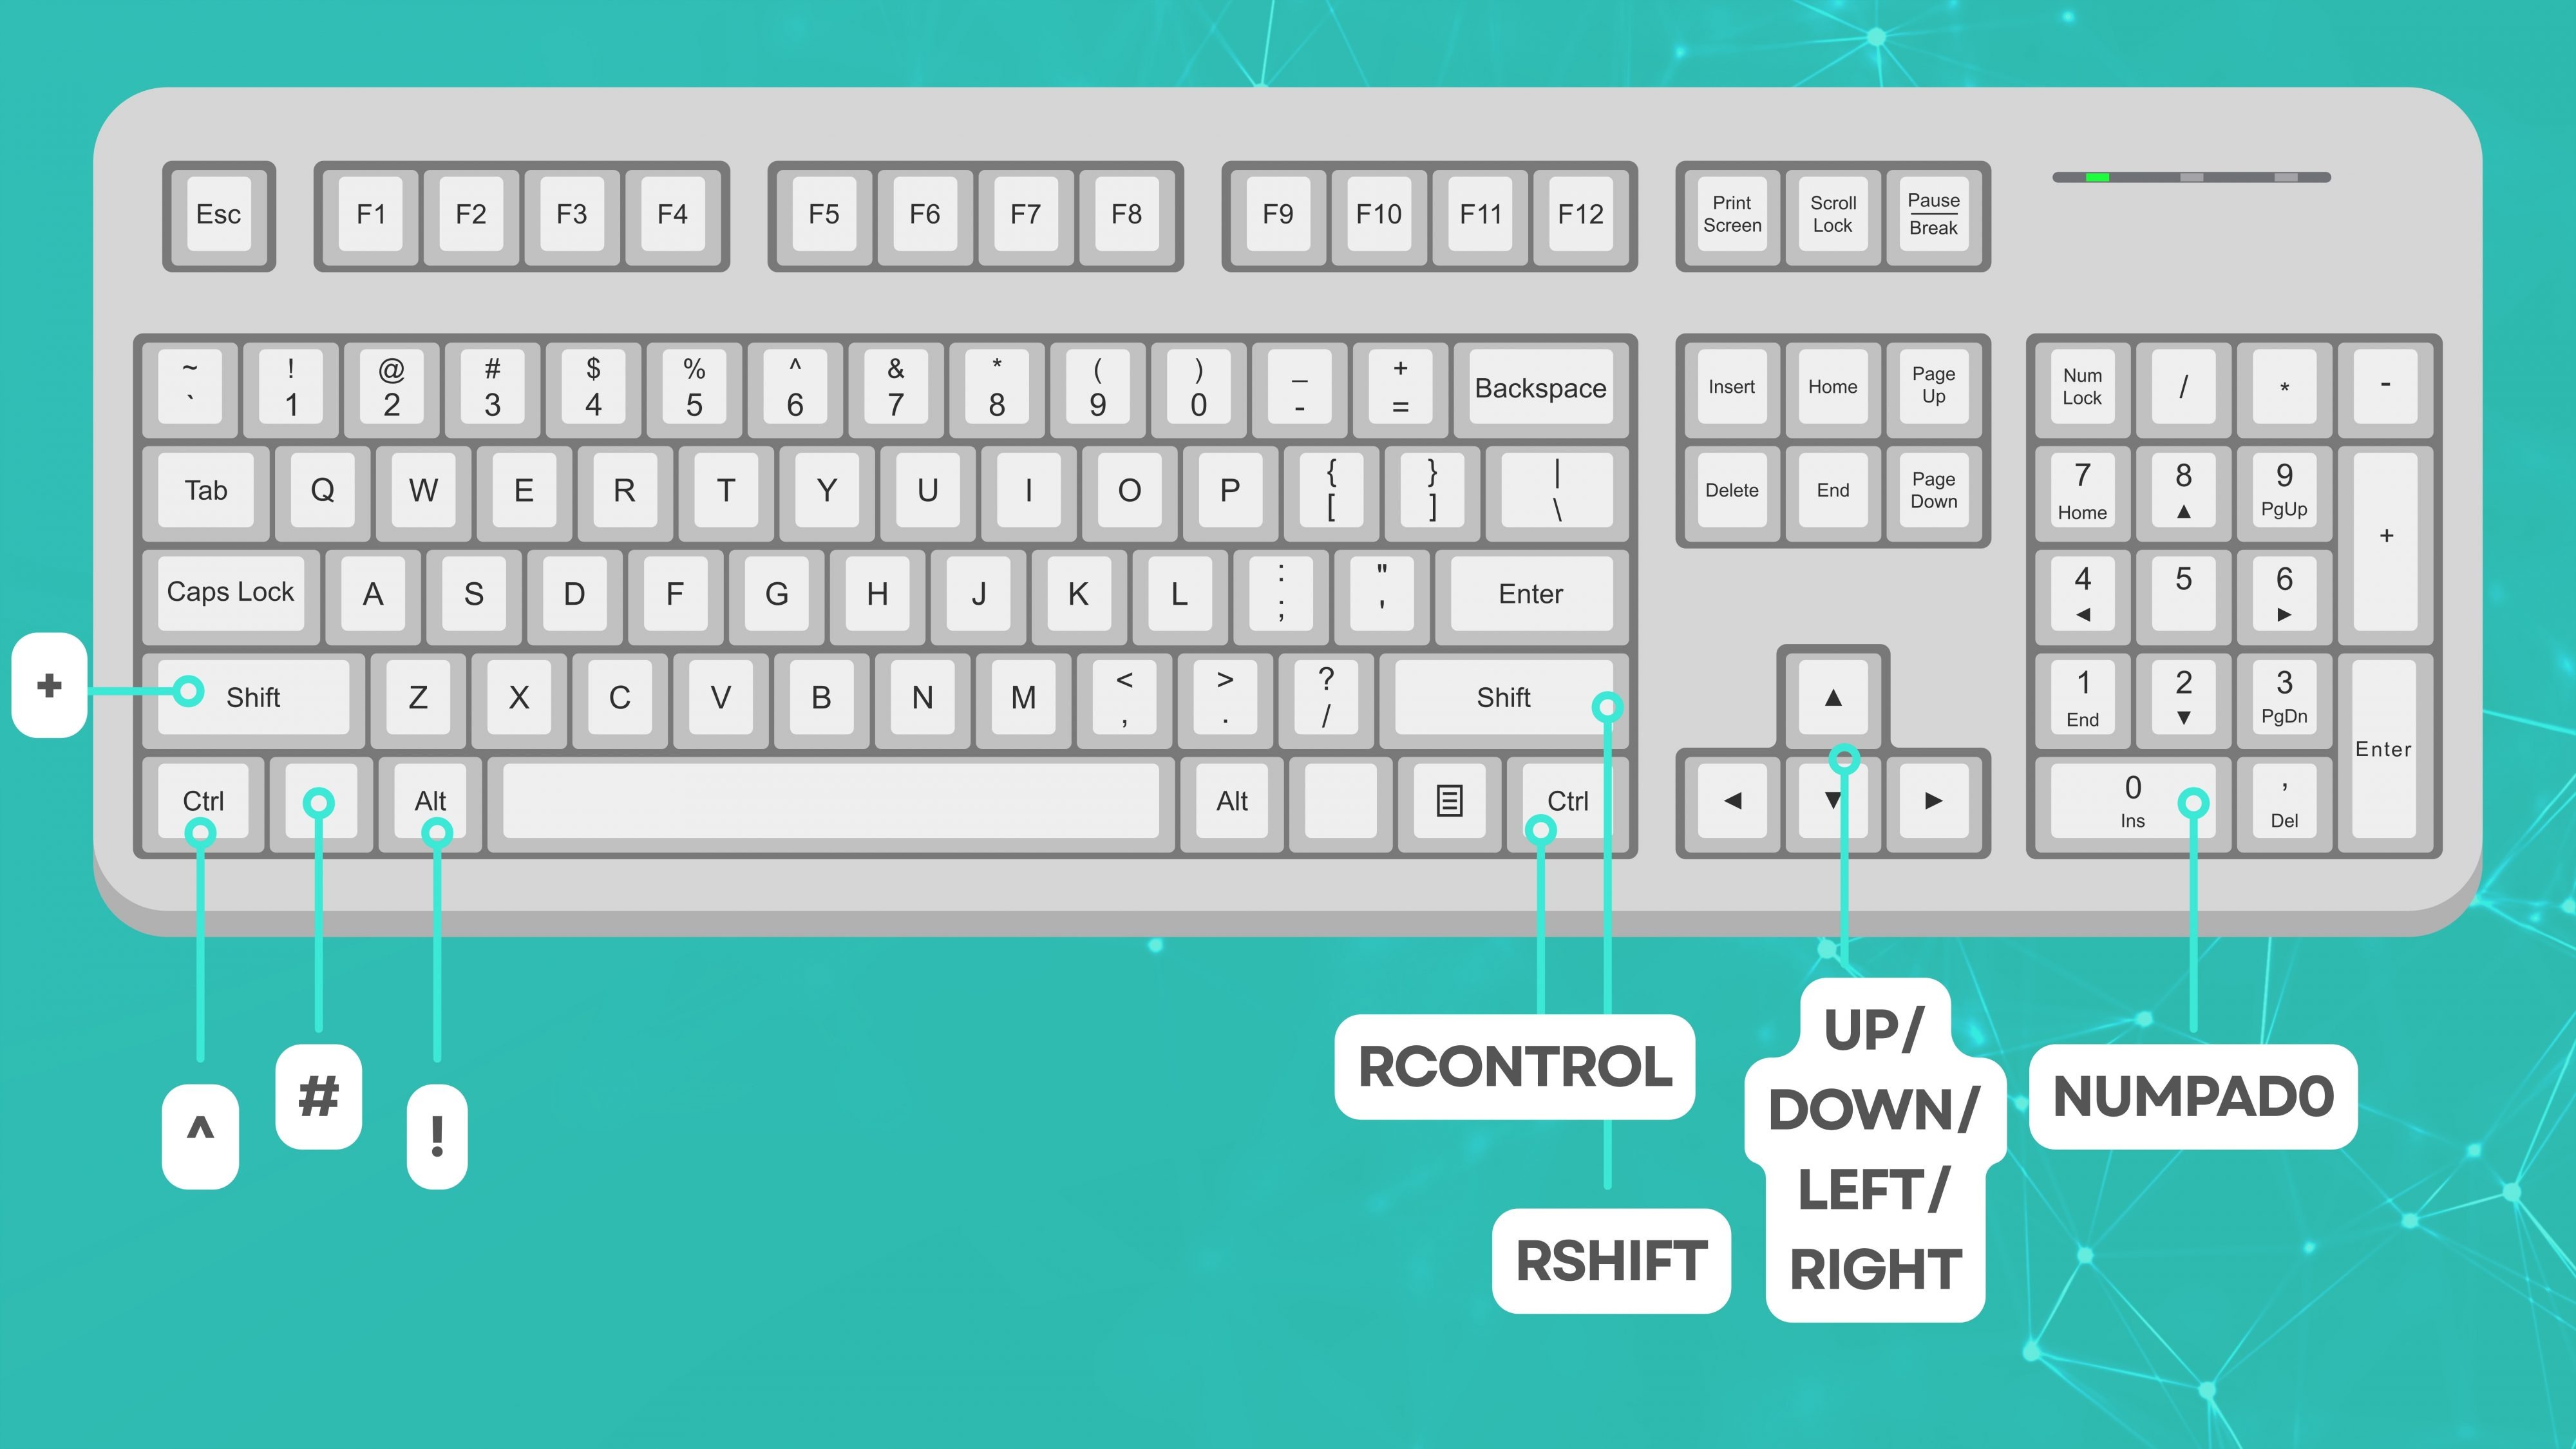
With WIN+CTRL+NUMPAD, I adjust system volume in 10% increments:
#^Numpad0::
	SoundSet,0 ; set Volume to 0
	Send {Volume_Mute} ; Volume mute
        ; SoundSet,0 ; Volume mute
return

#^Numpad1::
	Send {Volume_Up} ; show Windows Volume overlay
	SoundSet,10 ; set Volume to 10
return

#^Numpad2::
	Send {Volume_Up} ; show Windows Volume overlay
	SoundSet,20 ; set Volume to 20
return

#^Numpad3::
	Send {Volume_Up} ; show Windows Volume overlay
	SoundSet,30 ; set Volume to 30
return

#^Numpad4::
	Send {Volume_Up} ; show Windows Volume overlay
	SoundSet,40 ; set Volume to 30
return

#^Numpad5::
	Send {Volume_Up} ; show Windows Volume overlay
	SoundSet,50 ; set Volume to 30
return

#^Numpad6::
	Send {Volume_Up} ; show Windows Volume overlay
	SoundSet,60 ; set Volume to 30
return

#^Numpad7::
	Send {Volume_Up} ; show Windows Volume overlay
	SoundSet,70 ; set Volume to 30
return

#^Numpad8::
	Send {Volume_Up} ; show Windows Volume overlay
	SoundSet,80 ; set Volume to 30
return

#^Numpad9::
	Send {Volume_Up} ; show Windows Volume overlay
	SoundSet,90 ; set Volume to 30
return
Autohotkey Commands Explained
To better understand how the scripts work, here’s a quick overview of the most common commands used in my setup:
#SingleInstance Force
Ensures that only one instance of the script runs. If it’s already active, it restarts automatically.#NoEnv
Prevents Windows environment variables from interfering with script performance.^,!,+,#
These represent modifier keys:^= Ctrl,!= Alt,+= Shift,#= Windows key.
For example,^!Tmeans Ctrl + Alt + T.Send
Simulates key presses or mouse clicks. Example:Send {Volume_Up}increases system volume.Run
Launches a program or file. Example:Run wt.exeopens Windows Terminal.
With*RunAs, it launches the program as administrator.GetKeyState()
Checks if a key is currently pressed, useful for combinations like holding two mouse buttons.Sleep
Adds a short delay between actions, measured in milliseconds. Example:Sleep, 400waits 0.4 seconds.SoundSet
Adjusts system volume directly, either in fixed values or relative steps.WinActivate
Activates a specific window before executing commands, ensuring the correct application is targeted.
These commands form the backbone of almost any Autohotkey script. With a little practice, you can use them to build complex automations and workflows for Windows.
Advantages of Autohotkey
- Perfect for power users, developers, and gamers
- Works on any Windows PC, regardless of hardware
- No cloud account or online login required
- Scripts are portable and can be shared easily
- No background telemetry or unnecessary processes
- Extremely low CPU usage and memory footprint
Useful Tips for Getting Started
- Test your scripts: Double-click your
.ahkfile to run it and verify it works as expected. - Add to startup: Place your script in the Autostart folder (
shell:startup) so it runs automatically on boot. - Use the documentation: Autohotkey’s official docs are excellent for learning and experimentation.
- Security tip: Only use scripts from trusted sources — Autohotkey can automate keyboard input, which could be abused.
FAQ – Frequently Asked Questions About Autohotkey
1. Is Autohotkey safe to use?
Yes, Autohotkey is completely safe. It’s open source and maintained by an active community. Just make sure to only run scripts from sources you trust.
2. Does Autohotkey only work with specific mice or keyboards?
No. It works with almost any device, regardless of the manufacturer – a major advantage over Logitech Options or Razer Synapse.
3. Do I need programming skills to use it?
Not really. Many scripts are only a few lines long. Basic examples are easy to understand, and the documentation is very beginner-friendly.
4. Is Autohotkey compatible with Windows 11?
Yes, it works perfectly on both Windows 10 and Windows 11 and receives regular updates.
5. How can I make my script run automatically at startup?
Copy your .ahk file into the Windows Autostart folder (shell:startup). It will launch automatically after each reboot.
6. Can Autohotkey fully replace Logitech Options?
For most users, yes. You can remap buttons, control media, and create shortcuts across devices. Only some hardware-specific features like battery level or Flow remain exclusive to Logitech’s software.
7. What’s the difference between Send and SendInput?
Both send keystrokes, but SendInput is faster and more reliable in modern apps. For basic automations, Send is usually enough.
8. How can I stop or restart a script?
Running scripts appear in the Windows system tray. Right-click the AHK icon to Pause, Reload, or Exit.
9. Can I run multiple scripts at once?
Yes, multiple scripts can run simultaneously, though combining them into one file is usually more efficient.
10. Where can I find more ideas and examples?
The official Autohotkey website and community forums are full of examples and ready-to-use scripts – from gaming macros to workflow automations.
(*) Affiliate Links


