- What is Shopware 6?
- Why export customer and shipping addresses?
- Prerequisites in Shopware 6
- Step by step – export shipping addresses in Shopware 6
- 1. Open the import export module
- 2. Create a new profile for customers with shipping address
- 3. Define fields for the export (mapping)
- 4. Run the CSV export of shipping addresses
- Working with the CSV file
- Filtering and analysis in Excel or LibreOffice
- Use in shipping tools, CRM systems or mail merges
- GDPR and best practices for customer exports
What is Shopware 6?
If you run your shop on Shopware 6 for a while, you will automatically collect a lot of customer data: billing addresses, shipping addresses, companies, customer groups and languages. As soon as you want to work with an external shipping tool, a CRM system or mail merges, you will need this data outside your shop.
This is where the Shopware 6 import export module helps. With a custom profile you can export all customers including billing and shipping address as a clean CSV file. This is especially useful if you run several sales channels or subshops and want to filter by channel later.
In this article I walk you step by step through exporting shipping addresses in Shopware 6, explain which fields make sense in the profile and show you how to use the export in your daily work.
Shopware 6 is the current e commerce platform from Shopware and the successor to Shopware 5. Compared to the old version, the system has been completely redesigned. Some important aspects:
- Modern, API based architecture
- Headless ready – the storefront can be replaced if needed
- Strong focus on sales channels instead of rigid subshops
- Clear administration with a central settings area
For our topic the important part is: a lot of data can be managed centrally through the import export module – including customers, shipping addresses and billing addresses.
Why export customer and shipping addresses?
Exporting shipping addresses from Shopware 6 is useful in many scenarios:
- Passing data to parcel services or shipping software
- Importing customer data into a CRM system or ERP
- Creating mail merges, labels or shipping stickers
- Analysing customers by country, language or customer group
- Comparing active customers vs guest accounts
To make this work reliably, we create a dedicated profile in the import export module.
Prerequisites in Shopware 6
Before you start, a few basics should be in place:
- You have access to the Shopware 6 administration.
- The import export module is installed and visible.
- You know the structure of your sales channels and customer groups.
- Ideally you already work with a spreadsheet tool like Excel or LibreOffice to open the CSV file later.
Step by step – export shipping addresses in Shopware 6
The export is based on a profile for the object type “Customer”. In this profile you define which fields will end up in the CSV file.
The screenshots in your backend will roughly correspond to:
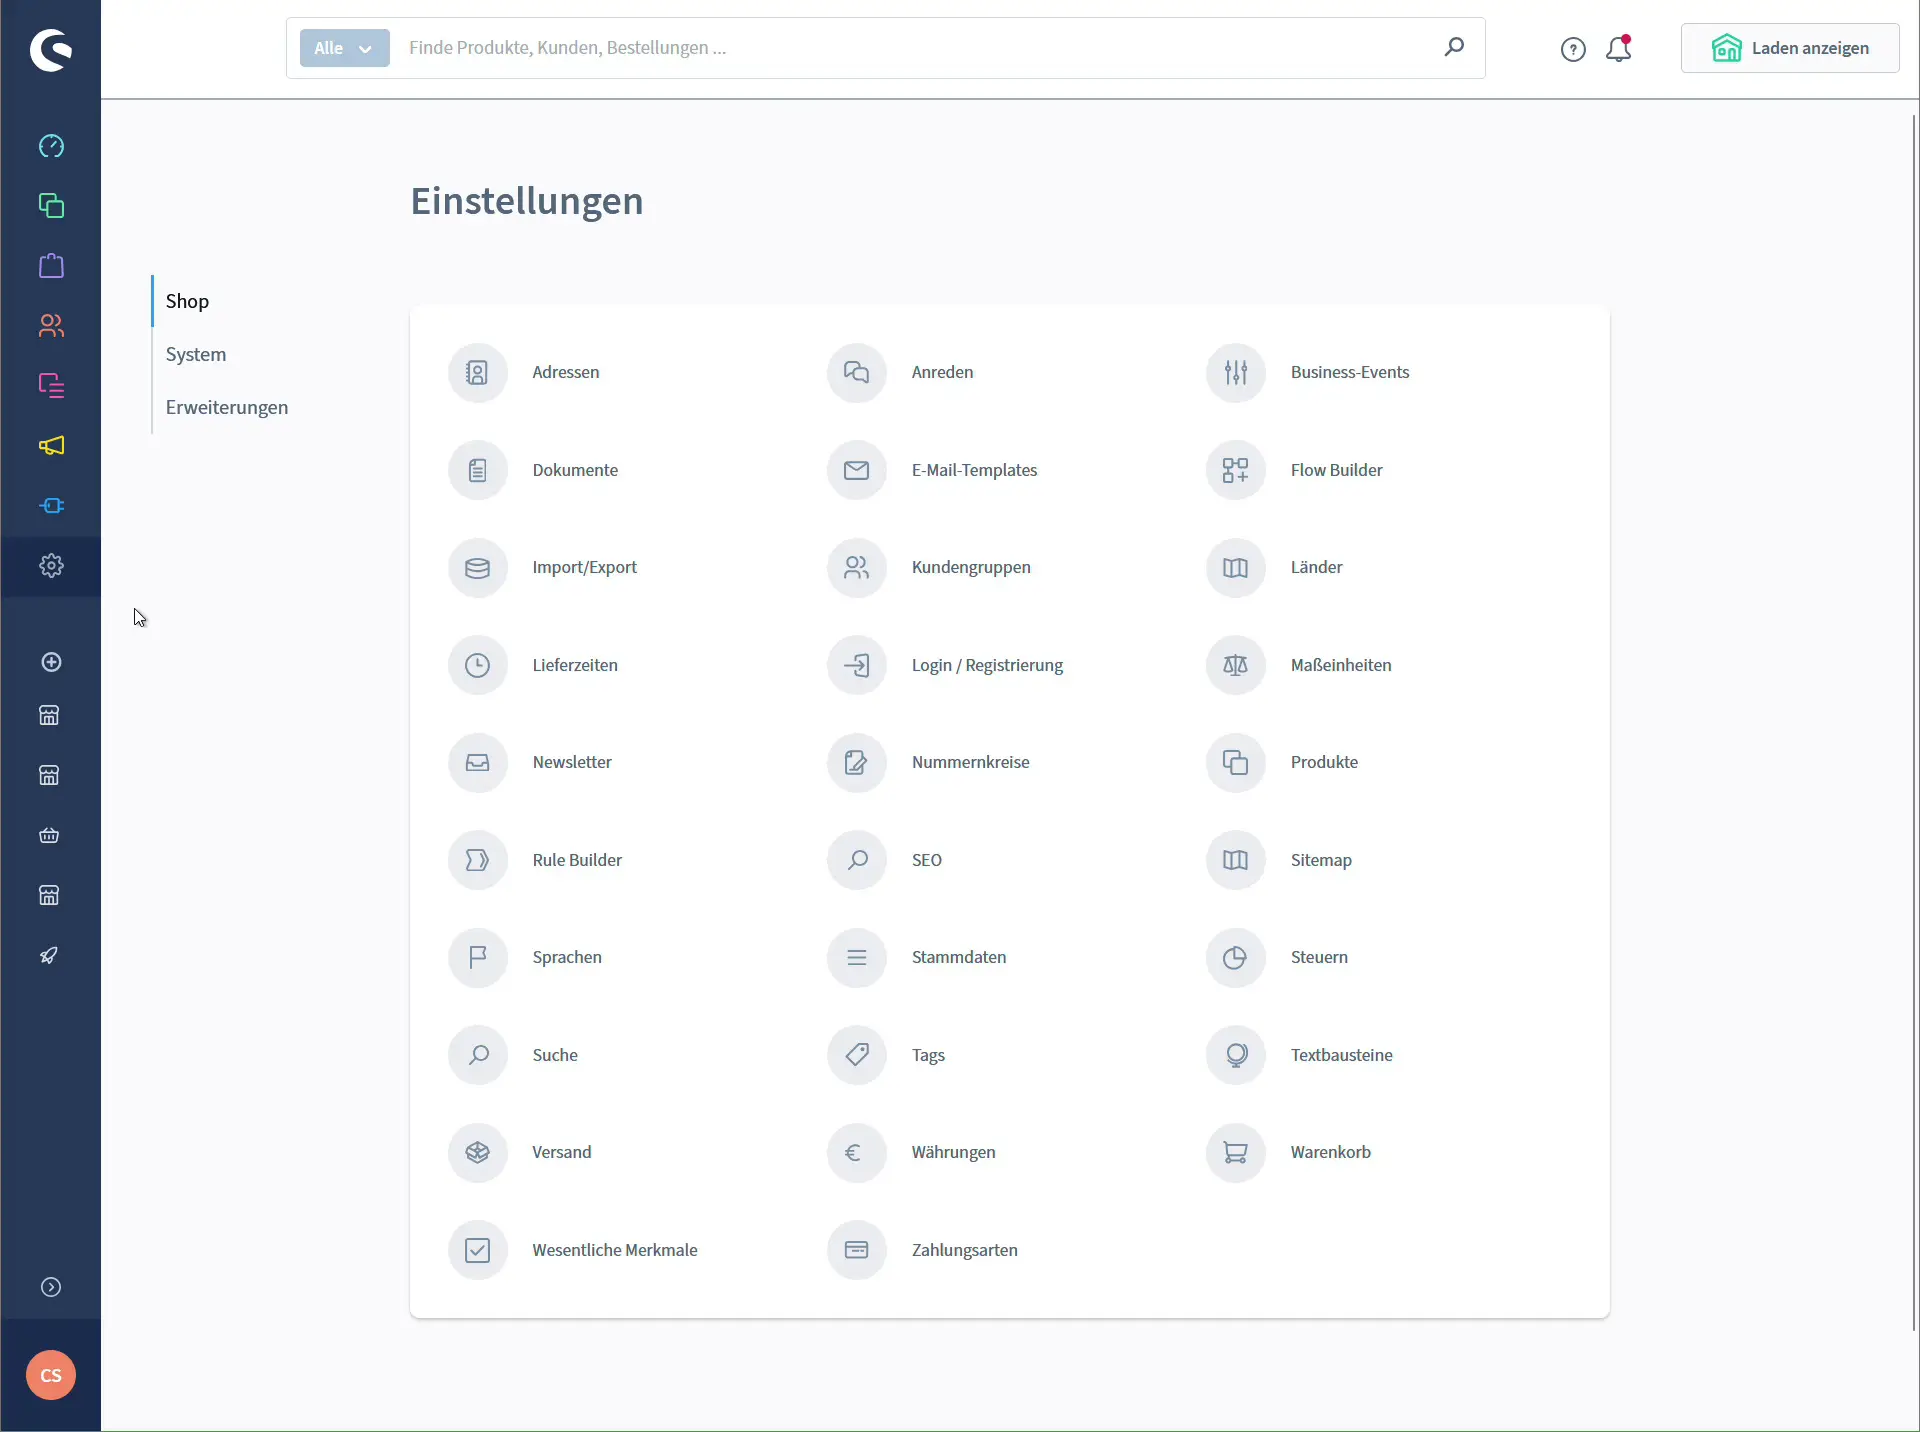

1. Open the import export module
- Log in to the backend of your shop.
- Click the gear icon in the left sidebar to open the settings.
- In the “Shop” section select Import/Export.
At the top you will now see the tabs “Import”, “Export” and “Profiles”.
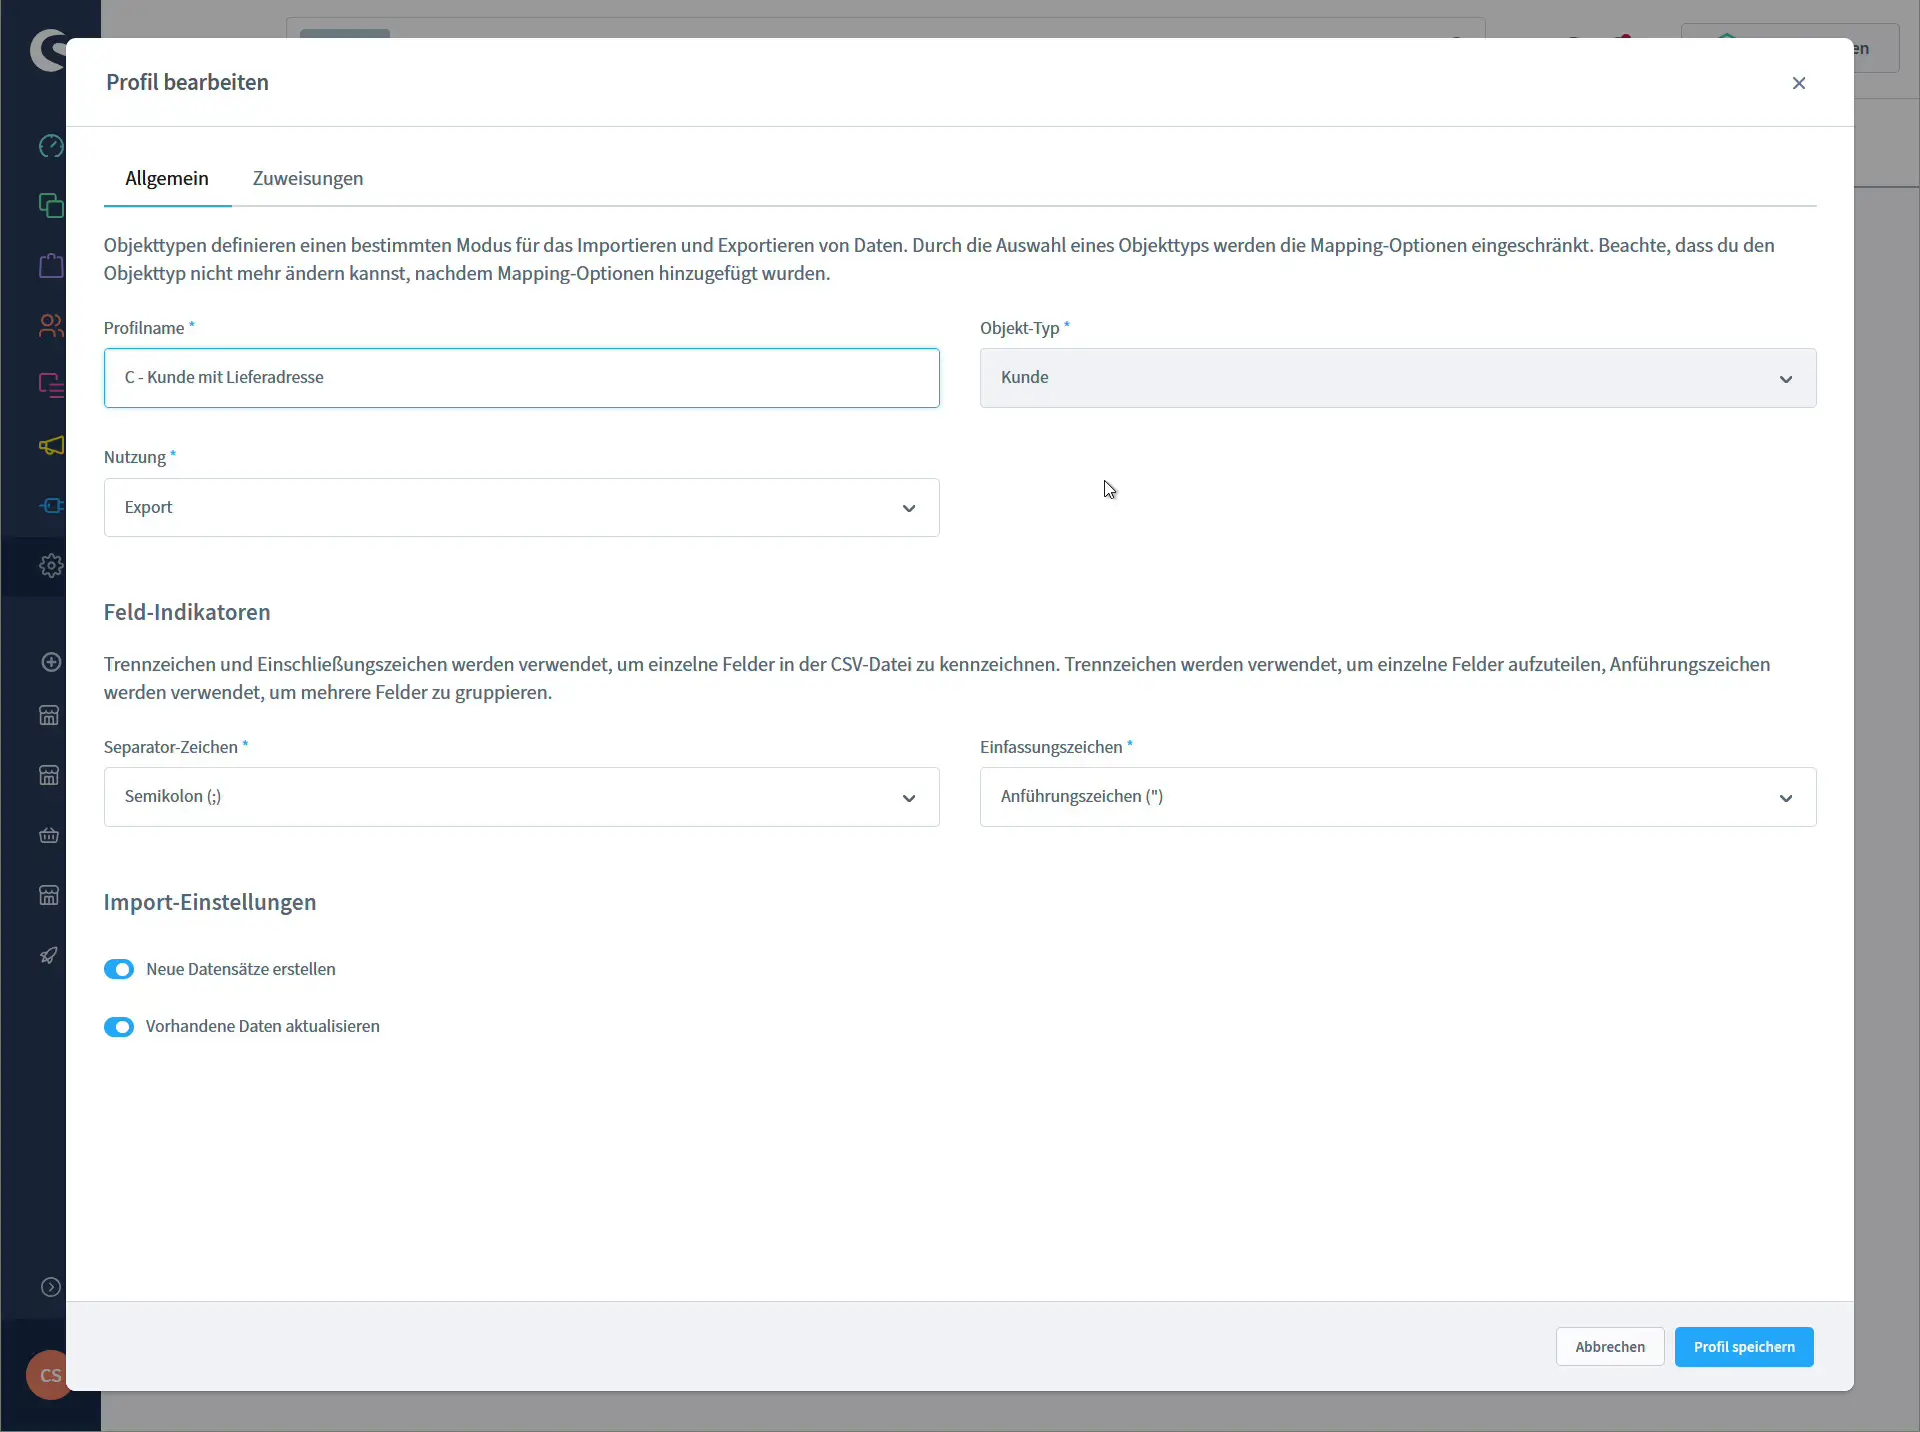
2. Create a new profile for customers with shipping address
- Switch to the Profiles tab.
- Click Add new profile.
- In the General tab enter for example:
- Object type: Customer
- Usage: Export
- Separator: Semicolon (;)
- Enclosure: ” (quotation mark)
- Save the profile.
This defines that the profile is a Shopware 6 customer export that will later be saved as a CSV file.
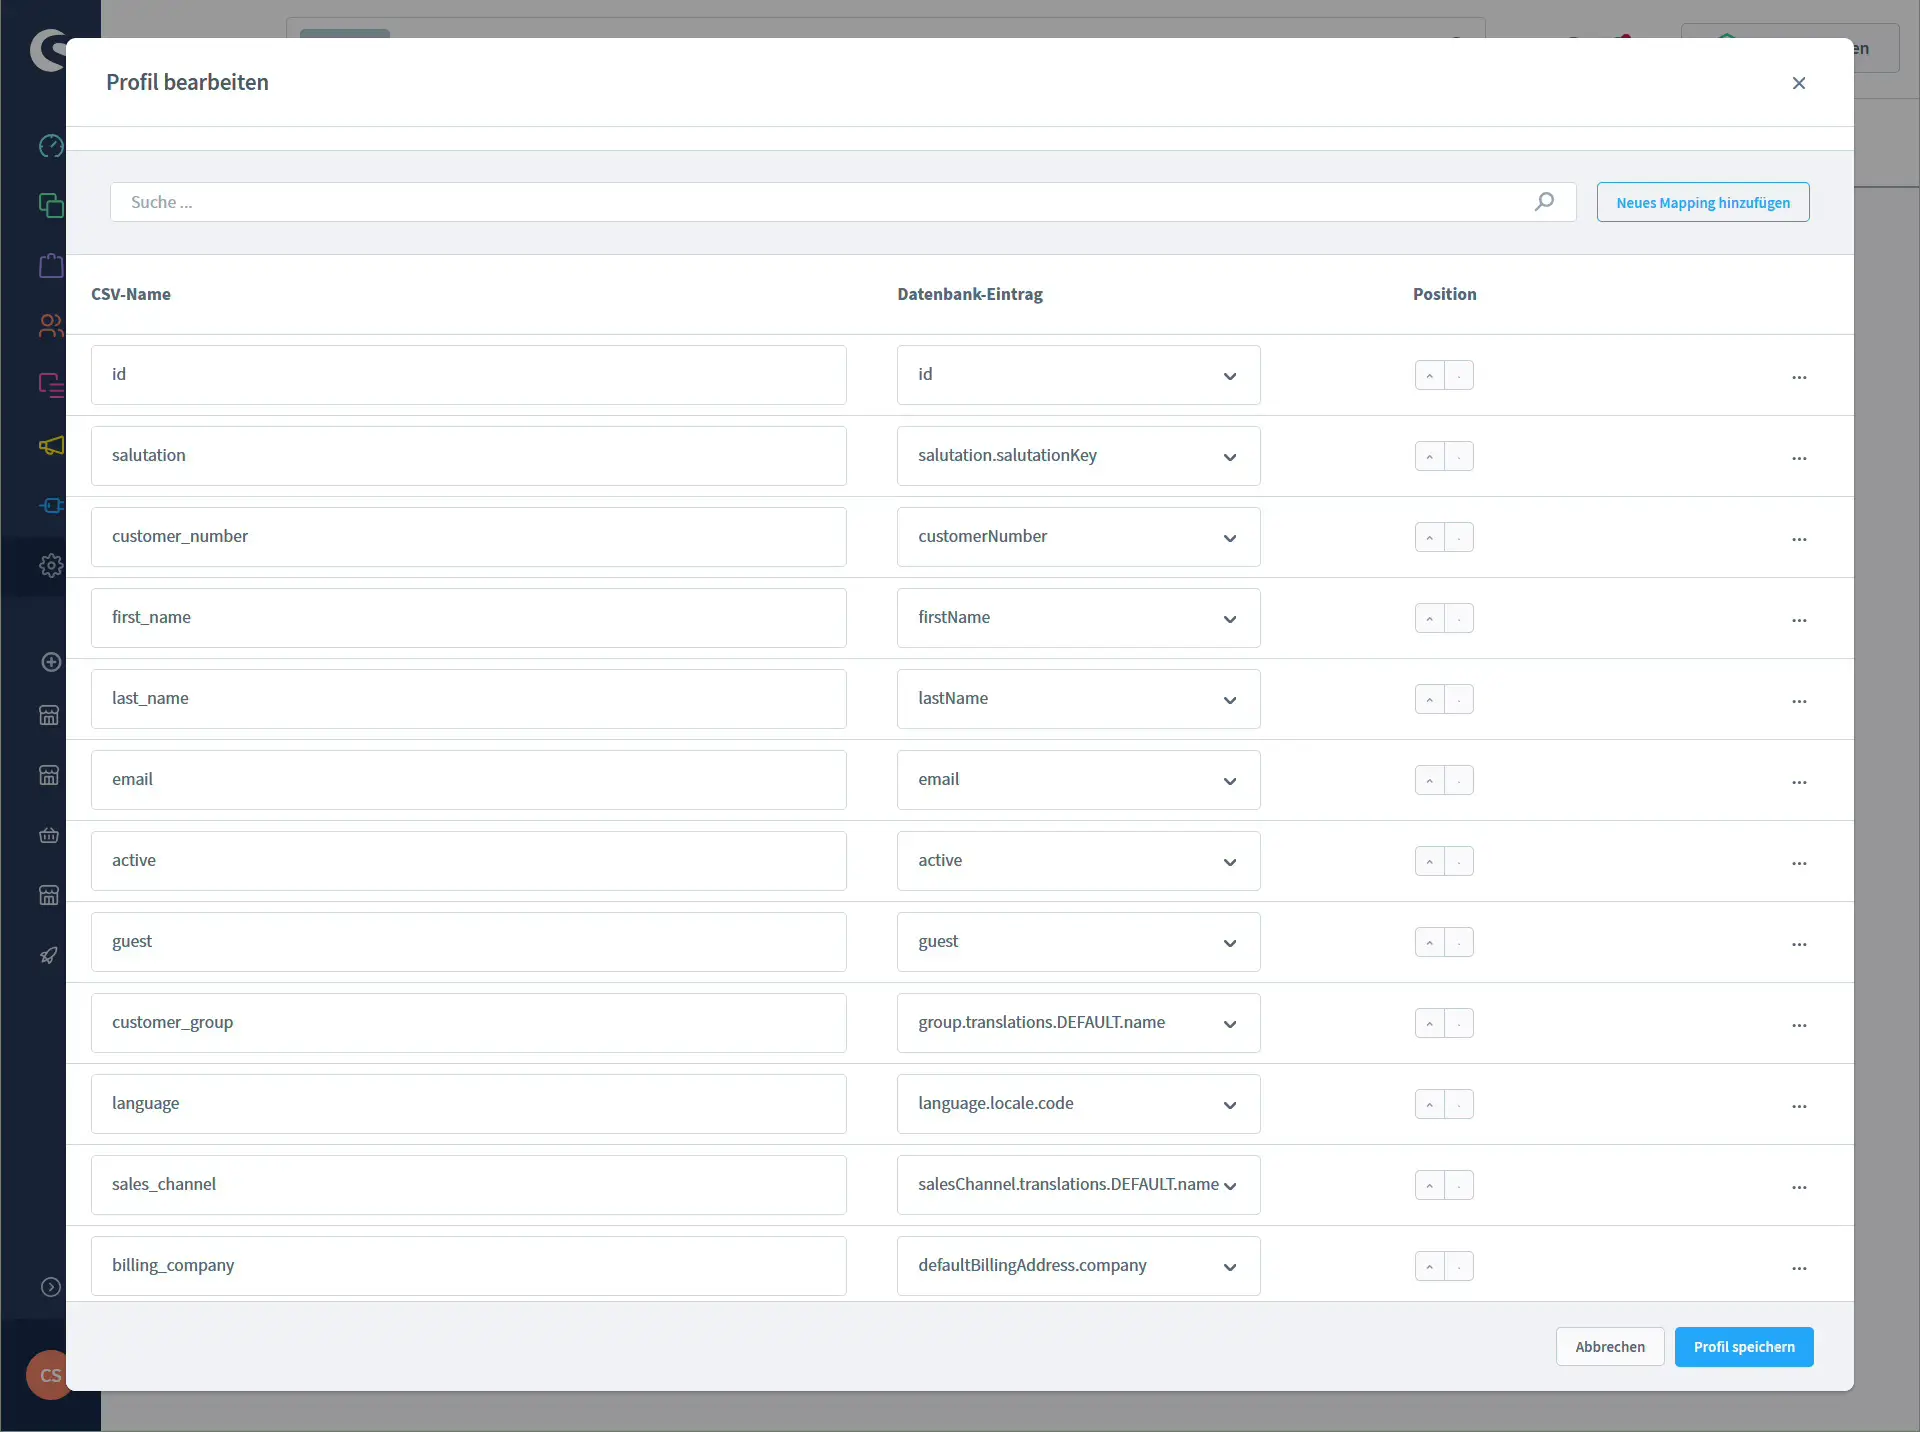
3. Define fields for the export (mapping)
In the Mapping tab you define which columns appear in the CSV and which database fields they are linked to. You can get very detailed here.
A practical mapping might look like this:
| CSV name | Database entry | Description |
|---|---|---|
id | id | Internal customer ID |
salutation | salutation.salutationKey | Salutation, for example mr, mrs |
customer_number | customerNumber | Customer number |
first_name | firstName | First name |
last_name | lastName | Last name |
email | email | Email address of the customer account |
active | active | 1 = active, 0 = deactivated |
guest | guest | 1 = guest account, 0 = regular account |
customer_group | group.translations.DEFAULT.name | Customer group as plain text |
language | language.locale.code | Language code, for example de-DE, en-GB |
sales_channel | salesChannel.translations.DEFAULT.name | Sales channel as plain text |
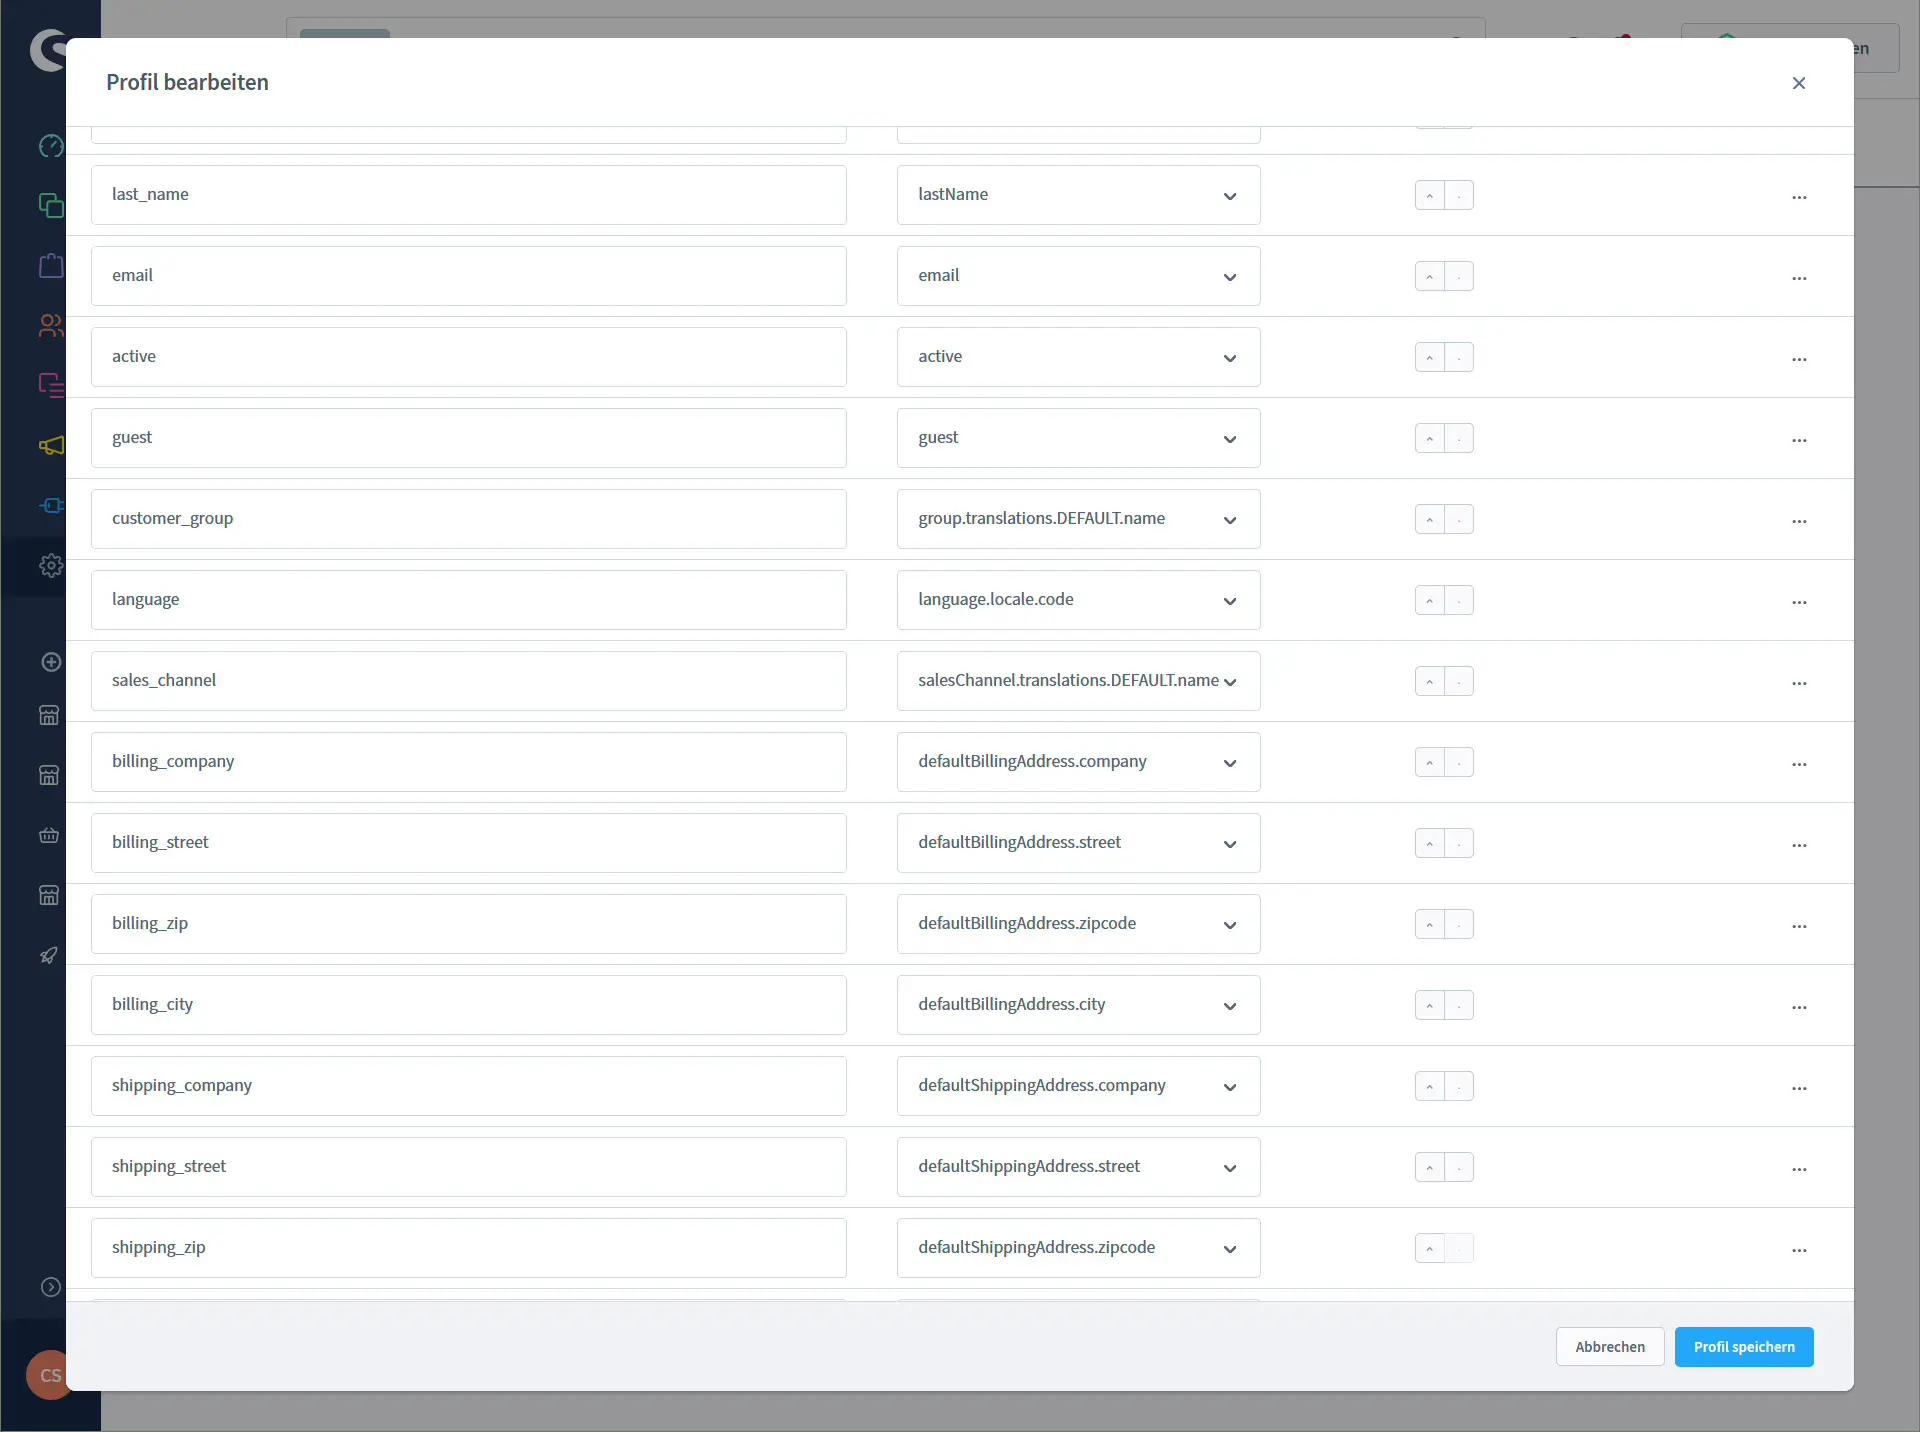
billing_company | defaultBillingAddress.company | Company in billing address |
billing_street | defaultBillingAddress.street | Street of billing address |
billing_zip | defaultBillingAddress.zipcode | Postcode of billing address |
billing_city | defaultBillingAddress.city | City of billing address |
shipping_company | defaultShippingAddress.company | Company in shipping address |
shipping_street | defaultShippingAddress.street | Street of shipping address |
shipping_zip | defaultShippingAddress.zipcode | Postcode of shipping address |
shipping_city | defaultShippingAddress.city | City of shipping address |
With this mapping you cover both billing and shipping data in a single Shopware 6 customer export. If you need additional fields you can add them at any time.
Tip: Make sure to include the sales channel in the export profile. If you run several shops or subshops you can later filter by the human readable sales channel name in Excel.
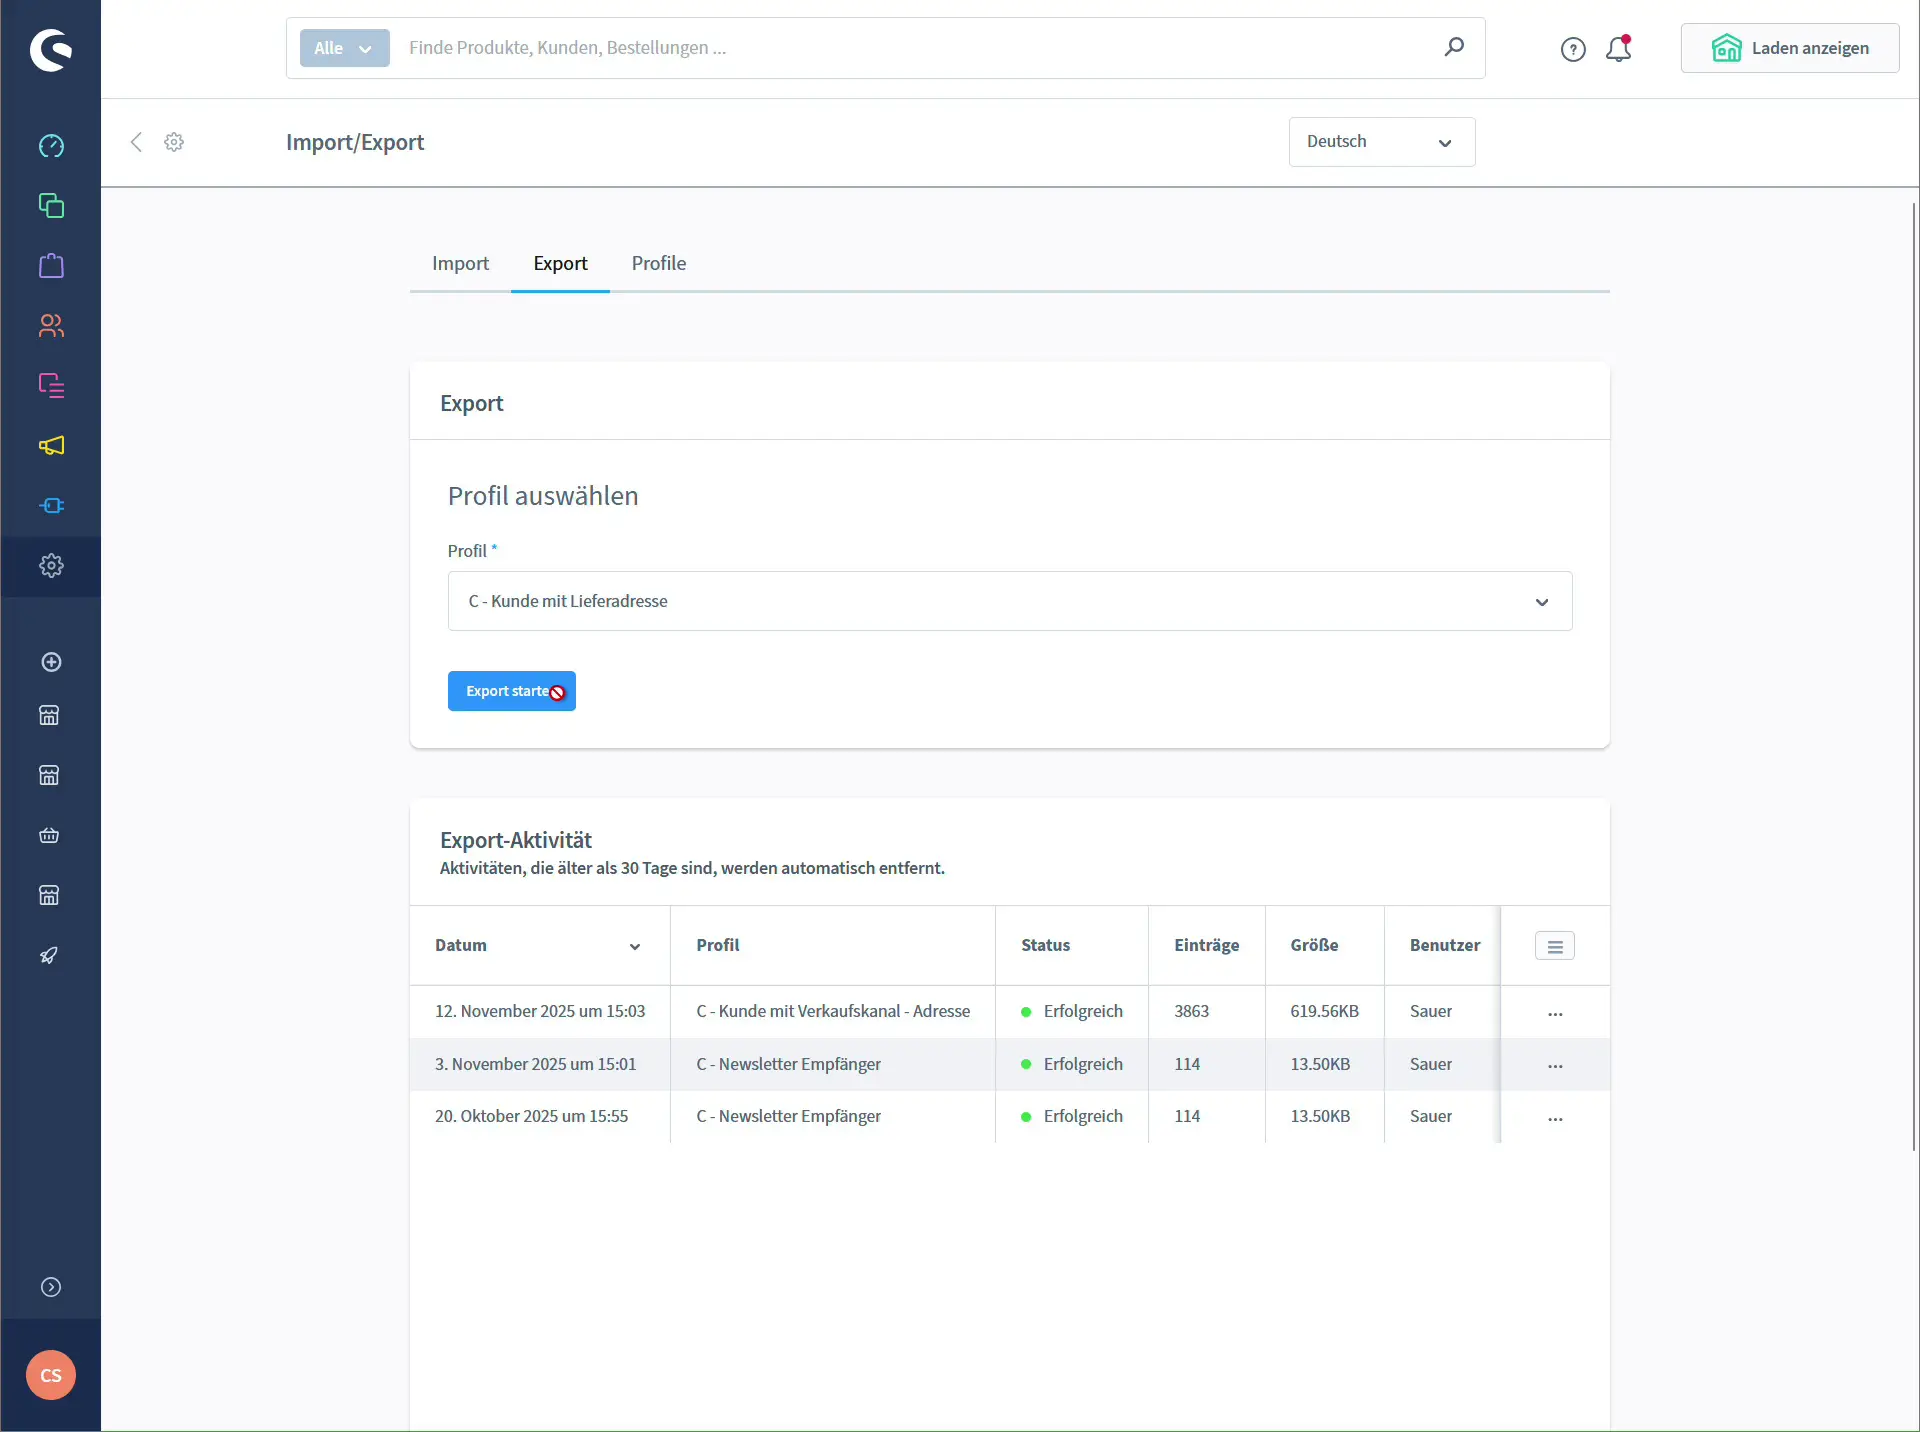
4. Run the CSV export of shipping addresses
Once the profile is ready you can start the actual export:
- In the import export module go to the Export tab.
- Under “Profile” select the profile you created earlier, for example “C – Customer with shipping address”.
- Click Start export.
Shopware now creates an export task. In the “Export activity” section a new entry with status “Successful” will appear after a short time. Use the menu on the right to download the CSV file.
You now have a complete list of all customers with billing and shipping address on your computer.
Working with the CSV file
The exported CSV file is very flexible and can be used in many ways.
Filtering and analysis in Excel or LibreOffice
- Filter by
active = 1to show only active customers. - Filter by
guest = 1to analyse pure guest checkouts. - Filter by
sales_channelif you want to evaluate different sales channels separately. - Sort by
billing_countryor by postcode to create regional evaluations.
Use in shipping tools, CRM systems or mail merges
- Import the CSV into your shipping software to create labels or parcel stickers.
- Transfer customer data into a CRM system to work with target groups, pipelines and customer history.
- Use the address fields in a word processor like Word for mail merges or personalised letters.
This way your Shopware 6 shipping address export becomes the central data source for many processes outside your shop.
GDPR and best practices for customer exports
Data protection rules apply when exporting shipping addresses as well.
Some points you should keep in mind:
- Export only the data you really need – think about data minimisation.
- Do not store CSV files unencrypted on shared drives.
- Delete old exports when you no longer need them.
- If you pass data to external service providers, make sure you have a proper data processing agreement.
- Customers who requested deletion should be removed both in your shop and in external systems.
Handled correctly, exporting customer and shipping addresses from Shopware 6 gives you a powerful and flexible basis for shipping, CRM and analysis – while still keeping control over your customer data.